

Animations can be challenging. Especially if your designer asks you to implement an animation like this one 😱
First of all, DON’T PANIC! It’s actually not so complicated! Especially if you use Jetpack Compose animations!
Jetpack Compose has a powerful set of animation APIs that enable developers to create complex and smooth animations with minimal effort. It also provides a wide range of customisable parameters that can be used to control the speed, duration, and type of animation.
TLDR:
– The source code of the final version of this animation could be found here.
– There will be two different approaches to recreate the same animation — one by using parallel threads and another by using a little bit of math.
– Both of them look good. Tell me in the comments which one you like more!!
In this series of articles I’ll explain how to:
- Split this huge animation into smaller animations
- Write each animation separately
- Combine all parallel animations into a nice, smooth and sleek transition.
- Rewrite these parallel animations to use only a single animation (that one will be a twist at the end!!)
Let’s dive in and try to write these animations using Jetpack Compose! And don’t forget to clap 👏👏 at the end if you liked this article !
Decoupling animations
10 hours of coding can save 10 minutes of planning. Or the other way around.
By taking a closer look at this animation, we might start to see some patterns. First of all — this animation has two different phases :
Phase 1 : The clock hand “shoots out” the dots.
During this phase dots are spreading in parallel and going in different directions. They do not change their path after they get shot out. The clock hand in the meantime each time gets shorter by the size of the dot until it disappears completely 😱.
Phase 2 : The clock hand collects these dots back
During the 2nd phase dots are moving one after another and on the same line as the clock hand. Hand continues rotation with them and gets longer and longer, until it reaches its original length.Then the animation repeats.
We will approach this animation step by step and implement these animations one after another.
Sizing
We might realise that the length of a clock hand is exactly 12 dots, and it makes a full circle, so :
- length of the clock hand is 12 dots
- width of the clock hand is 1 dot
- size of the screen is 24 dots both width and height
Based on these calculations we might calculate all required sizes later.
Step 1: Implement Rotation of a clock hand
Ok, let’s dive into animations.
First of all we need to create an infinite rotation animation. As we have two circles, we will have an animation from 0f to 720f.
| @Composable | |
| fun ClockAnimation(duration: Int) { | |
| val infiniteTransition = rememberInfiniteTransition() | |
| // Creates a child animation of float type as a part of the [InfiniteTransition]. | |
| val clockAnimation by infiniteTransition.animateFloat( | |
| initialValue = 0f, | |
| targetValue = 720f, | |
| animationSpec = infiniteRepeatable( | |
| animation = tween(duration, easing = LinearEasing), | |
| repeatMode = RepeatMode.Restart | |
| ) | |
| ) | |
| } |
Now we have to draw an clock hand and rotate it with this animation
| var strokeWidth by remember { mutableStateOf(0f) } | |
| Spacer(modifier = Modifier | |
| .fillMaxSize() | |
| // Set strokeWidth based on the size of the viewport | |
| .onGloballyPositioned { | |
| strokeWidth = (it.size.width / 24).toFloat() | |
| } | |
| .drawBehind { | |
| val center = Offset(size.width / 2, size.height / 2) | |
| val endOffset = Offset(size.width / 2, 0f) | |
| // Rotate the line around the pivot point, which is the | |
| // center of the screen. Rotation goes from 0 to 720 degrees | |
| rotate(clockAnimation, pivot = center) { | |
| drawLine( | |
| color = Color.White, | |
| start = center, | |
| end = endOffset, | |
| strokeWidth = strokeWidth, | |
| ) | |
| } | |
| } | |
| ) |
And that’s how our animation will look so far:
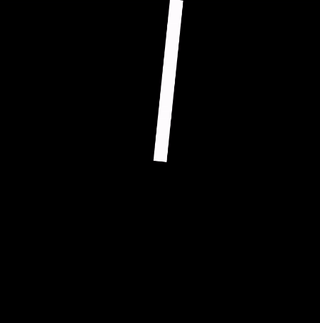
Animation after Step 1
The full code for this step could be found here
Ok, now let’s add some details!
Step 2: Shrink and extend a Clock hand step by step
We already specified that the clock hand is getting shorter during the 1st phase and extends back during the 2nd.
What we should do now is to shrink the length of the endOffset coordinate by dot length every hour, which is exactly 30 degrees of rotation. Then we should extend it to the original length.
First we need to create a currentHour field. We’ll use derivedStateOf from clockAnimation for updating this state when it changes.
OUR VIDEO RECOMMENDATION


Jobs
val currentHour by remember(clockAnimation) {
        derivedStateOf { clockAnimation.toInt() / 30 }
    }
Then we write a function which calculates the length of the clock hand
| //Function which calculates the length of the clock hand | |
| private fun calculateClockHandLength(maxHeight: Float, currentHour: Int): Float { | |
| val stepHeight = maxHeight / 12 | |
| // Height decreases first 360 deg, then increases again | |
| return stepHeight * if (currentHour < 12) { | |
| 12 - 1 - currentHour | |
| } else { | |
| currentHour - 12 | |
| } | |
| } |
And then use it as the endOffset inside of the Spacer’s drawBehind
| Spacer(... | |
| .drawBehind { | |
| ... | |
| val endOffset = Offset( | |
| size.width / 2, | |
| size.height / 2 - calculateClockHandLength( size.height / 2, currentHour) | |
| ) | |
| ... | |
| rotate(animationAngle, pivot = center) { | |
| drawLine( | |
| color = Color.White, | |
| start = center, | |
| end = endOffset, | |
| strokeWidth = strokeWidth, | |
| ) | |
| } | |
| ... |
And that’s how our animation will look like after step 2
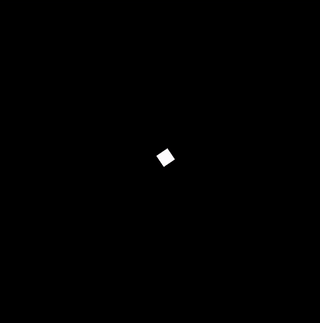
Animation after Step 2
The full code for this step could be found here
Looks great 👍 ! But we don’t see any dots though … Let’s add them!
Step 3: Adding Dots
We have 12 dots on the screen, placed on a circle of 360 degrees. This makes it 30 degrees per each dot.
First we have to create an array of 12 dots, from 0 to 11.
val hours: List<Int> = remember { List(12) { it } }
During the first 12 hours each hour (every 30 degrees) we place a new dot on the screen. During the last 12 hours we take each dot back.
Dots will appear on the screen only before the currentHour if it’s less than 12h, and right after the currentHour if it’s bigger than 12h.
Sounds complicated but can be described with this simple piece of code.
| val dotsVisibility = remember(currentHour) { | |
| hours.map { index -> | |
| when { | |
| index > currentHour -> false | |
| index > currentHour - 12 -> true | |
| else -> false | |
| } | |
| } | |
| } |
By using the remember function, we can recalculate this array only when currentHour changes.
Then we have to place these dots every 30 degrees on the screen. For that we’ll be rotating each dot by 30*hour degrees. If the dot is not visible — it’ll just not be drawn.
| Spacer(... | |
| .drawBehind { | |
| ... | |
| hours.forEach { | |
| if (!dotsVisibility[it]) return@forEach | |
| val degree = it * 30f | |
| rotate(degree) { | |
| val start = Offset(size.width / 2, 0f) | |
| val end = Offset(size.width / 2, strokeWidth) | |
| drawLine( | |
| color = Color.White, | |
| start = start, | |
| end = end, | |
| strokeWidth = strokeWidth, | |
| ) | |
| } | |
| } | |
| ... | |
| } | |
| ) |
And that’s how our animation will look like after Step 3. Cool 😎, heh?🔥
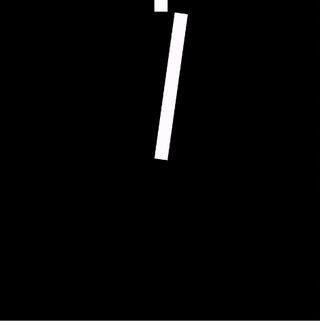
Animation after Step 3
The full code for this step could be found here
And that’s it for Part 1 🔥🔥🔥
Yes, I know that we still miss some important parts of this animation — but trust me, we’ll continue with it in Part2 of our “Amazing Clock animation with Jetpack compose” tutorial.
Summary
In this part we managed to:
- Create an endless rotation animation by using
infiniteTransitionandanimateFloatapis - Learn how to draw a clock hand and rotate it with this endless animation
- Use
derivedStateOffor efficiently calculating dots positions. drawing and updating them when necessary
Stay tuned for Part2!
You can check the full source code for this animation in my Github repository.
If you liked this article I would really appreciate it if you clap 👏👏👏 for it. It gives me more motivation to write more articles like that and makes me a little bit happier 🙂
This article was previously published on proandroiddev.com


