

Originally published at Stream blog by Jaewoong.
We’ve broken down our WebRTC in Jetpack Compose into a multi-part series, each covering essential concepts of WebRTC and how to use WebRTC in your Android project with Jetpack Compose.
In the last post, we covered essential concepts of WebRTC and how to establish a peer-to-peer connection between clients and build your Android video application with WebRTC.
In this part, you’ll learn how to render real-time video communication with WebRTC in the Jetpack Compose project.
Let’s get started!
WebRTC in Jetpack Compose
Since Google announced Jetpack Compose 1.0 stable, the Jetpack Compose ecosystem keeps growing up, and many companies have started to adapt it in their production-level projects.
However, WebRTC doesn’t support Jetpack Compose directly on the UI side, such as video stream renderers, so we must figure out how to render WebRTC video tracks in Jetpack Compose projects.
Firstly, let’s dive into how to render video streams on Android using traditional Android UI components.
VideoTextureViewRenderer
You should use a particular UI component to render stream content, such as a video or an OpenGL scene from a video, camera preview, real-time network, or something.
Typically, you can use SurfaceViewRenderer to display real-time video streams on a layout which is plane structures or simple.
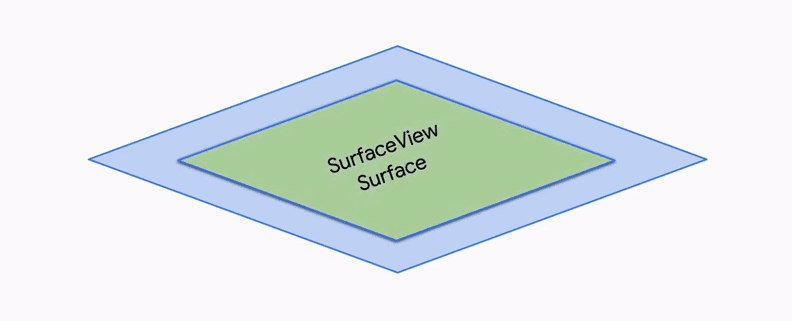
However, if you want to implement complicated layouts, such as one video track overlays another, you should figure out different ways. Let’s suppose you should implement a complex video call screen, such as one video call layout should overlay another video call layout like the image below:

In that case, the SurfaceViewRenderer doesn’t work as expected. There are two reasons that the SurfaceViewRenderer is not working correctly:
SurfaceViewRendereris embedded inside a view hierarchy: SurfaceView lives on its plane, which means it essentially punches a hole in its window to display the content directly on the screen. Also, the surface is Z-ordered, so when you overlay multipleSurfaceViews, they can destroy each other, and Z-ordering may not work as expected.- Lifecycle problem of
SurfaceViewRenderer:SurfaceViewRendererextends SurfaceView, and this means that when aSurfaceViewis made invisible, the underlying surface is destroyed. Depending on your use cases, you will face aSurfaceViewgoing blank or black as its surface has been destroyed.
So we need to figure out an alternative way — TextureView. Unlike SurfaceView, TextureView doesn’t create a separate window but instead behaves as a regular view. It also allows translucency, arbitrary rotations, and complex clipping.
There is one more reason to use TextureView is because the SurfaceView rendering wasn’t properly synchronized with view animations until API 24. So if you need to implement complex animation, such as dragging a video layout or scrolling, you must use the TextureView.
Note: If you want to learn more about the difference between
SurfaceViewandTextureView, check out Android HDR | Migrating from TextureView to SurfaceView (Part #1) — How to Migrate.
The WebRTC in Jetpack Compose project implemented a custom view called VideoTextureViewRenderer, which extends TextureView, VideoSink, and SurfaceTextureListener like the code below:
| // Copyright 2023 Stream.IO, Inc. All Rights Reserved. | |
| // SPDX-License-Identifier: Apache-2.0 | |
| /** | |
| * Custom [TextureView] used to render local/incoming videos on the screen. | |
| */ | |
| open class VideoTextureViewRenderer @JvmOverloads constructor( | |
| context: Context, | |
| attrs: AttributeSet? = null | |
| ) : TextureView(context, attrs), VideoSink, SurfaceTextureListener { | |
| private val resourceName: String = getResourceName() | |
| private val eglRenderer: EglRenderer = EglRenderer(resourceName) | |
| private var rendererEvents: RendererEvents? = null | |
| private val uiThreadHandler = Handler(Looper.getMainLooper()) | |
| private var isFirstFrameRendered = false | |
| private var rotatedFrameWidth = 0 | |
| private var rotatedFrameHeight = 0 | |
| private var frameRotation = 0 | |
| init { | |
| surfaceTextureListener = this | |
| } | |
| /** | |
| * Called when a new frame is received. Sends the frame to be rendered. | |
| * | |
| * @param videoFrame The [VideoFrame] received from WebRTC connection to draw on the screen. | |
| */ | |
| override fun onFrame(videoFrame: VideoFrame) { | |
| eglRenderer.onFrame(videoFrame) | |
| updateFrameData(videoFrame) | |
| } | |
| /** | |
| * Updates the frame data and notifies [rendererEvents] about the changes. | |
| */ | |
| private fun updateFrameData(videoFrame: VideoFrame) { | |
| if (isFirstFrameRendered) { | |
| rendererEvents?.onFirstFrameRendered() | |
| isFirstFrameRendered = true | |
| } | |
| if (videoFrame.rotatedWidth != rotatedFrameWidth || | |
| videoFrame.rotatedHeight != rotatedFrameHeight || | |
| videoFrame.rotation != frameRotation | |
| ) { | |
| rotatedFrameWidth = videoFrame.rotatedWidth | |
| rotatedFrameHeight = videoFrame.rotatedHeight | |
| frameRotation = videoFrame.rotation | |
| uiThreadHandler.post { | |
| rendererEvents?.onFrameResolutionChanged( | |
| rotatedFrameWidth, | |
| rotatedFrameHeight, | |
| frameRotation | |
| ) | |
| } | |
| } | |
| } | |
| /** | |
| * After the view is laid out we need to set the correct layout aspect ratio to the renderer so that the image | |
| * is scaled correctly. | |
| */ | |
| override fun onLayout(changed: Boolean, left: Int, top: Int, right: Int, bottom: Int) { | |
| eglRenderer.setLayoutAspectRatio((right - left) / (bottom.toFloat() - top)) | |
| } | |
| /** | |
| * Initialise the renderer. Should be called from the main thread. | |
| * | |
| * @param sharedContext [EglBase.Context] | |
| * @param rendererEvents Sets the render event listener. | |
| */ | |
| fun init( | |
| sharedContext: EglBase.Context, | |
| rendererEvents: RendererEvents | |
| ) { | |
| ThreadUtils.checkIsOnMainThread() | |
| this.rendererEvents = rendererEvents | |
| eglRenderer.init(sharedContext, EglBase.CONFIG_PLAIN, GlRectDrawer()) | |
| } | |
| /** | |
| * [SurfaceTextureListener] callback that lets us know when a surface texture is ready and we can draw on it. | |
| */ | |
| override fun onSurfaceTextureAvailable(surfaceTexture: SurfaceTexture, width: Int, height: Int) { | |
| eglRenderer.createEglSurface(surfaceTexture) | |
| } | |
| /** | |
| * [SurfaceTextureListener] callback that lets us know when a surface texture is destroyed we need to stop drawing | |
| * on it. | |
| */ | |
| override fun onSurfaceTextureDestroyed(surfaceTexture: SurfaceTexture): Boolean { | |
| val completionLatch = CountDownLatch(1) | |
| eglRenderer.releaseEglSurface { completionLatch.countDown() } | |
| ThreadUtils.awaitUninterruptibly(completionLatch) | |
| return true | |
| } | |
| override fun onSurfaceTextureSizeChanged( | |
| surfaceTexture: SurfaceTexture, | |
| width: Int, | |
| height: Int | |
| ) { | |
| } | |
| override fun onSurfaceTextureUpdated(surfaceTexture: SurfaceTexture) {} | |
| override fun onDetachedFromWindow() { | |
| eglRenderer.release() | |
| super.onDetachedFromWindow() | |
| } | |
| private fun getResourceName(): String { | |
| return try { | |
| resources.getResourceEntryName(id) + ": " | |
| } catch (e: Resources.NotFoundException) { | |
| "" | |
| } | |
| } | |
| } |
Note: If you use the webrtc-android open-source library’s WebRTC for UI Components package, you can use the VideoTextureViewRenderer UI component quickly without additional implementation.
Now, let’s dive into how to render video streams in Jetpack Compose.
VideoRenderer
As we discussed before, WebRTC doesn’t support Jetpack Compose directly on the UI side, and Jetpack Compose doesn’t have particular UI components that allow interop between multiple renderers: the UI toolkit and a video player or an OpenGL/Vulkan rendering engine. So we still need to utilize SurfaceView in Jetpack Compose to render video streams.
Hopefully, Jetpack Compose supports interoperability APIs that allow you to use traditional Android View and include an Android View hierarchy in a Compose UI.
With AndroidView composable, you can add the traditional Android View inside a Compose UI. You can create a new composable function called VideoRenderer that renders video streams using the AndroidView composable and VideoTextureViewRenderer as you’ve seen in the code below:
| // Copyright 2023 Stream.IO, Inc. All Rights Reserved. | |
| // SPDX-License-Identifier: Apache-2.0 | |
| @Composable | |
| fun VideoRenderer( | |
| videoTrack: VideoTrack, | |
| modifier: Modifier = Modifier | |
| ) { | |
| val trackState: MutableState<VideoTrack?> = remember { mutableStateOf(null) } | |
| var view: VideoTextureViewRenderer? by remember { mutableStateOf(null) } | |
| DisposableEffect(videoTrack) { | |
| onDispose { | |
| cleanTrack(view, trackState) | |
| } | |
| } | |
| val sessionManager = LocalWebRtcSessionManager.current | |
| AndroidView( | |
| factory = { context -> | |
| VideoTextureViewRenderer(context).apply { | |
| init( | |
| sessionManager.peerConnectionFactory.eglBaseContext, | |
| object : RendererCommon.RendererEvents { | |
| override fun onFirstFrameRendered() = Unit | |
| override fun onFrameResolutionChanged(p0: Int, p1: Int, p2: Int) = Unit | |
| } | |
| ) | |
| setupVideo(trackState, videoTrack, this) | |
| view = this | |
| } | |
| }, | |
| update = { v -> setupVideo(trackState, videoTrack, v) }, | |
| modifier = modifier | |
| ) | |
| } | |
| private fun cleanTrack( | |
| view: VideoTextureViewRenderer?, | |
| trackState: MutableState<VideoTrack?> | |
| ) { | |
| view?.let { trackState.value?.removeSink(it) } | |
| trackState.value = null | |
| } | |
| private fun setupVideo( | |
| trackState: MutableState<VideoTrack?>, | |
| track: VideoTrack, | |
| renderer: VideoTextureViewRenderer | |
| ) { | |
| if (trackState.value == track) { | |
| return | |
| } | |
| cleanTrack(renderer, trackState) | |
| trackState.value = track | |
| track.addSink(renderer) | |
| } |
Let’s break the functions above one by one:
- VideoRenderer: The
VideoRenderercomposable receives a VideoTrack and create theVideoTextureViewRendererwith theAndroidViewcomposable. This function cleans upVideoTextureViewRenderer, which extends VideoSink when it leaves the composition using DisposableEffect. - cleanTrack: This function cleans up the given video track with a given
VideoTextureViewRenderer; this means the given VideoSink(VideoTextureViewRenderer) is no longer used by and totally removed from the VideoTrack. - setupVideo: Add the given
VideoTextureViewRendererto the VideoTrack and ready for rendering video streams.
Now, you can render video streams with the VideoRenderer composable. Let’s create a video call screen with the VideoRenderer composable to communicate peer-to-peer connection.
If you want to recap the essential concepts of WebRTC, check out What is WebRTC in the part 1 article.
VideoCallScreen
The video call screen consists of the main three parts like the image below:
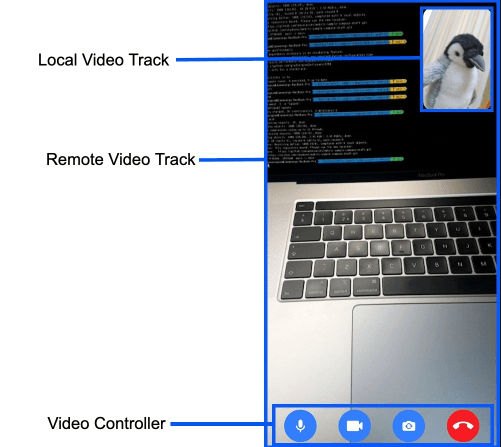
So the video call screen is responsible for the following four parts: initializing WebRtcSessionManager, rendering a remote video track, rendering a local video track, and controlling video call behaviors with a video controller.
Let’s break each part one by one!
Initializing WebRtcSessionManager
Firstly, you should initialize the WebRtcSessionManager with LaunchedEffect like the code below:
| // Copyright 2023 Stream.IO, Inc. All Rights Reserved. | |
| // SPDX-License-Identifier: Apache-2.0 | |
| @Composable | |
| fun VideoCallScreen() { | |
| val sessionManager = LocalWebRtcSessionManager.current | |
| LaunchedEffect(key1 = Unit) { | |
| sessionManager.onSessionScreenReady() | |
| } | |
| } |
So the WebRtcSessionManager is ready to render the local/remote video tracks from the peer-to-peer connection and send an answer or offer depending on the case.
Rendering A Remote Video Track
Next, you can easily render the remote video track with the VideoRenderer composable easily like the code below:
| // Copyright 2023 Stream.IO, Inc. All Rights Reserved. | |
| // SPDX-License-Identifier: Apache-2.0 | |
| val remoteVideoTrackState by sessionManager.remoteVideoSinkFlow.collectAsState(null) | |
| val remoteVideoTrack = remoteVideoTrackState | |
| if (remoteVideoTrack != null) { | |
| VideoRenderer( | |
| videoTrack = remoteVideoTrack, | |
| modifier = Modifier.fillMaxSize() | |
| ) | |
| } |
As you can see in the code above, you can observe a remote video track from the WebRtcSessionManager, and render the video track using the VideoRenderer composable.
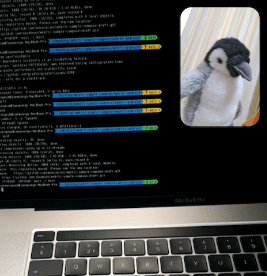
When you build the project on multiple devices, you’ll see each device’s remote call screens in real-time. Now, let’s add a local video track over the remote video track in Jetpack Compose.
Rendering A Local Video Track
Typically, people should be available to simultaneously see video screens about a caller and callee in 1:1 video calls. You can easily implement it by adding a new VideoRenderer composable, which renders a local video track. In this article, you’ll implement a floating video renderer, which is movable over the remote video track like the image below:
The basic concept of the floating video renderer is that the local video track is movable on the top of the remote video track by user actions. It also must not be placed outside the remote video track and cut out by the screen. So we can implement FloatingVideoRenderer using pointerInput and detetDragGestures Compose functions like the code below:
| // Copyright 2023 Stream.IO, Inc. All Rights Reserved. | |
| // SPDX-License-Identifier: Apache-2.0 | |
| @Composable | |
| fun FloatingVideoRenderer( | |
| videoTrack: VideoTrack, | |
| parentBounds: IntSize, | |
| paddingValues: PaddingValues, | |
| modifier: Modifier = Modifier | |
| ) { | |
| var videoSize by remember { mutableStateOf(IntSize(0, 0)) } | |
| var offsetX by remember { mutableStateOf(0f) } | |
| var offsetY by remember { mutableStateOf(0f) } | |
| val offset by animateOffsetAsState(targetValue = Offset(offsetX, offsetY)) | |
| val density = LocalDensity.current | |
| LaunchedEffect(parentBounds.width) { | |
| offsetX = 0f | |
| offsetY = 0f | |
| } | |
| val paddingOffset = density.run { 16.dp.toPx() } | |
| Card( | |
| elevation = 8.dp, | |
| modifier = Modifier | |
| .offset { IntOffset(offset.x.toInt(), offset.y.toInt()) } | |
| .pointerInput(parentBounds) { | |
| detectDragGestures { change, dragAmount -> | |
| change.consume() | |
| val newOffsetX = (offsetX + dragAmount.x) | |
| .coerceAtLeast( | |
| -calculateHorizontalOffsetBounds( | |
| parentBounds = parentBounds, | |
| paddingValues = paddingValues, | |
| floatingVideoSize = videoSize, | |
| density = density, | |
| offset = paddingOffset * 2 | |
| ) | |
| ) | |
| .coerceAtMost( | |
| 0f | |
| ) | |
| val newOffsetY = (offsetY + dragAmount.y) | |
| .coerceAtLeast(0f) | |
| .coerceAtMost( | |
| calculateVerticalOffsetBounds( | |
| parentBounds = parentBounds, | |
| paddingValues = paddingValues, | |
| floatingVideoSize = videoSize, | |
| density = density, | |
| offset = paddingOffset * 2 | |
| ) | |
| ) | |
| offsetX = newOffsetX | |
| offsetY = newOffsetY | |
| } | |
| } | |
| .then(modifier) | |
| .padding(16.dp) | |
| .onGloballyPositioned { videoSize = it.size }, | |
| shape = RoundedCornerShape(16.dp) | |
| ) { | |
| VideoRenderer( | |
| modifier = Modifier | |
| .fillMaxSize() | |
| .clip(RoundedCornerShape(16.dp)), | |
| videoTrack = videoTrack | |
| ) | |
| } | |
| } | |
| private fun calculateHorizontalOffsetBounds( | |
| parentBounds: IntSize, | |
| paddingValues: PaddingValues, | |
| floatingVideoSize: IntSize, | |
| density: Density, | |
| offset: Float | |
| ): Float { | |
| val rightPadding = | |
| density.run { paddingValues.calculateRightPadding(LayoutDirection.Ltr).toPx() } | |
| return parentBounds.width - rightPadding - floatingVideoSize.width - offset | |
| } | |
| private fun calculateVerticalOffsetBounds( | |
| parentBounds: IntSize, | |
| paddingValues: PaddingValues, | |
| floatingVideoSize: IntSize, | |
| density: Density, | |
| offset: Float | |
| ): Float { | |
| val bottomPadding = | |
| density.run { paddingValues.calculateBottomPadding().toPx() } | |
| return parentBounds.height - bottomPadding - floatingVideoSize.height - offset | |
| } |
OUR VIDEO RECOMMENDATION


Jobs
Next, you can update the VideoCallScreen with the FloatingVideoRenderer composable like the code below:
| // Copyright 2023 Stream.IO, Inc. All Rights Reserved. | |
| // SPDX-License-Identifier: Apache-2.0 | |
| @Composable | |
| fun VideoCallScreen() { | |
| val sessionManager = LocalWebRtcSessionManager.current | |
| LaunchedEffect(key1 = Unit) { | |
| sessionManager.onSessionScreenReady() | |
| } | |
| Box( | |
| modifier = Modifier.fillMaxSize() | |
| ) { | |
| var parentSize: IntSize by remember { mutableStateOf(IntSize(0, 0)) } | |
| val remoteVideoTrackState by sessionManager.remoteVideoTrackFlow.collectAsState(null) | |
| val remoteVideoTrack = remoteVideoTrackState | |
| val localVideoTrackState by sessionManager.localVideoTrackFlow.collectAsState(null) | |
| val localVideoTrack = localVideoTrackState | |
| if (remoteVideoTrack != null) { | |
| VideoRenderer( | |
| videoTrack = remoteVideoTrack, | |
| modifier = Modifier | |
| .fillMaxSize() | |
| .onSizeChanged { parentSize = it } | |
| ) | |
| } | |
| if (localVideoTrack != null) { | |
| FloatingVideoRenderer( | |
| modifier = Modifier | |
| .size(width = 150.dp, height = 210.dp) | |
| .clip(RoundedCornerShape(16.dp)) | |
| .align(Alignment.TopEnd), | |
| videoTrack = localVideoTrack, | |
| parentBounds = parentSize, | |
| paddingValues = PaddingValues(0.dp) | |
| ) | |
| } | |
| } | |
| } |
You’ve implemented all the real-time rendering screens for video calls. Now, let’s implement a video controller, which controls audio and camera settings in a video call.
Video Controller
A video controller is a typical feature that allows people to control the video call settings, such as turning on/off audio and camera, flipping the camera, or something else. In WebRTC-in-Jetpack-Compose, the video controller includes the following four features: flipping a camera, toggling a camera, toggling a microphone, and leaving a call.
Flipping a Camera
You can flip a local camera easily in the WebRtcSessionManagerImpl class using Camera2Capturer’s switchCamera function like the code below:
| // Copyright 2023 Stream.IO, Inc. All Rights Reserved. | |
| // SPDX-License-Identifier: Apache-2.0 | |
| override fun flipCamera() { | |
| (videoCapturer as? Camera2Capturer)?.switchCamera(null) | |
| } |
The switchCamera function switches an internal camera’s orientation depending on the current camera status: From front-facing to rear-facing or opposite direction.
Toggling a Camera
You can enable or disable the camera easily with VideoCapturer like the code below:
| // Copyright 2023 Stream.IO, Inc. All Rights Reserved. | |
| // SPDX-License-Identifier: Apache-2.0 | |
| override fun enableCamera(enabled: Boolean) { | |
| if (enabled) { | |
| videoCapturer.startCapture(resolution.width, resolution.height, 30) | |
| } else { | |
| videoCapturer.stopCapture() | |
| } | |
| } |
In the WebRtcSessionManagerImpl class, you’ve already calculated the resolution, so you can start capturing a camera with the startCapture function by giving the resolution. You can also stop a local camera easily by invoking the stopCapture function.
Toggling a Microphone
You’ve already used AudioManager to listen to audio sounds in a real-time peer-to-peer connection. So you can easily toggle a microphone with the setMicrophoneMute function like the code below:
| // Copyright 2023 Stream.IO, Inc. All Rights Reserved. | |
| // SPDX-License-Identifier: Apache-2.0 | |
| override fun enableMicrophone(enabled: Boolean) { | |
| audioManager?.isMicrophoneMute = !enabled | |
| } |
Leaving a Call
When people want to leave a call, disconnect the web socket to the signaling server and dispose of all resources, such as local/remote video tracks, an audio track, and local cameras, like the disconnect function below:
| // Copyright 2023 Stream.IO, Inc. All Rights Reserved. | |
| // SPDX-License-Identifier: Apache-2.0 | |
| override fun disconnect() { | |
| // dispose audio & video tracks. | |
| remoteVideoTrackFlow.replayCache.forEach { videoTrack -> | |
| videoTrack.dispose() | |
| } | |
| localVideoTrackFlow.replayCache.forEach { videoTrack -> | |
| videoTrack.dispose() | |
| } | |
| localAudioTrack.dispose() | |
| localVideoTrack.dispose() | |
| // dispose audio handler and video capturer. | |
| audioHandler.stop() | |
| videoCapturer.stopCapture() | |
| videoCapturer.dispose() | |
| // dispose signaling clients and socket. | |
| signalingClient.dispose() | |
| } |
Lastly, you can put together all of the controlling methods above into the VideoCallScreen composable below:
| // Copyright 2023 Stream.IO, Inc. All Rights Reserved. | |
| // SPDX-License-Identifier: Apache-2.0 | |
| VideoCallControls( | |
| modifier = Modifier | |
| .fillMaxWidth() | |
| .align(Alignment.BottomCenter), | |
| callMediaState = callMediaState, | |
| onCallAction = { | |
| when (it) { | |
| is CallAction.ToggleMicroPhone -> { | |
| val enabled = callMediaState.isMicrophoneEnabled.not() | |
| callMediaState = callMediaState.copy(isMicrophoneEnabled = enabled) | |
| sessionManager.enableMicrophone(enabled) | |
| } | |
| is CallAction.ToggleCamera -> { | |
| val enabled = callMediaState.isCameraEnabled.not() | |
| callMediaState = callMediaState.copy(isCameraEnabled = enabled) | |
| sessionManager.enableCamera(enabled) | |
| } | |
| CallAction.FlipCamera -> sessionManager.flipCamera() | |
| CallAction.LeaveCall -> { | |
| sessionManager.disconnect() | |
| activity?.finish() | |
| } | |
| } | |
| } | |
| ) |
After running the project on multiple Android devices, you will finally see the result below:
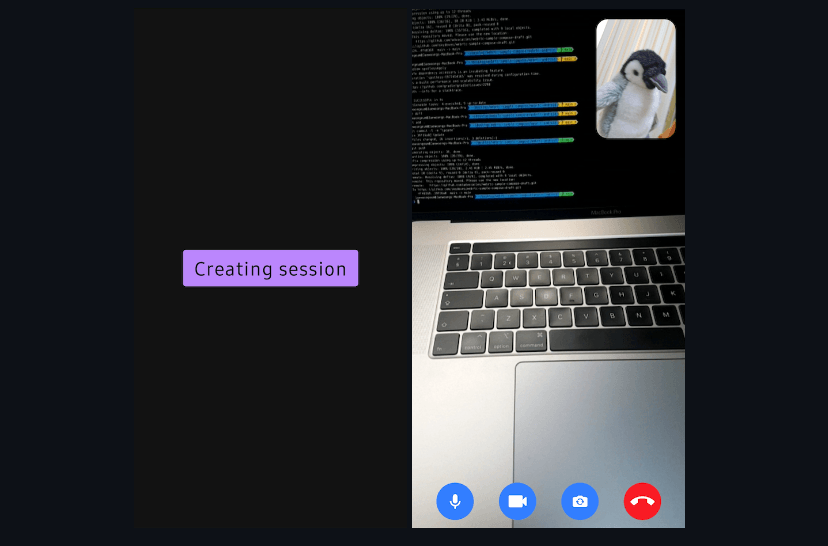
Conclusion
This concludes part two of the WebRTC in Jetpack Compose. This installment covered how to render WebRTC video streams in Jetpack Compose.
If you want to have a better grasp of how WebRTC works and relevant terminologies, such as peer-to-peer, the signaling server, SDP (Session Description Protocol), and ICE (Interactive Connectivity Establishment), check out the Building a Video Chat App: WebRTC on Android (Part1) blog post. You can also find the full source code repository on GitHub.
If you’d like to stay up to date with Stream, follow us on Twitter @getstream_io or the author @github_skydoves for more great technical content.
And as always, happy coding!
— Jaewoong
This article was previously published on proandroiddev.com


