How to implement user input for Android Wear OS
When you are creating an app for Wear OS it is a good idea to make sure all user interaction is easy and makes sense for a small screen. There are unavoidable situations of course where you do need to get more information from the user than a simple button press, slider number or toggle set.
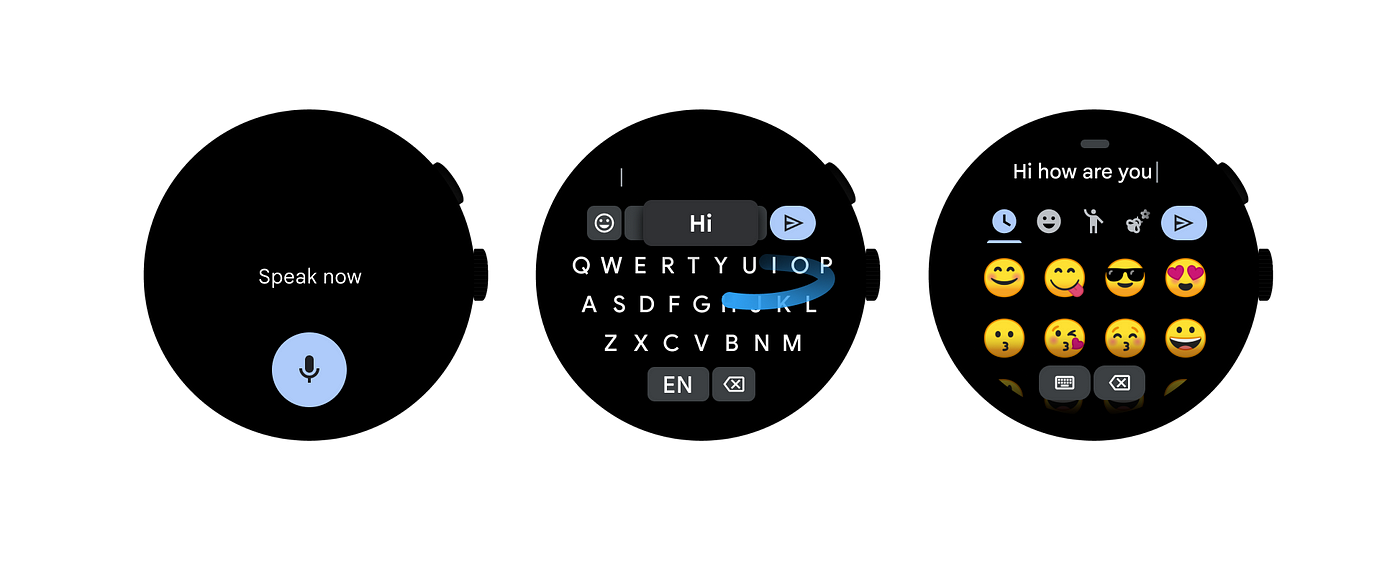
If you are asking for input from the user on the Wear OS device you can direct them to use a companion phone app but if this is not possible you can ask for voice, text or emoji input directly from the watch using the inbuilt IME tools.

Wear input methods, voice to text, keyboard & emoji. (Source: https://developer.android.google)
The official documentation is mainly focussed on how to create custom IME methods so I thought I would show an example on how the standard input methods can be implemented using the RemoteInput API
You may initially think that you can just use an EditText, but unfortunately if you are using Jetpack Compose on Wear OS (as is the official recommendation) EditText is not (yet?) available for Jetpack Compose Wear OS. Instead, we need to launch the input methods via a button. Using a button to launch a full screen input interface has the added benefit of giving the user much more room to type or make their selections and providing a more consistent user experience on such a tiny screen.
Requesting User Input for Wear OS
In order to launch the RemoteInput behaviour we first need to include the Wear Input dependency:
| implementation("androidx.wear:wear-input:1.2.0-alpha02") |
Then, we need to create a few variables to store our default text, to store received text and a key to identify the input request when it is returned from the remote input method:
| // Default text to be displayed before text is entered | |
| val defaultText = stringResource(R.string.edit_user_input) | |
| // A variable to store the received text in | |
| var userInput by remember { mutableStateOf(defaultText) } | |
| // A key to identify the text we are receiving when coming back from the remote input | |
| val inputTextKey = "input_text" |
The next step is to set up what input methods are allowed using the RemoteInput.Builder:
| val remoteInputs: List<RemoteInput> = listOf( | |
| RemoteInput.Builder(inputTextKey) | |
| .setLabel(stringResource(id = R.string.edit_user_input)) | |
| .wearableExtender { | |
| setEmojisAllowed(true) | |
| setInputActionType(EditorInfo.IME_ACTION_DONE) | |
| }.build() | |
| ) |
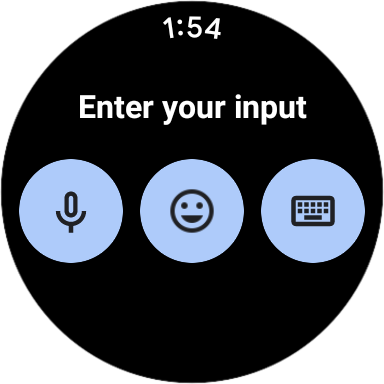
Here, we first pass in the resultKey (named inputTextKey in my example above) to identify the result of the input. Then, we can set the label that will be displayed when the input is requested using setLabel (“Enter your input” in my screenshot below).
Then the wearableExtender extension method can be used to indicate whether the emoji input method is allowed (voice and keyboard are always allowed) and setInputActionType to set the IME action label (this could also be IME_ACTION_SEARCH , IME_ACTION_SEND etc.)
Finally we call build() to build the result.

Providing input type choice to the user
Here the user can select how they want to enter their input, the next step for us is to capture it.
To do this, we need to handle the result using a remembered ManagedActivityResultLauncher and StartActivityForResult.
| val launcher = rememberLauncherForActivityResult( | |
| ActivityResultContracts.StartActivityForResult() | |
| ) { | |
| it.data?.let { data -> | |
| // Get all the results | |
| val results: Bundle = RemoteInput.getResultsFromIntent(data) | |
| // Use the inputTextKey to select the input we are interested in | |
| val newInputText: CharSequence? = results.getCharSequence(inputTextKey) | |
| // Save the text to our variable as a string. Ensure to handle the null case | |
| userInput = newInputText?.toString() ?: "" | |
| } | |
| } |
In the onResult lambda for rememberLauncherForActivityResult we get the input results and fetch the specific one we are interested in using the result key we specified in the RemoteInput.Builder. Be careful to handle the null case as there is chance that the result could be null if the request is interrupted. You could also trim or do other processing on the text here before saving it to the previously defined variable.
Now we have set up the interface and handled the result we need to be able to use this launcher to start the input request!
To do this we create an Intent using RemoteInputIntentHelper and launch this intent on click of a button:
| // Create the intent to launch the remote input | |
| val intent: Intent = RemoteInputIntentHelper.createActionRemoteInputIntent() | |
| RemoteInputIntentHelper.putRemoteInputsExtra(intent, remoteInputs) | |
| CompactButton( | |
| onClick = { | |
| // Use the launcher to launch the intent on click of a button | |
| launcher.launch(intent) | |
| }, | |
| ) { | |
| ... | |
| } |
To the intent we add our remote input configuration defined earlier and use the ManagedActivityResultLauncher to launch this intent.
This is now done! We can request the input from the user and save it to a variable for use elsewhere in our Wear OS application.

Hello user input!
Job Offers
The full code is as follows:
| @Composable | |
| fun UserInputScreen( | |
| modifier: Modifier = Modifier | |
| ) { | |
| val defaultText = stringResource(id = R.string.edit_user_input) | |
| var userInput by remember { mutableStateOf(defaultText) } | |
| val inputTextKey = "input_text" | |
| val remoteInputs: List<RemoteInput> = listOf( | |
| RemoteInput.Builder(inputTextKey) | |
| .setLabel(stringResource(id = R.string.edit_user_input)) | |
| .wearableExtender { | |
| setEmojisAllowed(true) | |
| setInputActionType(EditorInfo.IME_ACTION_DONE) | |
| }.build(), | |
| ) | |
| val launcher = rememberLauncherForActivityResult( | |
| ActivityResultContracts.StartActivityForResult() | |
| ) { | |
| it.data?.let { data -> | |
| val results: Bundle = RemoteInput.getResultsFromIntent(data) | |
| val newInputText: CharSequence? = results.getCharSequence(inputTextKey) | |
| userInput = newInputText?.toString() ?: "" | |
| } | |
| } | |
| val intent: Intent = RemoteInputIntentHelper.createActionRemoteInputIntent() | |
| RemoteInputIntentHelper.putRemoteInputsExtra(intent, remoteInputs) | |
| Box( | |
| contentAlignment = Alignment.Center, | |
| modifier = modifier.fillMaxSize() | |
| ) { | |
| Row(modifier = Modifier.fillMaxWidth(0.75f)) { | |
| Text(text = userInput, Modifier.weight(1f)) | |
| CompactButton( | |
| onClick = { launcher.launch(intent) }, | |
| ) { | |
| Icon( | |
| imageVector = Icons.Filled.Edit, | |
| contentDescription = stringResource(id = R.string.edit_user_input) | |
| ) | |
| } | |
| } | |
| } | |
| } |
Chaining User Input
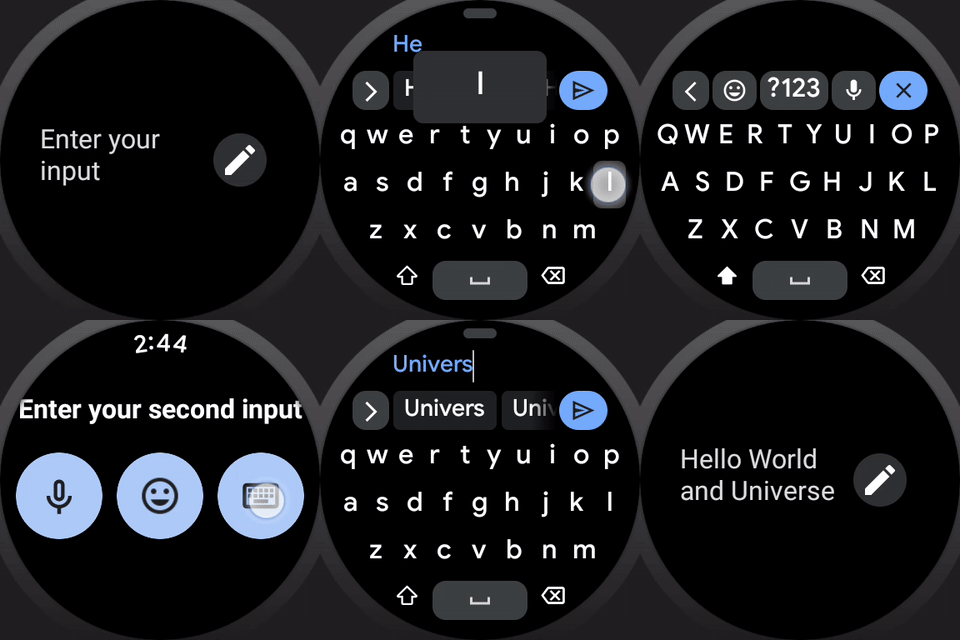
The eagle eyed of you may have noticed when we pass the RemoteInput into the RemoteInputIntentHelper it is done using a list. This may initially seem strange but instead it allows a better user experience when multiple input items are requested from the user. If you do require the user to fill out a form (not really recommended to be done on a watch!!) rather than the user having to click a new button for each form field you can request them one after another.
To set this up, provide each RemoteInput in the list with different resultKey values and labels:
| val remoteInputs: List<RemoteInput> = listOf( | |
| RemoteInput.Builder(inputTextKey1) | |
| .setLabel(stringResource(R.string.edit_user_input_1)) | |
| .wearableExtender { | |
| setEmojisAllowed(true) | |
| setInputActionType(EditorInfo.IME_ACTION_NEXT) | |
| }.build(), | |
| RemoteInput.Builder(inputTextKey2) | |
| .setLabel(stringResource(R.string.edit_user_input_2)) | |
| .wearableExtender { | |
| setEmojisAllowed(true) | |
| setInputActionType(EditorInfo.IME_ACTION_NEXT) | |
| }.build(), | |
| RemoteInput.Builder(inputTextKey3) | |
| .setLabel(stringResource(R.string.edit_user_input_2)) | |
| .wearableExtender { | |
| setEmojisAllowed(true) | |
| setInputActionType(EditorInfo.IME_ACTION_DONE) | |
| }.build(), | |
| ) |
And then when processing the result you can fetch each input item separately using the associated key and join them together or construct object as needed:
| val launcher = rememberLauncherForActivityResult( | |
| ActivityResultContracts.StartActivityForResult() | |
| ) { | |
| it.data?.let { data -> | |
| val results: Bundle = RemoteInput.getResultsFromIntent(data) | |
| val newInputText1: CharSequence = results.getCharSequence(inputTextKey1) ?: "" | |
| val newInputText2: CharSequence = results.getCharSequence(inputTextKey2) ?: "" | |
| val newInputText3: CharSequence = results.getCharSequence(inputTextKey3) ?: "" | |
| userInput = "$newInputText1 $newInputText2 and $newInputText3" | |
| } | |
| } |
Here I am just joining my text inputs to a string and saving it. To launch, it is just the same as for a single input.

A much better user experience than requesting with button presses one by one
You can find a full working example of requesting user input on Wear OS on github here:
This article was previously published on proandroiddev.com


