Use Python scripts and packages to supercharge Android apps

Python is one of the most popular languages in the developer community due to its simplicity, robustness and a large ecosystem of packages which make it super-useful across multiple domains. The use of packages like NumPy and SciPy enables programmers to perform high-level mathematical operations which are otherwise not available in other programming languages easily. What about bringing the power of Python to Android apps?
Chaquopy is a framework that can help developers run Python scripts from Java/Kotlin code in Android apps. Unlike other cross-language libraries, there are no hassles of NDK or native code and the installation is easy. In this story, we’ll explore Chaquopy, its architecture and use with Kotlin code.
Contents
What is Chaquopy and how does it use Python on Android?
Just as most cross-language interfacing works, Python and Android have a common ancestry of C/C++ which can let them communicate over a common medium. Android’s NDK allows developers to use native libraries (written in C/C++) within an Android app which is great for high-performance graphics and scientific computation.
Chaquopy uses CPython, an implementation of Python written in C language. Unlike the common misconception, Python isn’t a purely interpreted language. Python’s source code is first compiled to a special bytecode which is then interpreted by CPython. CPython is just one of the several implementations of Python, others include PyPy, IronPython, Jython etc.

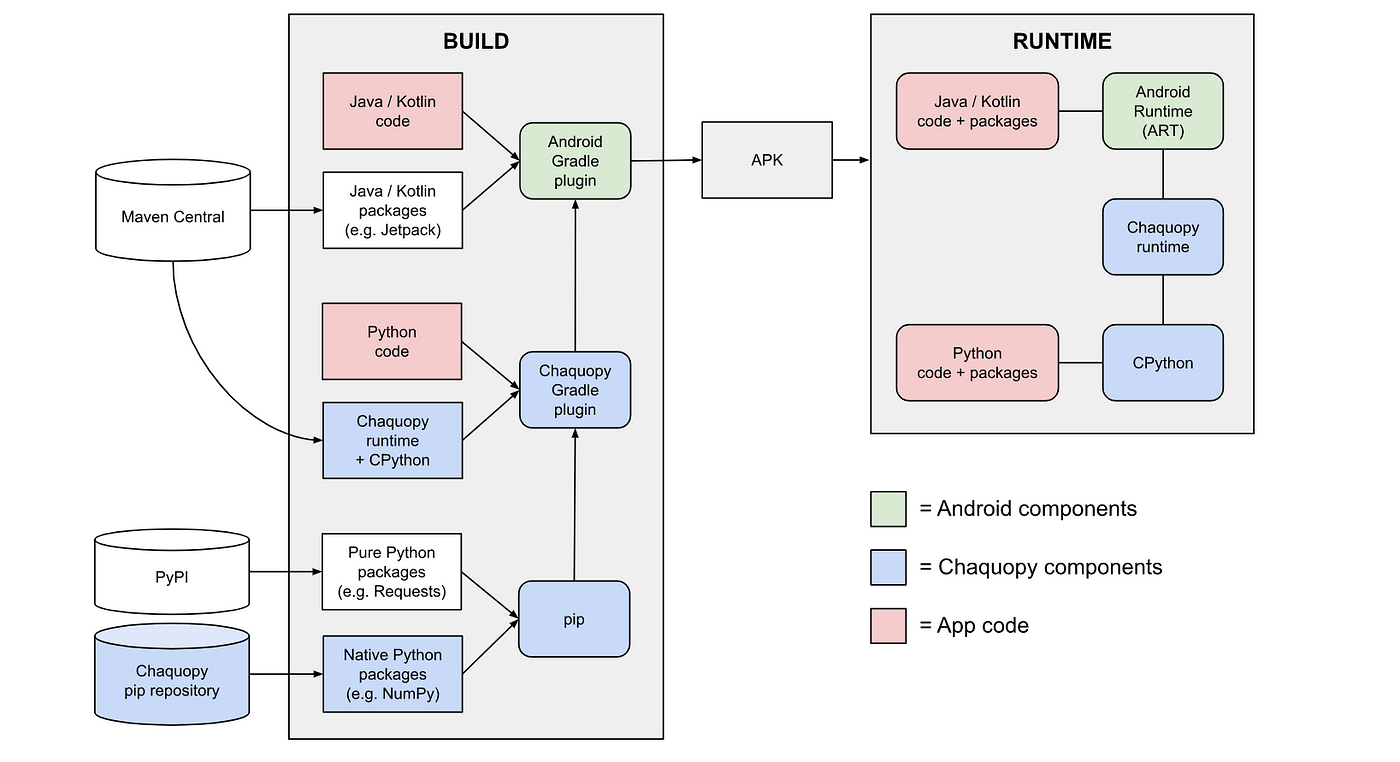
Chaquopy Architecture. Source: Malcolm Smith (with permissions acquired)
The Chaquopy team builds CPython with Android’s NDK toolchain. CPython is downloaded from the Maven Central repository by Chaquopy’s Gradle plugin while building the project and users need not download NDK for the process. It also downloads the Chaquopy runtimes which interfaces the Java/Kotlin code with Python through JNI.
Meanwhile, we would also need Python’s package manager pip which can download packages for the interpreter. Popular packages like NumPy and SciPy use native code to perform CPU-intensive computations, which needs to be built prior to installation. So, the Chaquopy team maintains their own repositories with native packages built specifically for Android’s ARM architecture. Maintainers of these packages do not build their native code for Android target, due to a smaller number of users, hence the Chaquopy team builds them for Android target and distributes them via their own repository.
For pure Python packages, no external building is required and Chaquopy’s interpreter can run them directly. For a high-level overview, Chaquopy contains three main components:
- Chaquopy Gradle Plugin
- Chaquopy Runtime
- Package Repository
1. Adding Chaquopy in your Android Project
1.1. Gradle dependencies and ABI specifications
To add Chaquopy in your new/existing Android project, head to the project-level build.gradle script, where we define Gradle plugins for the project, and add Chaquopy’s Gradle plugin,
plugins {
    id 'com.android.application' version '7.3.0' apply false
    id 'com.android.library' version '7.3.0' apply false
    id 'org.jetbrains.kotlin.android' version '1.7.21' apply false
    id 'com.chaquo.python' version '13.0.0' apply false
}
Next, in the module-level build.gradle , we’ll include the Chaquopy plugin and also specify the ABI filters,
plugins {
    id 'com.android.application'
    id 'org.jetbrains.kotlin.android'
    id 'com.chaquo.python'
}

android {
    ...
    defaultConfig {
        ...
        ndk {
            abiFilters "armeabi-v7a" //, "arm64-v8a", "x86", "x86_64"
        }
    }
    ...
}
As mentioned in the official docs, the Python interpreter is a native component which is built using the Android NDK. The NDK builds native code for a specific architectures, like arm , x86 or x86_64 . Different devices support different architectures, so we can only include that specific build of the Python interpreter, instead of building for all architectures which increases the app’s size. The official Android docs say,
The default behavior of the build system is to include the binaries for each ABI in a single APK, also known as a fat APK. A fat APK is significantly larger than one containing only the binaries for a single ABI; the tradeoff is gaining wider compatibility, but at the expense of a larger APK. It is strongly recommended that you take advantage of either App Bundles or APK Splits to reduce the size of your APKs while still maintaining maximum device compatibility.
1.2. Python version and PIP packages
Next, we’ll configure the version of Python that has to be built. We can specify this by modifying the module-level build.gradle ,
plugins {
    id 'com.android.application'
    id 'org.jetbrains.kotlin.android'
    id 'com.chaquo.python'
}

android {
    ...
    defaultConfig {
        ...
        ndk {
            abiFilters "armeabi-v7a" //, "arm64-v8a", "x86", "x86_64"
        }
        python {
            version "3.8"
        }
    }
    ...
}
Different Chaquopy versions support different Python versions that have different minimum API-level requirements. Use this table to find a version that suites your requirements. Next, we specify the packages that are to be installed in the Python interpreter.
defaultConfig {
    python {
        pip {
            // A requirement specifier, with or without a version number:
            install "scipy"
            install "requests==2.24.0"

            // An sdist or wheel filename, relative to the project directory:
            install "MyPackage-1.2.3-py2.py3-none-any.whl"

            // A directory containing a setup.py, relative to the project
            // directory (must contain at least one slash):
            install "./MyPackage"

            // "-r"` followed by a requirements filename, relative to the
            // project directory:
            install "-r", "requirements.txt"
        }
    }
}
Job Offers
There are different ways to install packages in Chaquopy; it could be a package name with a specific version, a custom package or requirements.txt package list.
2. Using Python objects from Java/Kotlin code
In Python, we use functions or data members that belong to a Python module which is a .py file containing the source code. To use any member from a Python module, the first step is to place the Python source code in the <project>/app/src/main/python directory.
# Contents of my_module.py

import numpy as np

def get_exec_details():
    return __file__

def sumOp( nums ):
    return sum( nums )

def powOp( a , x ):
    return a**x

def npMatrixSum( m , n ):
    mat = np.ones( ( m , n ) )
    mat_sum = np.sum( mat , axis=1 )
    return mat_sum

class Operations:

    num_ops = 2

    def meanOp( self , nums ):
        return sum( nums ) / len( nums )

    def maxOp( self , nums ):
        return max( nums )

nums_len = 10
nums_len_str = "ten"
ops = Operations()

Location of the Python module relative to the Android project and its contents. Image Source: Image by author
To use members from my_module , we use the Python.getModule method passing the name of the module. Before that, we need to enable Python fort the app, which can be performed in the onCreate method of Application ,
class App : Application() {

    override fun onCreate() {
        super.onCreate()
        if( !Python.isStarted() ) {
            Python.start( AndroidPlatform( this ) )
        }
    }

}
Adding App to AndroidManifest.xml ,
<manifest xmlns:android="http://schemas.android.com/apk/res/android"
    xmlns:tools="http://schemas.android.com/tools">

    <application
        android:name=".App"
        ...
    </application>

</manifest>
And then in MainActivity , we are allowed to Python.getInstance (else we would get a PyException ),
val py = Python.getInstance()
val module = py.getModule( "my_module" )
2.1. Accessing variables (data members)
To use a data member, like nums_len in my_module.py ,
val numsLength = module[ "nums_len" ]?.toInt()
println( "Nums Length is $numsLength" )
Nums Length is 10
To access attributes of the object ops of class Operations ,
val ops = module[ "ops" ]!!
println( "Operations: $ops" )
println( "num_ops : ${ ops[ "num_ops" ] }" )
println( "mean func : ${ ops[ "meanOp" ] }" )
Operations: <my_module.Operations object at 0xb9339ce8>
num_ops : 2
mean func : <bound method Operations.mean of <my_module.Operations object at 0xb9339ce8>>
2.2. Calling Functions
As a function is an object in Python, accessing functions as values of the module is allowed. Then, we use PyObject.call method to pass arguments to a function and get the results (if the function returns a value)
val sumFunc = module[ "sumOp" ]
val sum = sumFunc?.call( intArrayOf( 12 , 25 , 32 ) )
val powFun = module[ "powOp" ]
val pow = powFun?.call( 5 , 2 )
println( "Sum: $sum" )
println( "Pow: $pow" )
Sum: 69
Pow: 25
To access member functions from the ops object,
val meanFunc = ops[ "meanOp" ]
val mean = meanFunc?.call( intArrayOf( 23 , 45 , 12 , 91 ) )
println( "Mean: $mean" )

// OR

val mean = ops.callAttr( "meanOp" , intArrayOf( 23 , 45 , 12 , 91 ) )
println( "Mean: $mean" )
Mean: 42.75
Here’s an example in which a Python function uses numpy and returns the result which is of type np.ndarray
# my_module.py
import numpy as np

def npMatrixSum( m , n ):
    mat = np.ones( ( m , n ) )
    mat_sum = np.sum( mat , axis=1 )
    return mat_sum
val npSumFunc = module[ "npMatrixSum" ]
val output = npSumFunc?.call( 2 , 3 )

// OR

val output = module.callAttr( "npMatrixSum" , 2 , 3 )

println( "Output: $output" )
println( "Output shape: ${output!![ "shape" ] }")
Output: [3. 3.]
Output shape: (2,)
Resources
- Official Chaquopy docs
- Chaquopy FAQ: This section contains answers to various questions around Chaquopy
- Chaquopy Demos on GitHub
The End
Hope I’ve added a new tool to your Android development toolbox! Chaquopy is a great tool with a neat syntax and hassle-free installation. Make sure you use in your next Android project. Keep learning and have a nice day ahead!


