


Introduction
Deep linking is directing users to specific content within a mobile app, rather than just the app’s homepage or landing screen. It allows users to directly access the content they are looking for, instead of navigating through the app’s menus and screens to find it.
Android Jetpack Navigation, on the other hand, is a component of the Android Jetpack library that simplifies the implementation of navigation in Android apps.
By using Deeplink with Android Jetpack Navigation, developers can provide an even smoother user experience by allowing users to directly access specific screens within the app. In this article, we will explore the concept of Deeplink, the basics of Android Jetpack Navigation, and how to use Deeplink with Android Jetpack Navigation to enhance your mobile app.
Table of Contents
- Understanding Deeplink
- Understanding Android Jetpack Navigation
- Using Deeplink
- UI testing with Deeplinks in Jetpack Compose
Section 1: Understanding Deeplink
Deep linking on Android is a way of directing users to a specific location or content within an app, instead of just opening the app’s default screen. It enables users to directly access the content they are interested in, bypassing the need to navigate through the app’s menus and screens.
In technical terms, deep linking is implemented using a URL scheme that maps a URL to a specific location within an app. When a user clicks on a deep link, the URL is intercepted by the operating system, which then launches the app and navigates to the relevant location or content within the app.
Section 2: Understanding Android Jetpack Navigation
What is the Navigation Graph and how is it created?
Jetpack Compose Navigation Graph is a component of the Jetpack Navigation library that simplifies the implementation of navigation in Jetpack Compose-based apps. It is similar to the Navigation Graph used in traditional Android apps, but it is specifically designed to work with Jetpack Compose UI components.
A Navigation Graph in Jetpack Compose is created using the NavHost composable, which is responsible for hosting the app’s navigation graph. The NavHost composable must be placed in the app’s layout, and it can be customized with various parameters such as the start destination, the back stack behavior, and the animation options.
For example, the navigation class of the Home Page is as follows. You have to do this for each screen.
Section 3: Using Deeplink
Setup your implicit intent
Jetpack Compose Navigation can handle implicit intents for you. First, you need a change in AndroidManifest.xml to create the intent. Here you need to specify the host and scheme with a data tag for deep link under intent-filter.
| <activity | |
| android:name=".MainActivity" | |
| android:exported="true" | |
| android:label="@string/app_name" | |
| android:theme="@style/Theme.ComposeDeeplinkTutorial"> | |
| <intent-filter> | |
| <action android:name="android.intent.action.MAIN" /> | |
| <category android:name="android.intent.category.LAUNCHER" /> | |
| </intent-filter> | |
| <intent-filter android:autoVerify="true"> | |
| <!--below line is to set the action to our intent to view--> | |
| <action android:name="android.intent.action.VIEW" /> | |
| <!--on below line we are adding a default category to our intent--> | |
| <category android:name="android.intent.category.DEFAULT" /> | |
| <!--on below line we are adding a category to make our app browsable--> | |
| <category android:name="android.intent.category.BROWSABLE" /> | |
| <!--on below line we are specifying the host name and | |
| the scheme type from which we will be calling our app--> | |
| <data | |
| android:host="compose" | |
| android:scheme="example" /> | |
| </intent-filter> | |
| <meta-data | |
| android:name="android.app.lib_name" | |
| android:value="" /> | |
| </activity> |
Setup the deeplink in your route
To create a deeplink in Jetpack Navigation Component in Jetpack Compose, follow these steps:
In this example, we handle navigation using the Navigation Component library. The NavHost links the NavController with a navigation graph that specifies the composable destinations that you should be able to navigate between. As you navigate between composables, the content NavHost is automatically recomposed. Each composable destination in your navigation graph is associated with a route.
OUR VIDEO RECOMMENDATION


Jobs
In the example above, we tell the Jetpack Compose Navigation Library to process links that can satisfy the given URI pattern. You can do it in two different approaches. First, you can tell it to handle all connections and all parameters in the argument and handle these arguments in the ViewModel and manage the navigation. Second, you can tell it to handle the connection that can meet the screen-specific URI pattern.
uriPattern = "example://compose/dashboard/{name}"
Here in uriPattern, we define a specific deeplink pattern where the dashboard screen takes a “name” parameter according to the host and scheme defined in AndroidManifest.
arguments = listOf(
    navArgument("name") {
        type = NavType.StringType
        defaultValue = ""
    }
)
We define an argument parameter called “name”. We can also make it optional, the default value is empty string. In fact, this process is exactly setting a value that we can meet on the screen. Here you can get the deeeplink data directly.
val argument = navBackStackEntry.arguments?.getString("name")
HomeScreenRoute(deepLinkData = argument)
When setting up HomeScreen, as a bundle in the navigation, we check if there is a value in the arguments according to the name parameter and send the value sent from this deeplink to HomeScreenRoute. According to the scenario, if you want to show an id with the Home screen deeplink, you can follow this flow and take the name parameter you get from here and show it on the Home screen.
You may pass any kind of intent properties into the navDeepLink builder, such as actions and mimetype.
We display the Deeplink data on the HomeScreen as in the example below.
| @Composable | |
| internal fun HomeScreenRoute( | |
| modifier: Modifier = Modifier, | |
| deepLinkData: String? = null | |
| ) { | |
| HomeScreen(modifier, deepLinkData) | |
| } | |
| @OptIn(ExperimentalMaterial3Api::class) | |
| @Composable | |
| fun HomeScreen( | |
| modifier: Modifier = Modifier, | |
| deepLinkData: String? = null | |
| ) { | |
| Scaffold( | |
| modifier = modifier.fillMaxSize(), | |
| topBar = { | |
| CenterAlignedTopAppBar( | |
| modifier = Modifier.fillMaxWidth(), | |
| title = { | |
| Text(text = "Home Screen") | |
| }, | |
| ) | |
| }, | |
| content = { paddingValues -> | |
| Content(modifier = Modifier.padding(paddingValues), deepLinkData) | |
| } | |
| ) | |
| } | |
| @Composable | |
| fun Content(modifier: Modifier = Modifier, deepLinkData: String? = null) { | |
| Column( | |
| modifier = modifier | |
| .fillMaxSize(), | |
| horizontalAlignment = Alignment.CenterHorizontally, | |
| verticalArrangement = Arrangement.Center | |
| ) { | |
| Text(text = "This is Home Screen $deepLinkData ", color = Color.Blue) | |
| } | |
| } |
Note here that the Jetpack Compose Navigation Component Library will navigate to the best match deeplink it can find in your Navigation graph. If no matches were found, then it will just navigate to the HomeScreen destination.
You can use this to try deep linking;
adb shell am start -W -a android.intent.action.VIEW -d "example://compose/dashboard/dashBoardDeeplink"
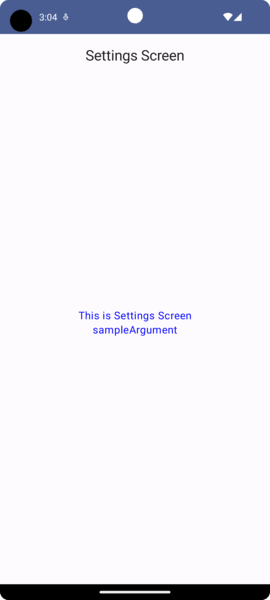
Also, let’s assume that there is a SettingsScreen according to our scenario. According to the scenario, we navigate the user to SettingsScreen with deeplink redirection and show the argument that comes with deeplink.
| fun NavGraphBuilder.settingsScreen() { | |
| composable( | |
| route = settingsNavigationRoute, | |
| deepLinks = listOf(navDeepLink { | |
| uriPattern = "example://compose/settings/{id}" | |
| action = Intent.ACTION_VIEW | |
| }), | |
| arguments = listOf( | |
| navArgument("id") { | |
| type = NavType.StringType | |
| defaultValue = "" | |
| } | |
| ) | |
| ) { navBackStackEntry -> | |
| val argument = navBackStackEntry.arguments?.getString("id") | |
| SettingsScreen(deepLinkData = argument) | |
| } | |
| } |
You can use this;
adb shell am start -W -a android.intent.action.VIEW -d "example://compose/settings/sampleArgument"
Section 4: UI testing with Deeplinks in Jetpack Compose

When building a Jetpack Compose app that utilizes deeplinks, it’s important to ensure that the navigation flow works correctly for both regular app navigation and deeplink-based navigation. This is where UI testing comes in. In this section, we’ll explore how to write UI tests for deeplink-based navigation in Jetpack Compose.
To test a Deeplink in Jetpack Compose, you can create a UI test that simulates an incoming Deeplink and verifies that the app navigates to the correct destination. Here are the steps you can follow to create a Deeplink UI test in Jetpack Compose:
Create a test method: In your UI test class, create a test method that starts the app with a simulated Deeplink. You can do this by using the intent Action.View method from the androidx.compose.ui.test.junit4.ComposeTestRule class.
| @RunWith(AndroidJUnit4::class) | |
| class AppDeepLinkingTest { | |
| @get:Rule | |
| val activityScenarioRule = ActivityScenarioRule(MainActivity::class.java) | |
| @get:Rule | |
| val composeTestRule = createAndroidComposeRule<MainActivity>() | |
| private lateinit var scenario: ActivityScenario<MainActivity> | |
| @Before | |
| fun setup() { | |
| scenario = activityScenarioRule.scenario | |
| } | |
| @After | |
| fun cleanup() { | |
| scenario.close() | |
| } | |
| @Test | |
| fun deepLinkApplicationTextDashboardDeeplinkHasText() { | |
| // Launch the activity with the deep link | |
| val intent = Intent(Intent.ACTION_VIEW).apply { | |
| data = Uri.parse("example://compose/dashboard/johnDoe") | |
| } | |
| scenario.onActivity { activity -> | |
| activity.startActivity(intent) | |
| } | |
| // Verify that the activity displays the expected text | |
| val value = composeTestRule.onNodeWithTag("dashboardDeeplinkArgument") | |
| value.assertTextEquals("This is Home Screen johnDoe") | |
| for ((key, value) in value.fetchSemanticsNode().config) { | |
| if (key.name == "EditableText") { | |
| assertEquals("This is Home Screen johnDoe", value.toString()) | |
| } | |
| } | |
| } | |
| } |
In this example, the test method launches the app with a simulated Deeplink (example://compose/dashboard/johnDoe) and verifies that the text element “This is Home Screen johnDoe” exists on the destination screen. If the text element is found, the test passes. If not, the test fails, indicating that the app did not navigate to the correct destination.
Conclusion
In this article, we learned how to use Deeplinks in Jetpack Compose to create seamless navigation experiences for users. We covered how to create and handle Deeplinks, and how to use UI tests to ensure proper functioning. Jetpack Compose simplifies Deeplink implementation with its declarative UI framework. By following the steps outlined in this article, you can create a smooth navigation experience for your users and ensure app quality with UI testing.
Resource
- https://developer.android.com/jetpack/compose/navigation
- https://developer.android.com/jetpack/compose/navigation#deeplinks
- https://www.composables.co/tutorials/deeplinks
Github Repo:
This article was previously published on proandroiddev.com


1 Comment. Leave new
Hi, have you encountered problem where opening composable from pending intent (from notifications) and try to go back. In my case desired composable has one parent and when on parent you go back it should terminate the app (because i popped previous composables), but that is not happening.
clicking back on phone starts the app from the beginning.