

 Image by Dawson Lovell — Unsplash
I’ve been playing around with AGSL shaders which are supported starting from Android 13. Having a couple years of experience in game development with Unity3D, I’ve become a fan of shaders and what can be achieved using them, and decided to implement them in android right away.
Before we go on, in case you haven’t heard about shaders…
They are small programs that can directly manipulate pixels on the screen, change their color before they are displayed. These programs run on the GPU which is a highly optimized environment for such operations.
Even though there are different types of shaders, usually people mean Pixel/Fragment shaders when they talk about them, which is also the type of shader we’ll be looking at in Android.
First let’s look at some examples of what can be achieved with shaders.
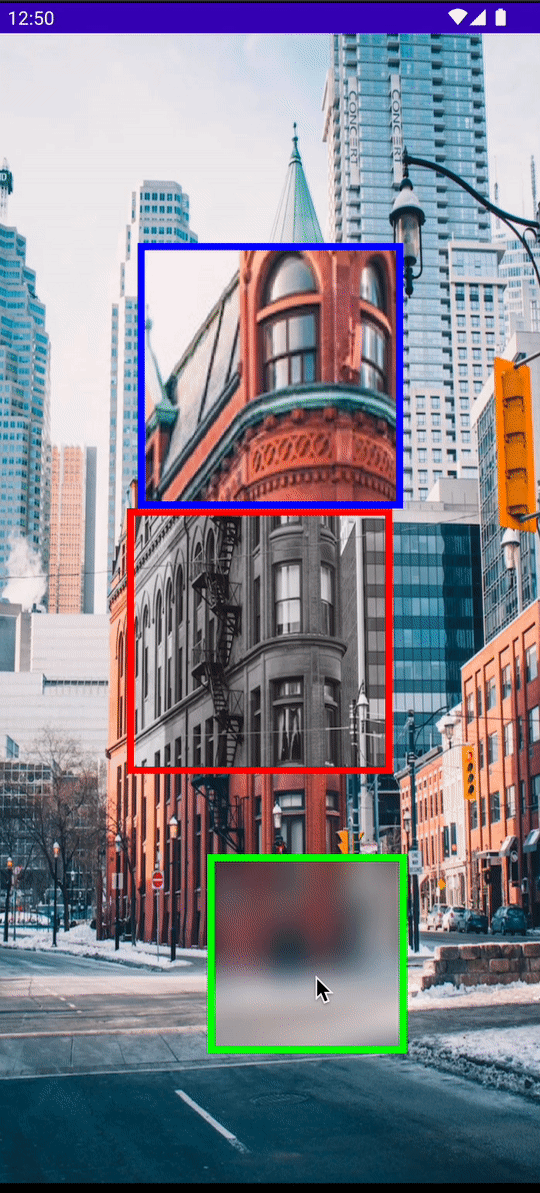
In the above sample, I’ve created 3 different shaders, blur, monochrome and zoom. What I did was just find the shaders written in GLSL from shadertoy.com or any other place and convert it to AGSL. You can use the quick-reference from the android official docs for converting. Lets checkout the monochrome shader code here.
private const val GREYSCALE_SHADER = """
    uniform float2 childResolution;
    uniform shader background;
    half4 main(float2 fragCoord){
           half4 color = background.eval( float2(fragCoord.x + childResolution.x, fragCoord.y + childResolution.y + 60));
        color.rgb = half3(dot(color.rgb, half3(0.2126, 0.7152, 0.0722)));
        return color;
    }
"""
The above code is not that hard to understand. The shaders script is receiving two properties. One is the position which is updated when the red colored box is moving and the second is the background bitmap (typed as shader). The function logic consists of getting the pixel color at the exact position (considering paddings and etc…) and the magical part
color.rgb = half3(dot(color.rgb, half3(0.2126, 0.7152, 0.0722)))
is using the commonly known “luma” formula. “Commonly known” at least according to ChatGPT 😛. I had no idea what it was doing, so here’s the full response from ChatGPT:
The formula used to calculate luminance is a weighted sum of the red, green, and blue values of the color using the coefficients 0.2126, 0.7152, and 0.0722, respectively. This equation is commonly known as the “luma” formula.
dot(color.rgb, half3(0.2126, 0.7152, 0.0722)) performs a dot product between the RGB color channels and the weights specified in the half3(0.2126, 0.7152, 0.0722) argument. The result is a scalar value representing the weighted sum of the input color’s channels.
– ChatGPT
After learning how to *steal GLSL shaders decided to find some cool shaders and apply it on my android project to create some fancy looking attractive UI. The first nice looking shader I’ve found was from compose-sample project Jet Lagged. I edited some of the properties of the shader and applied it on a button background and got the following result.

OUR VIDEO RECOMMENDATION


Jobs
I guess it’s easy to find a use-case for such UI elements, like when you want users to pay more attention to some UI components…
Another cool article I’ve found on AGSL shader implementation was “Making Jellyfish move in Compose: Animating ImageVectors and applying AGSL RenderEffects”. But this time, I’ve tried to be creative and make something even cooler than just a button. The result is:

I hope you’ve noticed the liquid like effect on background of UI items. Actually it’s not only the shader that does all the work. I’ve blurred the background image and used that as an input for shader script. Here’s the gist for modifier extension that can be used with any composable. It accepts the background image which is in my case the blurred copy of the actual background.
In conclusion, shaders are really powerful and can bring some exceptional result if used creatively. However, they can be really hard to write from scratch. Fortunately, my experience that I’ve shared with you proves that you can reuse/edit/mix the existing shaders easily without knowing much about formulas and the shading language itself.
If you’d like to learn about blurring item backgrounds in a scrollable container, you may like my other article on the topic “Glassmorphism in Jetpack Compose”.
This article was previously published on proandroiddev.com


