

There is a lot behind what you see!

In this tutorial, I’ll show you how can you create an user stack animation as shown below

Well, if you look at this animation it seems like a vertical list of user pictures collapses into a horizontal list and all gets overlapped with each other. We’ve seen such stacking on Jira dashboards 😄.
Can we use Row and Column?
My first thought actually was of converting Column into Rows and vice versa but immediately realisation hit and it seems like a bad idea because then we would have to manage shifting the items from column to row along with animation and visibilities and I’m not sure how easy it would be.
Hence that approach was dropped.
Stack approach
The actual approach used in this is stacking all the items one over the other first and then altering their offsets as per their position and put them in the right location on screen.
Let’s consider if the item is of size 50dp, then on the vertical arrangement, the items are placed simply with top margin equal to their index multiplied with 50dp as shown in the diagram.
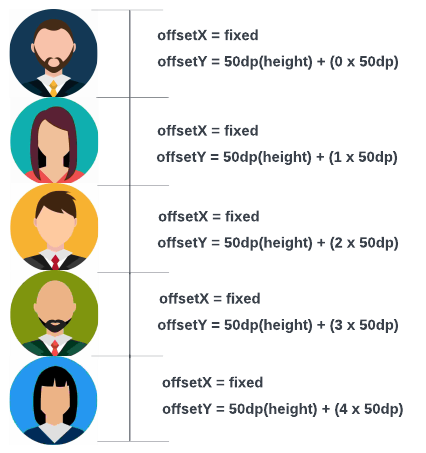
Calculation for vertical alignment
OUR VIDEO RECOMMENDATION


Jobs
Coding the animation
Let’s begin by setting up the vertical arrangement of items. Simply take a box and and for each user calculate its offsetX and offsetY as show above in the diagram.
| val userImages = listOf( | |
| R.drawable.img_user_1, | |
| R.drawable.img_user_2, | |
| R.drawable.img_user_3, | |
| R.drawable.img_user_4, | |
| R.drawable.img_user_5, | |
| ) | |
| ... | |
| Box(modifier = Modifier.fillMaxSize()) { | |
| userImages.forEachIndexed { index, drawable -> | |
| val offsetX = (screenWidth - 25.dp) / 2 // horizontal offset | |
| val offsetY = ((screenHeight - 25.dp) / 2) + (index * 50).dp // vertical offset including item index | |
| val modifier = Modifier | |
| .size(50.dp) | |
| .absoluteOffset( | |
| x = offsetX, | |
| y = offsetY, | |
| ) | |
| UserImage(modifier = modifier, image = drawable) | |
| } | |
| FloatingActionButton( | |
| modifier = Modifier | |
| .align(Alignment.BottomEnd) | |
| .padding(16.dp), | |
| onClick = { isHorizontal = isHorizontal.not() } | |
| ) { | |
| Text("Click") | |
| } | |
| } |
This will give us our vertical arrangement. Now lets settle our horizontal arrangement by tweaking the offsets calculation as follows
var isHorizontal by remember {
     mutableStateOf(false)
}
...

val offsetX = (screenWidth - 25.dp) / 2 + if (isHorizontal) (index * 25).dp else 0.dp
val offsetY = ((screenHeight  - 25.dp) / 2) + if (isHorizontal) 0.dp else (index * 50).dp

...
What we did here was created a isHorizontal variable which toggles when we click on the button to change the arrangement.
We added screen width and height portion in calculation just to bring the view into centre and it is not necessary.
For vertical arrangement, we increase the y coordinate by index times 50dp.
For horizontal arrangement, we increase the x coordinate by index times 25dp (50dp % 2).
By far, what we get it as below

Cool. But what is missing here is the smooth transition from one arrangement to the other. So let’s add that too. In order to do that we need to make our offsets to transition from their last value to the new value. Also setting these new offsets in our modifier as follows
// new offsetX
val targetCordX by animateDpAsState(
    targetValue = offsetX,
    animationSpec = tween(
        easing = easing,
        durationMillis = animationDuration
    )
)
// new offsetY
val targetCordY by animateDpAsState(
    targetValue = offsetY,
    animationSpec = tween(
        easing = easing,
        durationMillis = animationDuration
    )
)

val modifier = Modifier
                .size(50.dp)
                .absoluteOffset(
                    x = targetCordX,  // offsetX -> targetCordX
                    y = targetCordY,  // offsetY -> targetCordY
                )
We simply animate our offsets as dp with new offsets values every time the arrangement is toggled. Now the result looks like this:

Whoa! We can see it is working as expected. Only one part is yet to be done. The last item in the stack hides for horizontal arrangement and shows up again for vertical and that too with an animation. So let’s do that too.
To make the last item hide/show, we simply add the condition that if the arrangement is horizontal and index is the last one then hide it otherwise show it.
val lastElementVisibility = if (isHorizontal && index == userImages.lastIndex) 0f else 1f
Now we create the alpha variable which will animate our visibility across the transitions as follows
val alpha by animateFloatAsState(
                targetValue = lastElementVisibility,
                animationSpec = tween(
                    easing = easing,
                    durationMillis = animationDuration
                )
            )

val modifier = Modifier
                .size(50.dp)
                .absoluteOffset(
                    x = targetCordX,
                    y = targetCordY,
                )
                .alpha(alpha)  // affects the visibility along the transition

And bam! We successfully created our expected user stack animation.
You can clone the repo from github and play around with different scenarios.
GitHub – aqua30/UserStackAnimation: Sample project to show how can we create user stack animation.
Credits
The reference for this animation is taken from LinkedIn where it is created in flutter.
This article was previously published on proandroiddev.com


