

 WatchFace
In this blog, I will explain how we can implement this using the Compose Canvas API. I’ll also cover the mathematical concepts related to calculating coordinates on a circle and drawing shapes and text around those coordinates, Many of the formulas used here have been derived through trial and error, so understanding them at first can be challenging. However, I will simplify the explanations with diagrams to make them easier to grasp. I hope you enjoy reading this article.
TL;DR
GitHub – nikhil-mandlik-dev/watchface
Overview
- Terminology
- Drawing Second & Minute Dials
- Drawing Hour Label
- Drawing Minute-Second Overlay
- Terminology
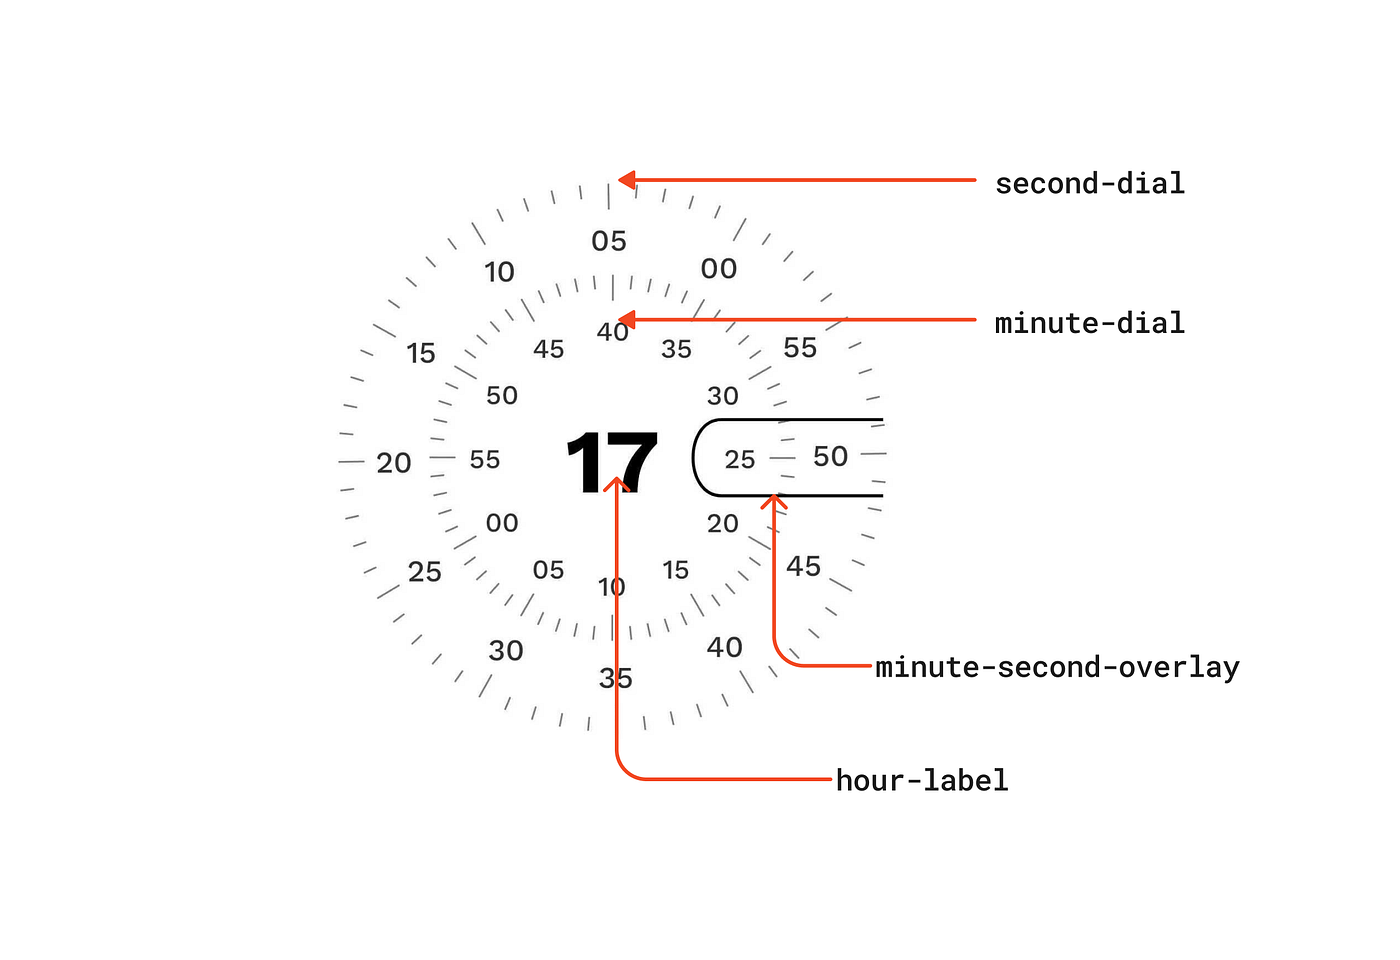
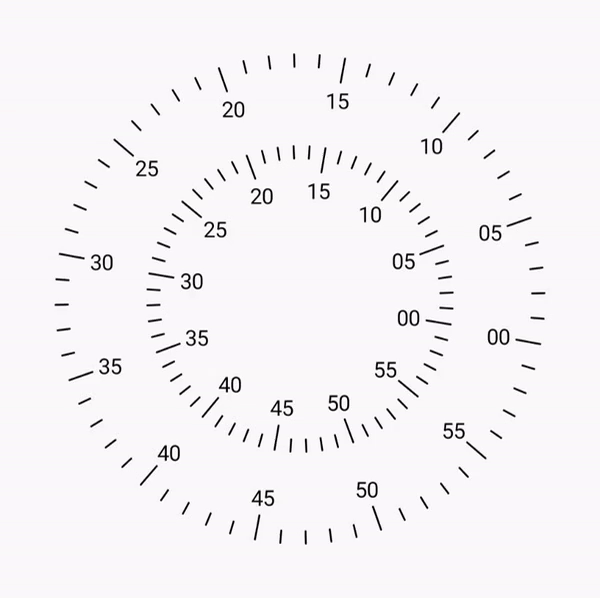
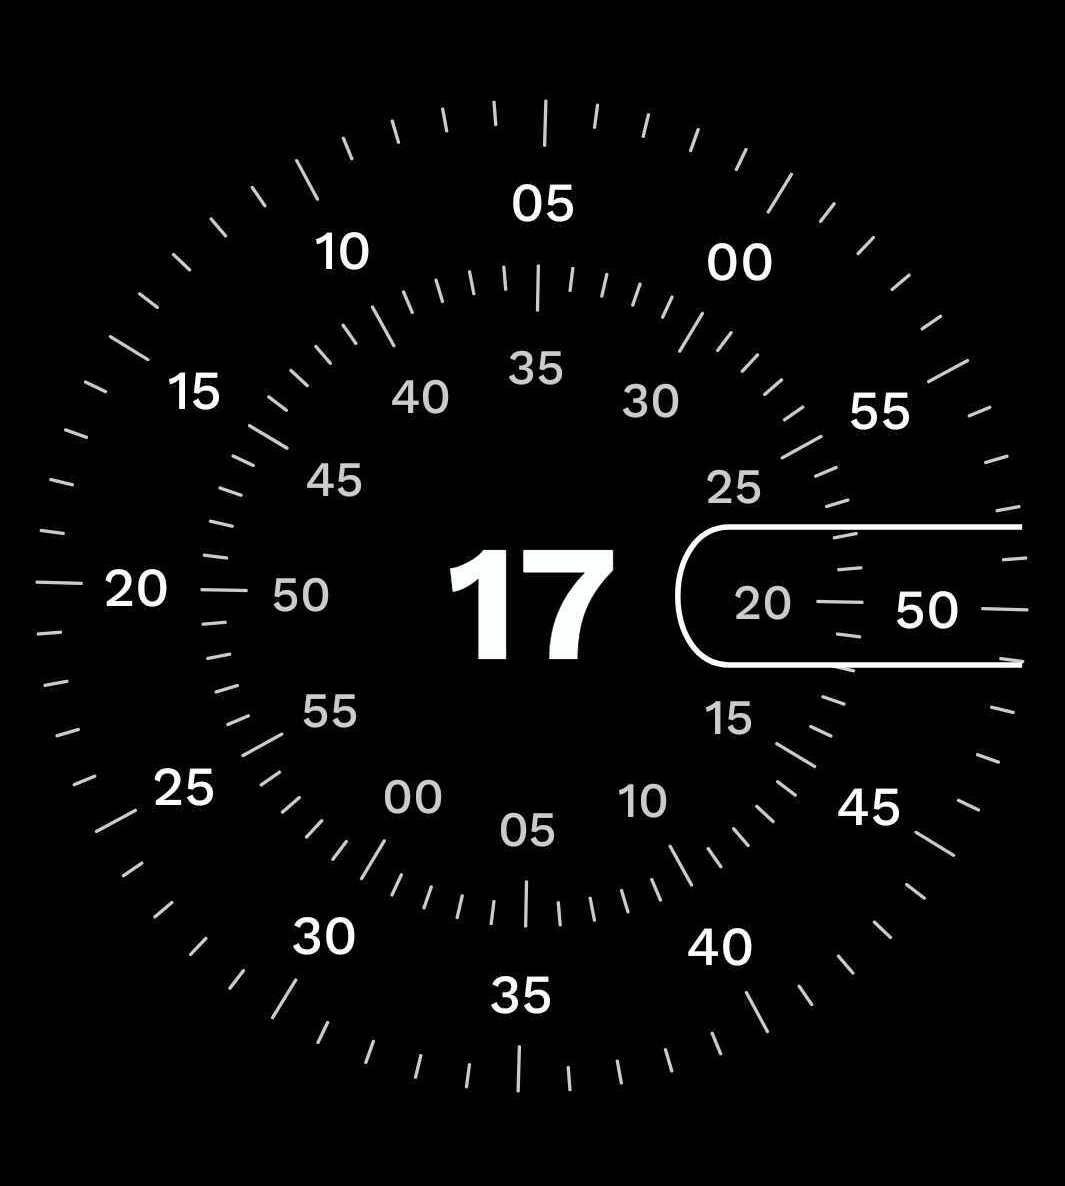
- Seconds and Minutes Dials: These are rotating circles on the watch face. Both dials are identical, except for their radius.
- Steps: The dials are divided into 60 steps, There are two types of steps normalStep and fiveStep.
- Step Labels: The fiveStep intervals are labelled with values such as [00, 05, 10…]
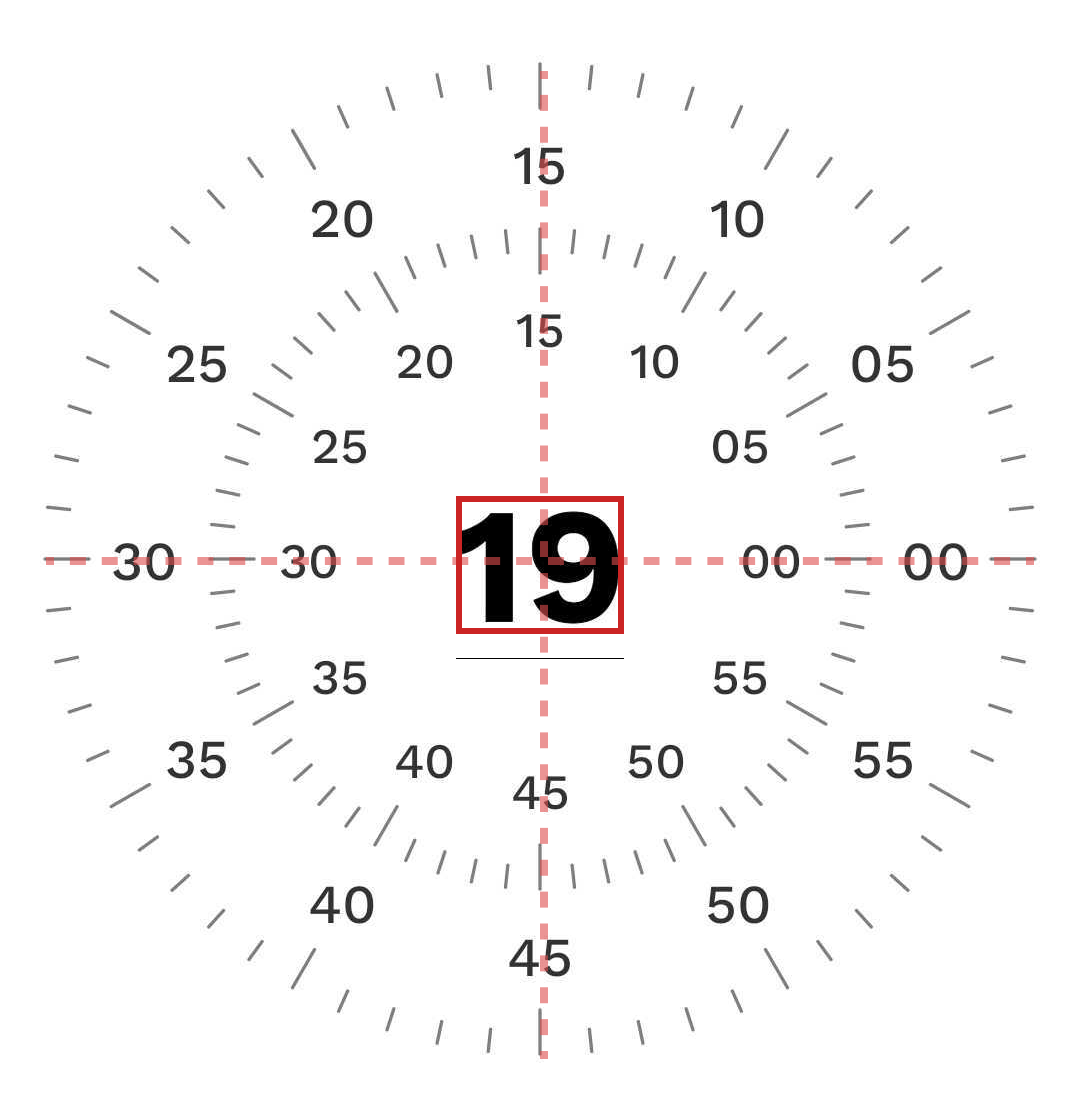
- Hour Label: The central label represents the hour of the day in a 24-hour format.
- Minutes-Second Overlay: To highlight the current minute and second, a rounded rectangle is positioned at the right center of the watch face.
2. Drawing Second & Minute Dial
This section is again divided into three subparts
- Understanding Dial
- Drawing steps
- Drawing steps labels
2.1 Understanding Dial
understanding dial
- Both the Second and Minute dials have the same number of steps but differ in their radius and rotation per second.
- The Second dial rotates 6 degrees every second, while the Minute dial also rotates 6 degrees every minute.
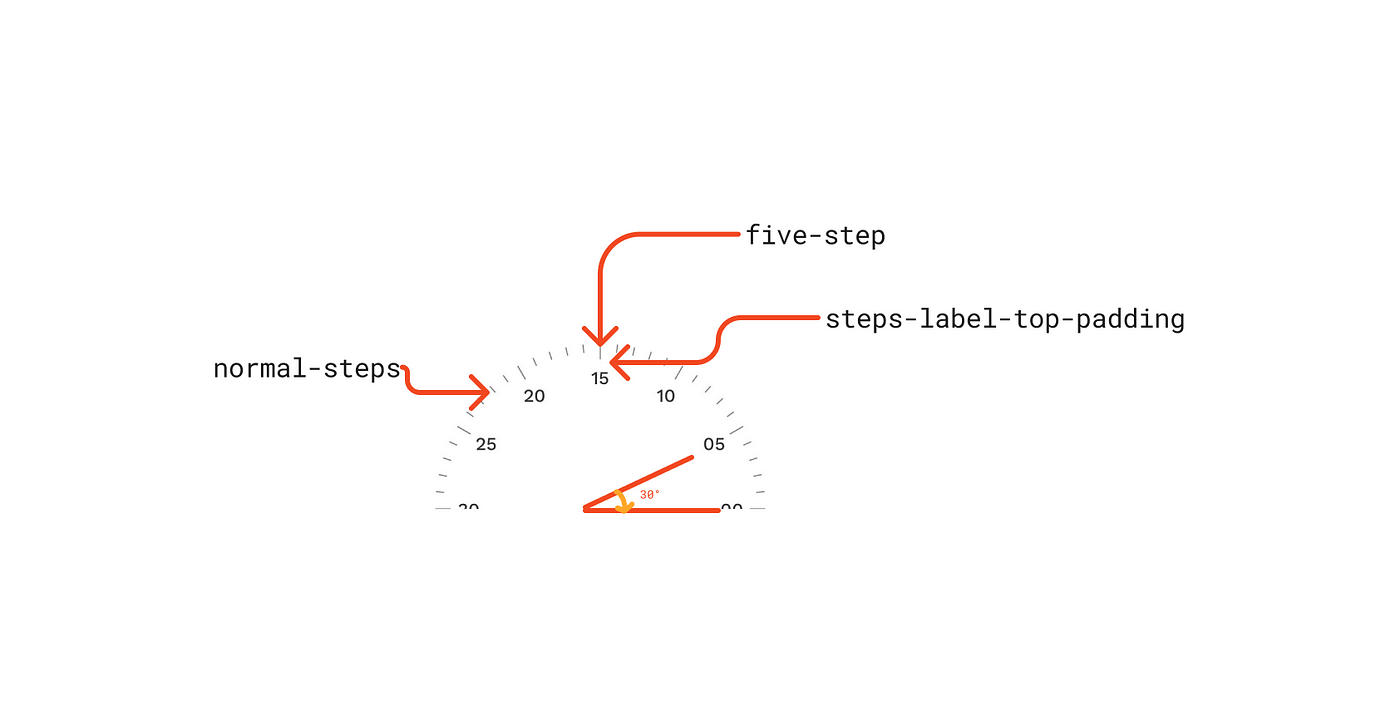
- Each dial consists of 60 normal steps and 12 five steps.
- The angle between two consecutive normal steps is 6 degrees.
- The angle between two consecutive five steps is 30 degrees.
- The line height of the five steps is greater than that of the normal steps to ensure proper separation.
- Five step labels, indicating values like [00, 05, 10…], are drawn with some padding called stepsLabelTopPadding.
2.2 Drawing steps

- To draw steps, we need the start and end offsets of each individual step, which can be calculated using the following formula
x = r * cos(θ)
y = r * sin(θ)
OUR VIDEO RECOMMENDATION


Jobs
- However, the coordinate system of a circle is different from the coordinate system of the canvas, so we need to modify the above formula to obtain the x, y coordinates on the canvas.
x = center.x + r * cos(θ)
y = center.y - r * sin(θ)
- In the formula, we require the angle in radians. we can need to multiply angleInDegrees by π/180. Therefore, the modified formula becomes:
x = center.x + r * cos(angleInDegrees * (π / 180))
y = center.y - r * sin(angleInDegrees * (π / 180))
- each step rotates at a certain degree every second, so we will add a “rotation” state in the above formula, this state will be modify every second to rotate each step
x = center.x + r * cos((angleInDegrees + rotation) * (π / 180))
y = center.y - r * sin((angleInDegrees + rotation) * (π / 180))
2.3 Drawing steps labels
- To drawText on the canvas we need the topLeft offset of the position where we want to draw a text
- While calculating this we also need to consider a label width and height to properly position the label at the center of the step
Code Snippet and Output for Drawing Second & Minute Dial
 Draw Steps and Labels Output
| //data class for wrapping dial customization | |
| data class DialStyle( | |
| val stepsWidth: Dp = 1.2.dp, | |
| val stepsColor: Color = Color.Black, | |
| val normalStepsLineHeight: Dp = 8.dp, | |
| val fiveStepsLineHeight: Dp = 16.dp, | |
| val stepsTextStyle: TextStyle = TextStyle(), | |
| val stepsLabelTopPadding: Dp = 12.dp, | |
| ) | |
| data class ClockStyle( | |
| val secondsDialStyle: DialStyle = DialStyle(), | |
| ) | |
| @OptIn(ExperimentalTextApi::class) | |
| @Composable | |
| fun Clock( | |
| modifier: Modifier = Modifier.size(320.dp), | |
| clockStyle: ClockStyle = ClockStyle() | |
| ) { | |
| val textMeasurer = rememberTextMeasurer() | |
| var minuteRotation by remember { mutableStateOf(0f) } | |
| var secondRotation by remember { mutableStateOf(0f) } | |
| //secondRotation is updated by 6 degree clockwise every one second | |
| //here rotation is in negative, in order to get clockwise rotation | |
| LaunchedEffect(key1 = true) { | |
| while (true) { | |
| //in-order to get smooth transition we are updating rotation angle every 16ms | |
| //1000ms -> 6 degree | |
| //16ms -> 0.096 | |
| delay(16) | |
| secondRotation -= 0.096f | |
| } | |
| } | |
| //minuteRotation is updated by 0.1 degree clockwise every one second | |
| //here rotation is in negative, in order to get clockwise rotation | |
| LaunchedEffect(key1 = true) { | |
| while (true) { | |
| delay(1000) | |
| minuteRotation -= 0.1f | |
| } | |
| } | |
| Canvas( | |
| modifier = modifier | |
| ) { | |
| val outerRadius = minOf(this.size.width, this.size.height) / 2f | |
| val innerRadius = outerRadius - 60.dp.toPx() | |
| //Seconds Dial | |
| dial( | |
| radius = outerRadius, | |
| rotation = secondRotation, | |
| textMeasurer = textMeasurer, | |
| dialStyle = clockStyle.secondsDialStyle | |
| ) | |
| //Minute Dial | |
| dial( | |
| radius = innerRadius, | |
| rotation = minuteRotation, | |
| textMeasurer = textMeasurer, | |
| dialStyle = clockStyle.minutesDialStyle | |
| ) | |
| } | |
| } | |
| @OptIn(ExperimentalTextApi::class) | |
| fun DrawScope.dial( | |
| radius: Float, | |
| rotation: Float, | |
| textMeasurer: TextMeasurer, | |
| dialStyle: DialStyle = DialStyle() | |
| ) { | |
| var stepsAngle = 0 | |
| //this will draw 60 steps | |
| repeat(60) { steps -> | |
| //fiveStep lineHeight > normalStep lineHeight | |
| val stepsHeight = if (steps % 5 == 0) { | |
| dialStyle.fiveStepsLineHeight.toPx() | |
| } else { | |
| dialStyle.normalStepsLineHeight.toPx() | |
| } | |
| //calculate steps, start and end offset | |
| val stepsStartOffset = Offset( | |
| x = center.x + (radius * cos((stepsAngle + rotation) * (Math.PI / 180f))).toFloat(), | |
| y = center.y - (radius * sin((stepsAngle + rotation) * (Math.PI / 180))).toFloat() | |
| ) | |
| val stepsEndOffset = Offset( | |
| x = center.x + (radius - stepsHeight) * cos( | |
| (stepsAngle + rotation) * (Math.PI / 180) | |
| ).toFloat(), | |
| y = center.y - (radius - stepsHeight) * sin( | |
| (stepsAngle + rotation) * (Math.PI / 180) | |
| ).toFloat() | |
| ) | |
| //draw step | |
| drawLine( | |
| color = dialStyle.stepsColor, | |
| start = stepsStartOffset, | |
| end = stepsEndOffset, | |
| strokeWidth = dialStyle.stepsWidth.toPx(), | |
| cap = StrokeCap.Round | |
| ) | |
| //draw steps labels | |
| if (steps % 5 == 0) { | |
| //measure the given label width and height | |
| val stepsLabel = String.format("%02d", steps) | |
| val stepsLabelTextLayout = textMeasurer.measure( | |
| text = buildAnnotatedString { append(stepsLabel) }, | |
| style = dialStyle.stepsTextStyle | |
| ) | |
| //calculate the offset | |
| val stepsLabelOffset = Offset( | |
| x = center.x + (radius - stepsHeight - dialStyle.stepsLabelTopPadding.toPx()) * cos( | |
| (stepsAngle + rotation) * (Math.PI / 180) | |
| ).toFloat(), | |
| y = center.y - (radius - stepsHeight - dialStyle.stepsLabelTopPadding.toPx()) * sin( | |
| (stepsAngle + rotation) * (Math.PI / 180) | |
| ).toFloat() | |
| ) | |
| //subtract the label width and height to position label at the center of the step | |
| val stepsLabelTopLeft = Offset( | |
| stepsLabelOffset.x - ((stepsLabelTextLayout.size.width) / 2f), | |
| stepsLabelOffset.y - (stepsLabelTextLayout.size.height / 2f) | |
| ) | |
| drawText( | |
| textMeasurer = textMeasurer, | |
| text = stepsLabel, | |
| topLeft = stepsLabelTopLeft, | |
| style = dialStyle.stepsTextStyle | |
| ) | |
| } | |
| stepsAngle += 6 | |
| } | |
| } |
3. Drawing Hour Label
- To draw the overlay, we will utilize the path functions lineTo and cubicTo, which allow us to create rounded corners.
- When drawing the rounded corners, we need to consider the width of the minute and second labels, as well as the step size.
hour label
| //draw hour | |
| val hourString = String.format("%02d", hour) | |
| val hourTextMeasureOutput = textMeasurer.measure( | |
| text = buildAnnotatedString { append(hourString) }, | |
| style = clockStyle.hourLabelStyle | |
| ) | |
| val hourTopLeft = Offset( | |
| x = this.center.x - (hourTextMeasureOutput.size.width / 2), | |
| y = this.center.y - (hourTextMeasureOutput.size.height / 2) | |
| ) | |
| drawText( | |
| textMeasurer = textMeasurer, | |
| text = hourString, | |
| topLeft = hourTopLeft, | |
| style = clockStyle.hourLabelStyle | |
| ) |
3. Drawing the Minute-Second Overlay
- To draw the overlay, we will utilize the path functions lineTo and cubicTo, which allow us to create rounded corners.
- When drawing the rounded corners, we need to consider the width of the minute and second labels, as well as the step size.
| //drawing minute-second overlay | |
| val minuteHandOverlayPath = Path().apply { | |
| val startOffset = Offset( | |
| x = center.x + (outerRadius * cos(8f * Math.PI / 180f)).toFloat(), | |
| y = center.y - (outerRadius * sin(8f * Math.PI / 180f)).toFloat(), | |
| ) | |
| val endOffset = Offset( | |
| x = center.x + (outerRadius * cos(-8f * Math.PI / 180f)).toFloat(), | |
| y = center.y - (outerRadius * sin(-8f * Math.PI / 180f)).toFloat(), | |
| ) | |
| val overlayRadius = (endOffset.y - startOffset.y) / 2f | |
| val secondsLabelMaxWidth = textMeasurer.measure( | |
| text = buildAnnotatedString { append("60") }, | |
| style = clockStyle.secondsDialStyle.stepsTextStyle | |
| ).size.width | |
| val minutesLabelMaxWidth = textMeasurer.measure( | |
| text = buildAnnotatedString { append("60") }, | |
| style = clockStyle.minutesDialStyle.stepsTextStyle | |
| ).size.width | |
| val overlayLineX = | |
| size.width - clockStyle.secondsDialStyle.fiveStepsLineHeight.toPx() - clockStyle.secondsDialStyle.stepsLabelTopPadding.toPx() - secondsLabelMaxWidth - clockStyle.minutesDialStyle.fiveStepsLineHeight.toPx() - clockStyle.minutesDialStyle.stepsLabelTopPadding.toPx() - (minutesLabelMaxWidth /2f) | |
| moveTo(x = startOffset.x, y = startOffset.y) | |
| lineTo(x = overlayLineX, y = startOffset.y) | |
| cubicTo( | |
| x1 = overlayLineX - overlayRadius, | |
| y1 = startOffset.y, | |
| x2 = overlayLineX - overlayRadius, | |
| y2 = endOffset.y, | |
| x3 = overlayLineX, | |
| y3 = endOffset.y | |
| ) | |
| lineTo(endOffset.x, endOffset.y) | |
| } | |
| drawPath( | |
| path = minuteHandOverlayPath, | |
| color = clockStyle.overlayStrokeColor, | |
| style = Stroke(width = clockStyle.overlayStrokeWidth.toPx(),) | |
| ) |
You can customize the clockStyle to update the labels fontFamily, size and colour according to your preference.

If you have any questions, suggestions, or ideas for improvement, please feel free to leave a comment. If you found the article helpful, don’t forget to clap and follow.
Thank You
This article was previously published on proandroiddev.com


