

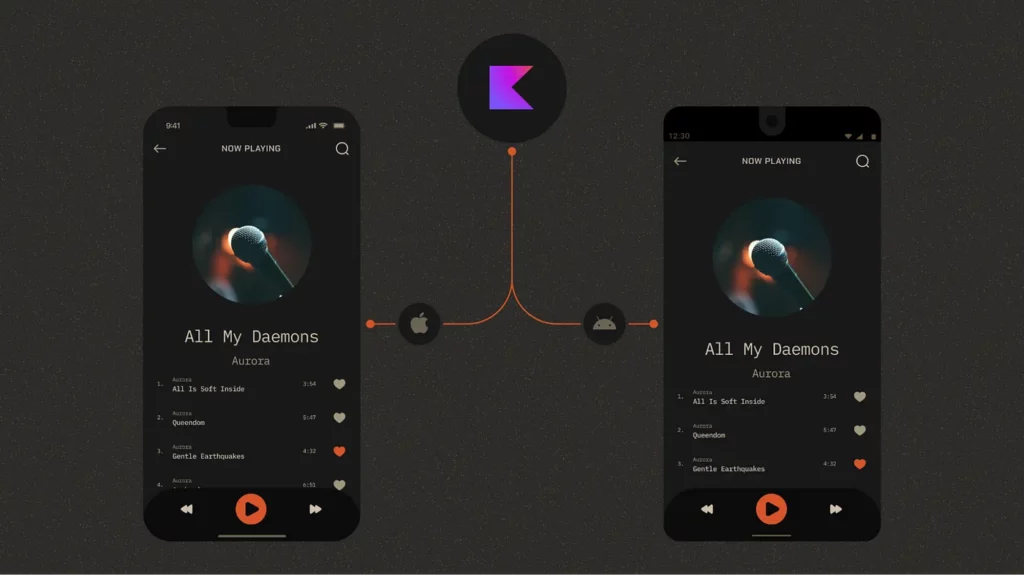
JetBrains and outside open-source contributors have been diligently working on Compose Multiplatform for several years and recently released an alpha version for iOS. Naturally, we were curious to test its functionality, so we decided to experiment by trying to run our Dribbble replication music app on iOS using the framework and seeing what challenges might arise.
Compose Multiplatform for desktop and iOS taps into the capabilities of Skia, an open-source 2D graphics library that is widely used across different platforms. Widely adopted software like Google Chrome, ChromeOS, and Mozilla Firefox are powered by Skia, along with JetPack Compose and Flutter.
Compose Multiplatform Architecture
To understand the Compose Multiplatform approach, we first looked into the overview from JetBrains itself, that includes Kotlin Multiplatform Mobile (KMM) as well.
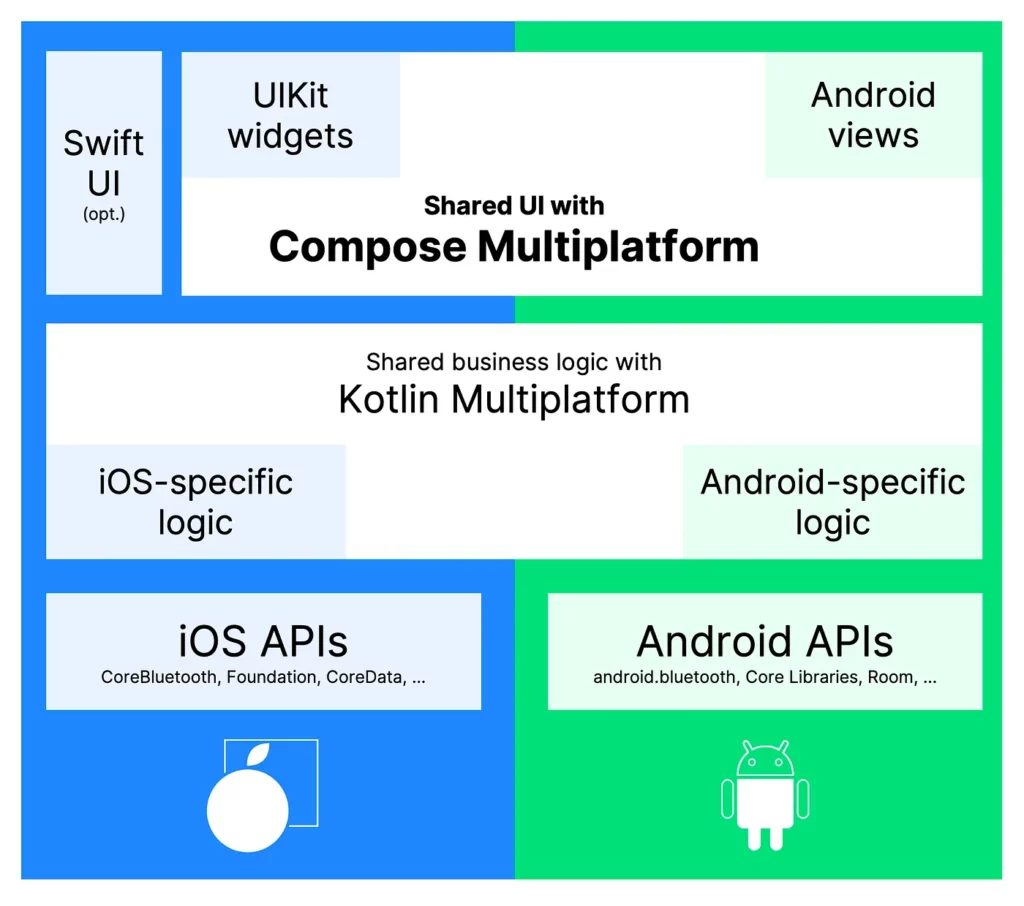
As you can see in the diagram, the general approach of Kotlin Multiplatform includes:
- Code for iOS-specific APIs like Bluetooth, CodeData etc.
- Shared code for business logic
- UI on the iOS side.
Compose Multiplatform introduced the ability of sharing not only the business logic code, but also the UI code. You have a choice to use native iOS UI frameworks (UIKit or SwiftUI), or embed iOS code directly into Compose. We wanted to see how our complex native Android UI would work on iOS, so we chose to limit native iOS UI code to the minimum. Currently you can only use Swift code for platform-specific APIs, and for platform-specific UI, all other code you can share with the Android app using Kotlin and Jetpack Compose.
The general approach of Kotlin Multiplatform, as shown in the diagram, can include:
- Writing code specifically for iOS APIs like Bluetooth and CodeData.
- Creating shared code for business logic written in Kotlin.
- Creating UI on the iOS side.
Compose Multiplatform has extended the capabilities for sharing code, so now you can share not only business logic but also the UI. You can still use SwiftUI for the UI or embed UIKit directly into Compose, which we will discuss below. With this new development, you can use Swift code only for platform-specific APIs, platform-specific UI and share all other code with the Android app using Kotlin and Jetpack Compose. Let’s delve into the preparation needed for startup.
Prerequisites for running on iOS
The best place to find instructions for iOS set up is the official doc itself. To summary it here, this is what you need to start:
Additionally, there is a template available in the Jetbrains repository, which can help with the multiple Gradle setups present.
Project Structure
Once you’ve set up the base project, you will see three primary directories:
androidAppiosAppshared
androidApp and shared are modules because they are related to Android and built with build.gradle. The iosApp is the directory of the actual ios application, which you can open via Xcode. The androidApp module is just an entry point for the Android application. The code below is familiar to anyone who ever developed for Android.
class MainActivity : AppCompatActivity() {
    override fun onCreate(savedInstanceState: Bundle?) {
        super.onCreate(savedInstanceState)
        setContent {
            MainView()
        }
    }
}
iosApp is the entry point for the iOS application with some boilerplate SwiftUI code:
import SwiftUI

@main
struct iOSApp: App {
 var body: some Scene {
  WindowGroup {
   ContentView()
  }
 }
}
As this is the entry point, you should implement the top-level changes here — for example we add the ignoresSafeArea modifier to show the application in fullscreen:
struct ComposeView: UIViewControllerRepresentable {
    func makeUIViewController(context: Context) -> UIViewController {
        return Main_iosKt.MainViewController()
    }
    func updateUIViewController(_ uiViewController: UIViewController, context: Context) {}
}

struct ContentView: View {
    var body: some View {
        ComposeView()
            .ignoresSafeArea(.all)
    }
}
The code above already lets you run your Android application on iOS. Here your ComposeUIViewController is wrapped inside a UIKit UIViewController and presented to the user. MainViewController() is located in the Kotlin file main.ios.kt, and App() contains the Composable application code.
fun MainViewController() = ComposeUIViewController { App()}
Here’s another example from JetBrains.
In case you need some platform specific functionality, you can embed UIKit in your Compose code with UIKitView. Here is an example with a map view from Jetbrains. Using UIKit is very similar to using AndroidView inside Compose, in case you are already familiar with that concept.
The shared module is the most important one of the three. Essentially, this Kotlin module contains shared logic for both Android and iOS implementations, facilitating the use of the same codebase across both platforms. Within the shared module, you’ll find three directories, each serving its own purpose: commonMain, androidMain, and iosMain. This a point of confusion – in fact, the code that is actually shared lies inside the commonMain directory. The other two directories are for writing platform-specific Kotlin code that will either behave or look differently on Android or iOS. This is done by writing an expect fun inside of the commonMain code, and implementing it using actualFun in the corresponding platform directory.
Migration
When starting the migration, we were sure we’d run into some issues that would require specific fixes. Even though the application we chose to migrate is very light on logic (it’s basically only UI, animations and transitions), we ran into quite a number of hurdles as expected. Here are some you might encounter yourself during the migration.
Resources
The first thing we had to deal with was the use of resources. There is no dynamically generated class R, which is specific to Android only. Instead you have to put a resource in the resources directory, and you need to specify the path as a string. Example for an image:
import org.jetbrains.compose.resources.painterResource

Image(
    painter = painterResource(“image.webp”),
    contentDescription = "",
)
When implementing resources in this way, you might get a runtime crash, instead of a compile-time crash due to an incorrectly named resource.
Moreover, if you refer to Android resources in your xml files, you also need to get rid of links to the android platform:
<vector xmlns:android="http://schemas.android.com/apk/res/android"
    android:width="24dp"
    android:height="24dp"
-   android:tint="?attr/colorControlNormal"
+   android:tint="#000000"
    android:viewportWidth="24"
    android:viewportHeight="24">
-   <path android:fillColor="@android:color/white"
+   <path android:fillColor="#000000"
        android:pathData="M9.31,6.71c-0.39,0.39 -0.39,1.02 0,1.41L13.19,12l-3.88" />
</vector>
Fonts
There is no way to use the standard font-loading techniques you would use on iOS and Android in Compose Multiplatform at the time of writing this article. As far as we could see, Jetbrains suggests loading fonts using byteArray, as in the iOS code below:
private val cache: MutableMap<String, Font> = mutableMapOf()

@OptIn(ExperimentalResourceApi::class)
@Composable
actual fun font(name: String, res: String, weight: FontWeight, style: FontStyle): Font {
    return cache.getOrPut(res) {
        val byteArray = runBlocking {
            resource("font/$res.ttf").readBytes()
        }
        androidx.compose.ui.text.platform.Font(res, byteArray, weight, style)
    }
}
However, we don’t like the asynchronous approach, or the fact that runBlocking is used, which will block the main UI thread during execution. So on Android, we decided to use a more common approach with an integer identifier:
@Composable
actual fun font(name: String, res: String, weight: FontWeight, style: FontStyle): Font {
    val context = LocalContext.current
    val id = context.resources.getIdentifier(res, "font", context.packageName)
    return Font(id, weight, style)
}
We can create a Fonts object and use it when needed for convenience.
object Fonts {
    @Composable
    fun abrilFontFamily() = FontFamily(
        font(
            "Abril",
            "abril_fatface",
            FontWeight.Normal,
            FontStyle.Normal
        ),
    )
}
Replacing Java with Kotlin

It’s not possible to use Java in the code, because Compose Multiplatform uses a Kotlin compiler plugin. Therefore we need to rewrite the parts where Java code is used. For example, in our app a Time formatter converts the music track time in seconds to a more convenient format in minutes. We had to give up using java.util.concurrent.TimeUnit, but it turned out good, because it gave us a chance to refactor the code and write it more elegantly.
fun format(playbackTimeSeconds: Long): String {
-   val minutes = TimeUnit.SECONDS.toMinutes(playbackTimeSeconds)
+   val minutes = playbackTimeSeconds / 60
-   val seconds = if (playbackTimeSeconds < 60) {
-       playbackTimeSeconds
-   } else {
-       (playbackTimeSeconds - TimeUnit.MINUTES.toSeconds(minutes))
-   }
+   val seconds = playbackTimeSeconds % 60
    return buildString {
        if (minutes < 10) append(0)
        append(minutes)
        append(":")
        if (seconds < 10) append(0)
        append(seconds)
    }
}
Native Canvas
Sometimes, we use the Android Native canvas to create drawings. However, in Compose Multiplatform, we don’t have access to the Android native canvas in common code, and the code has to be adapted accordingly. For instance, we had an animated title text that was relying on the measureText(letter) function from the native canvas to enable letter-by-letter animation. We had to find an alternative approach for this functionality, so we rewrote it with a Compose canvas, and used TextMeasurer instead of Paint.measureText(letter)
fun format(playbackTimeSeconds: Long): String {
-   val minutes = TimeUnit.SECONDS.toMinutes(playbackTimeSeconds)
+   val minutes = playbackTimeSeconds / 60
-   val seconds = if (playbackTimeSeconds < 60) {
-       playbackTimeSeconds
-   } else {
-       (playbackTimeSeconds - TimeUnit.MINUTES.toSeconds(minutes))
-   }
+   val seconds = playbackTimeSeconds % 60
    return buildString {
        if (minutes < 10) append(0)
        append(minutes)
        append(":")
        if (seconds < 10) append(0)
        append(seconds)
    }
}

alphabet.forEach { letter ->
-   sizeMap[letter] = textPaint.measureText(letter.toString())
+   sizeMap[letter] = textMeasurer.measure(
+       text = AnnotatedString(
+           text = letter.toString(),
+           spanStyle = spanStyle
+       )
+   ).size.width
}
The drawText method also relied on native canvas and had to be rewritten:
-it.nativeCanvas.drawText(
-    text,
-    0,
-    lastIndex,
-    0f,
-    height / 2f + textOffset,
-    textPaint
-)
+drawText(
+    textLayoutResult = textMeasurer.measure(
+        text = annotatedString.subSequence(0, lastIndex)
+    ),
+    topLeft = Offset(0f, baseOffset),
+    color = textColor
+)
Gestures
On Android, the BackHandler is always available – it handles back gestures or back button presses depending on the navigation mode that is available for the device. But this approach won’t work with Compose Multiplatform, because BackHandler is a part of the Android source set. Instead let’s use expect fun:
@Composable
expect fun BackHandler(isEnabled: Boolean, onBack: ()-> Unit)

//Android implementation
@Composable
actual fun BackHandler(isEnabled: Boolean, onBack: () -> Unit) {
  BackHandler(isEnabled, onBack)
}
There are many different approaches that can be proposed to achieve the desired result in iOS. For example, you can write your own back gesture in Compose, or if you have multiple screens in the app, you can wrap each in a separate UIViewController, and use native iOS navigation with UINavigationController that includes default gestures.
We chose an implementation that handles the backward gesture on the iOS side without wrapping separate screens in corresponding controllers (because the transitions between the views in our app are heavily customized). This is a good demonstration of how to link these two languages. First of all, we add a native iOS SwipeGestureViewController to detect gestures, and handlers for the gesture events. Full iOS implementation you can see here
struct SwipeGestureViewController: UIViewControllerRepresentable {
    var onSwipe: () -> Void

    func makeUIViewController(context: Context) -> UIViewController {
        let viewController = Main_iosKt.MainViewController()
        let containerController = ContainerViewController(child: viewController) {
            context.coordinator.startPoint = $0
        }

        let swipeGestureRecognizer = UISwipeGestureRecognizer(
            target:
                context.coordinator, action: #selector(Coordinator.handleSwipe)
        )
        swipeGestureRecognizer.direction = .right
        swipeGestureRecognizer.numberOfTouchesRequired = 1
        containerController.view.addGestureRecognizer(swipeGestureRecognizer)
        return containerController
    }

    func updateUIViewController(_ uiViewController: UIViewController, context: Context) {}

    func makeCoordinator() -> Coordinator {
        Coordinator(onSwipe: onSwipe)
    }

    class Coordinator: NSObject, UIGestureRecognizerDelegate {
        var onSwipe: () -> Void
        var startPoint: CGPoint?

        init(onSwipe: @escaping () -> Void) {
            self.onSwipe = onSwipe
        }

        @objc func handleSwipe(_ gesture: UISwipeGestureRecognizer) {
            if gesture.state == .ended, let startPoint = startPoint, startPoint.x < 50 {
                onSwipe()
            }
        }

        func gestureRecognizer(_ gestureRecognizer: UIGestureRecognizer, shouldRecognizeSimultaneouslyWith otherGestureRecognizer: UIGestureRecognizer) -> Bool {
            true
        }
    }
}
After that we create a corresponding function in the main.ios.kt file:
fun onBackGesture() {
    store.send(Action.OnBackPressed)
}
We can call this function in Swift like this:
public func onBackGesture() {
    Main_iosKt.onBackGesture()
}
We implement a store that collects actions.
interface Store {
    fun send(action: Action)
    val events: SharedFlow<Action>
}

fun CoroutineScope.createStore(): Store {
    val events = MutableSharedFlow<Action>()

    return object : Store {
        override fun send(action: Action) {
            launch {
                events.emit(action)
            }
        }
        override val events: SharedFlow<Action> = events.asSharedFlow()
    }
}
This store accumulates actions using store.events.collect:
@Composable
actual fun BackHandler(isEnabled: Boolean, onBack: () -> Unit) {
    LaunchedEffect(isEnabled) {
        store.events.collect {
            if(isEnabled) {
                onBack()
            }
        }
    }
}
This helps bridge the difference in gesture handling on the two platforms, and make the iOS app feel native and intuitive for back navigation.
Minor bugs
In some cases, you may encounter minor issues such as these: on the iOS platform, an item scrolls up to become visible when tapped on. You can compare the expected behavior (Android) with the faulty iOS behavior below:
That happens becauseModifier.clickable makes an item focused when it’s tapped, which in turn activates the “bringIntoView” scroll mechanism. Focus management is different on Android and iOS, which causes this different behavior. We fixed this by adding a .focusProperties { canFocus = false } modifier to the item.
Finally
Compose Multiplatform is the next stage in the development of Multiplatform for the Kotlin language after KMM. This technology provides even more opportunities for code sharing — not only business logic, but UI components as well. Although there is a possibility to combine Compose and SwiftUI in your multiplatform application, at the moment it doesn’t look very straightforward.
You should think about whether your application has business logic, UI or functional capabilities that could benefit from code sharing across multiple platforms. If your application requires a lot of platform-specific features, KMM and Compose Multiplatform may not be the best choice. The repo contains the full implementation. You also can check out the existing libraries to be more aware of current KMM capabilities.
As for us, we are impressed and think that Compose Multiplatform could be used in our actual projects, once a stable version is released. It’s best suited to UI-heavy applications without a ton of hardware-specific features. It might be a viable alternative to both Flutter and native development, but time will tell. Meanwhile we’ll continue focusing on native development — check out our iOS and Android articles!


