

Exploring, Mapping, and Creating in the Digital Cartography Realm
 Sourced from Cool Material
Introduction
Jetpack Compose is a modern toolkit for building native Android UI. It’s declarative, meaning you describe what your UI should look like, rather than how to make it.
This makes it easier to write and maintain code, and it also makes it easier to create beautiful and engaging UIs. Google Maps is a powerful API that allows you to add maps to your Android apps. It provides a variety of features, such as the ability to display maps, add markers, and track user movement.
In this article, we will show you how to use Jetpack Compose and Google Maps together to create amazing Android apps. We will cover a wide range of topics, from integrating the two to customizing your maps.
Integrating Jetpack Compose and Google Maps
1. Adding the Compose Maps Library
To add the Maps Compose library to your project, you need to add the following dependency to your build.gradle file —
dependencies {
    implementation("com.google.maps.android:maps-compose:<VERSION_HERE>")
}

//Add the API KEY to the manifest
<application>
<meta-data android:name="com.google.android.geo.API_KEY"
           android:value="YOUR_KEY_HERE"/>
...
</application>
For production purposes and keeping the key more secure refer this link.
2. Creating a Map Composable
To create a map composable, you can use the GoogleMap composable function. This function takes the camera position state as a parameter which can be built using the CameraPosition.fromLatLngZoom() function.
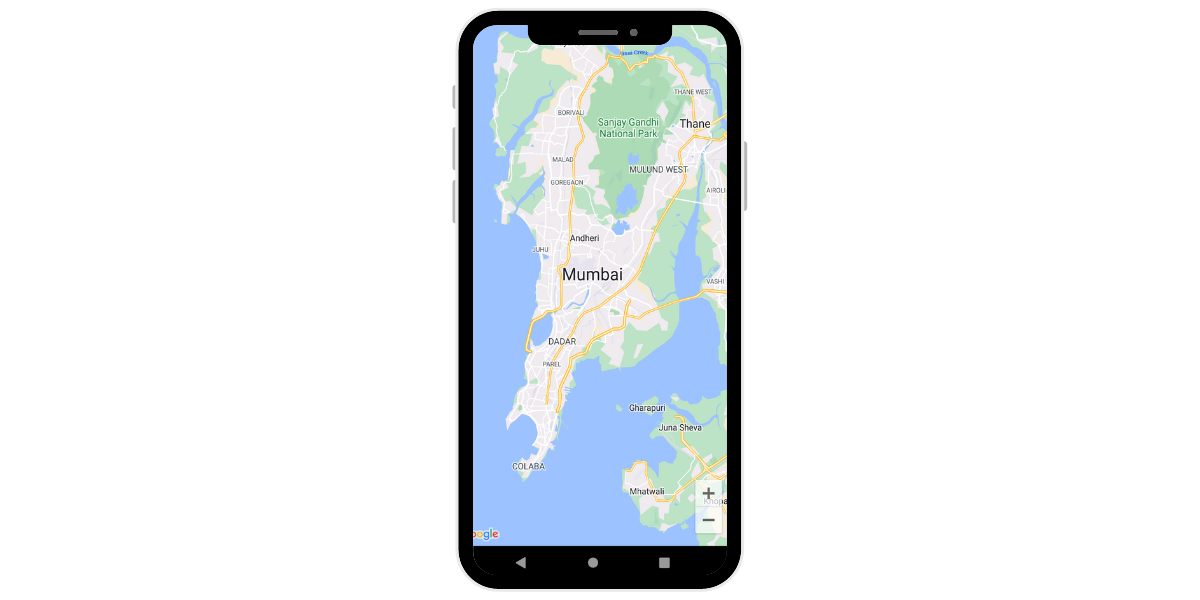
Basic Map Composable
@Composable
fun MapScreen() {
    val mumbai = LatLng(19.0760, 72.8777)
    val cameraPositionState = rememberCameraPositionState {
        position = CameraPosition.fromLatLngZoom(mumbai, 11f)
    }
    GoogleMap(
        modifier = Modifier.fillMaxSize(),
        cameraPositionState = cameraPositionState
    )
}
Exploring Map Features
Now that you’ve set up the basic Google Map in your Jetpack Compose project, it’s time to dive into some exciting map features and customizations. In this section, we’ll explore how to enhance your map by customizing its appearance, adding markers to specific locations, and making those markers interactive.
1. Customizing Map Controls / Properties
In the following code snippet, we demonstrate how to customize the user interface and controls of your Google Map. You can control various aspects of the map’s appearance and behavior. For instance, you can enable or disable zoom controls, change the map type (e.g., satellite view), and more.

Switchable Properties (Zoom Controls and Map Type)
@Composable
fun MapWithSwitchableProperties() {
    val mumbai = LatLng(19.0760, 72.8777)
    val cameraPositionState = rememberCameraPositionState {
        position = CameraPosition.fromLatLngZoom(mumbai, 11f)
    }

    var uiSettings by remember { mutableStateOf(MapUiSettings(zoomControlsEnabled = true)) }
    var properties by remember {
        mutableStateOf(MapProperties(mapType = MapType.TERRAIN))
    }

    Box(Modifier.fillMaxSize()) {
        GoogleMap(
            modifier = Modifier.matchParentSize(),
            cameraPositionState = cameraPositionState,
            properties = properties,
            uiSettings = uiSettings
        )
        Switch(
            modifier = Modifier
                .align(Alignment.BottomCenter)
                .padding(vertical = 16.dp),
            checked = uiSettings.zoomControlsEnabled,
            onCheckedChange = {
                uiSettings = uiSettings.copy(zoomControlsEnabled = it)
                properties = if (it) {
                    properties.copy(mapType = MapType.TERRAIN)
                } else {
                    properties.copy(mapType = MapType.SATELLITE)
                }
            }
        )
    }
}
Explaination —
- Initially centers the map on Mumbai with zoom controls enabled and a terrain map type.
- The switch allows users to toggle zoom controls and switch between terrain and satellite map types.
- When the switch state changes, it dynamically updates the map’s settings.
2. Adding Markers
Markers are an essential feature for pinpointing specific locations on the map. You can use them to highlight points of interest, businesses, or any location you want to draw attention to. Let’s explore how to add markers to your map.
a) Adding Simple Markers —
The code below showcases the addition of basic markers to your map. Each marker represents a different location, such as Sydney and Tokyo.
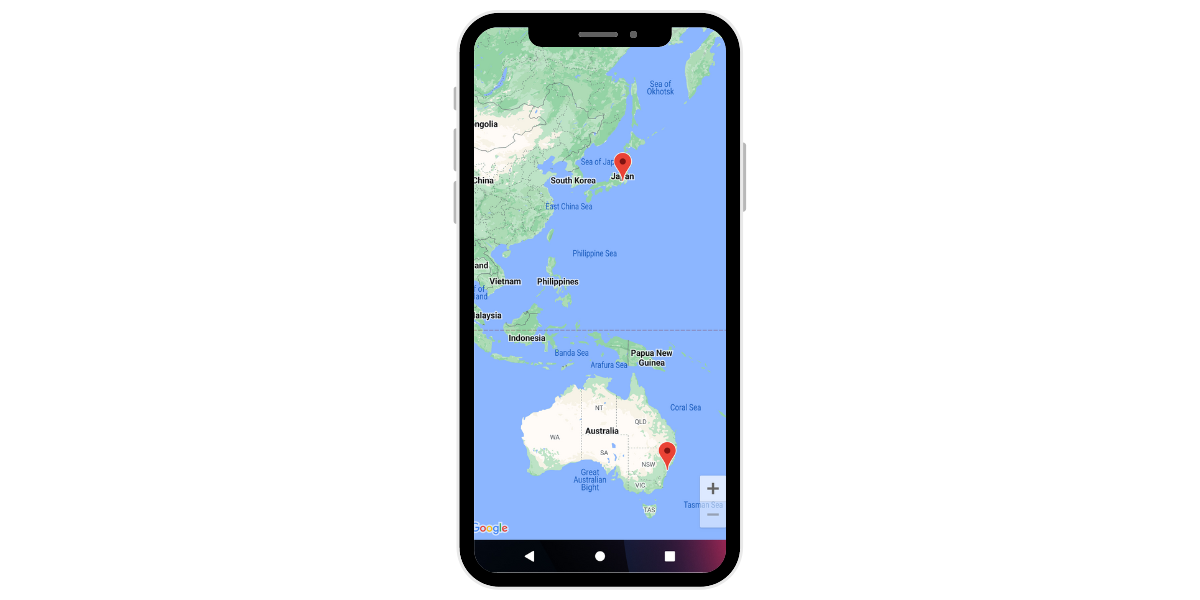
Simple Markers (Tokyo and Sydney)
@Composable
fun MapScreenWithMarker() {
    // change color of the marker
    // implement onClick with popup composable

    val philipineSea = LatLng(20.302039, 134.2082661)
    val cameraPositionState = rememberCameraPositionState {
        position = CameraPosition.fromLatLngZoom(philipineSea, 2f)
    }
    GoogleMap(
        modifier = Modifier.fillMaxSize(),
        cameraPositionState = cameraPositionState
    ) {
        Marker(
            state = MarkerState(position = LatLng(-34.0, 151.0)),
            title = "Marker in Sydney"
        )
        Marker(
            state = MarkerState(position = LatLng(35.66, 139.6)),
            title = "Marker in Tokyo"
        )
    }
}
b) Adding Custom Markers —
We can even have custom icons for markers. Here, a custom marker is placed over the Philippines, using an icon resembling a star.

Custom Marker on Philippines (Star)
OUR VIDEO RECOMMENDATION


Jobs
@Composable
fun MapScreenWithCustomMarker() {
    val philipineSea = LatLng(20.302039, 134.2082661)
    val cameraPositionState = rememberCameraPositionState {
        position = CameraPosition.fromLatLngZoom(philipineSea, 2f)
    }
    GoogleMap(
        modifier = Modifier.fillMaxSize(),
        cameraPositionState = cameraPositionState
    ) {
        Marker(
            state = MarkerState(position = LatLng(-34.0, 151.0)),
            title = "Marker in Sydney"
        )
        Marker(
            state = MarkerState(position = LatLng(35.66, 139.6)),
            title = "Marker in Tokyo"
        )
        MarkerComposable(
            state = MarkerState(position = LatLng(11.6600892, 117.3276336)),
        ) {
            Icon(
                imageVector = Icons.Filled.Star,
                contentDescription = "Philippines",
                tint = Color.Blue,
                modifier = Modifier.size(64.dp)
            )
        }
    }
}
c) Custom Photo Markers —
Custom photo markers can add an appealing touch to your map. In this snippet, we take it a step further by fetching images from Unsplash and using them as custom markers. This feature can be particularly engaging for users and can make your map application stand out.
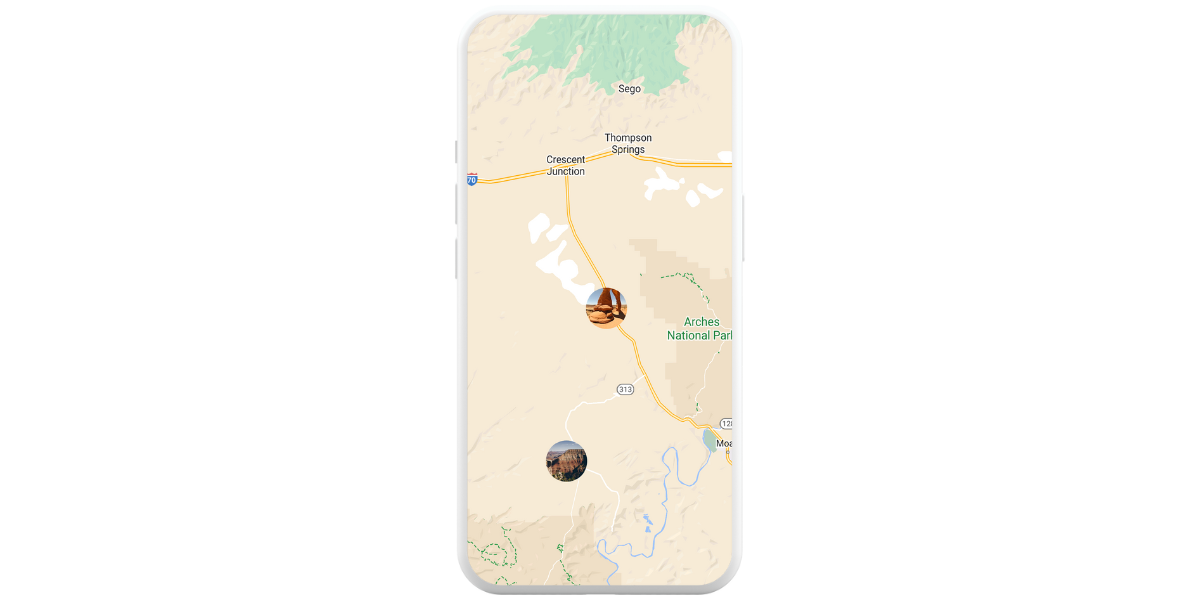
Custom Photo Markers (Arches and Canyonlands)
@Composable
fun MapScreenWithPhotoMarkers() {
    val center = LatLng(38.7319874, -109.7504477)
    val cameraPositionState = rememberCameraPositionState {
        position = CameraPosition.fromLatLngZoom(center, 10f)
    }

    val arches = MarkerState(position = LatLng(38.7319874, -109.7504477))
    val canyonLands = MarkerState(position = LatLng(38.5348271, -109.816405))


    val archesIconState = remember { mutableStateOf<BitmapDescriptor?>(null) }
    val canyonIconState = remember { mutableStateOf<BitmapDescriptor?>(null) }


    val context = LocalContext.current

    LaunchedEffect(key1 = Unit, block = {
        archesIconState.value = loadBitmapDescriptorFromUrl(
            context,
            "https://source.unsplash.com/random/128x128/?arches%20national%20park"
        )
        canyonIconState.value = loadBitmapDescriptorFromUrl(
            context,
            "https://source.unsplash.com/random/128x128/?canyon%20national%20park"
        )
    })

    GoogleMap(
        modifier = Modifier.fillMaxSize(),
        cameraPositionState = cameraPositionState
    ) {
        archesIconState.value?.let {
            Marker(state = arches, icon = it)
        }

        canyonIconState.value?.let {
            Marker(state = canyonLands, icon = it)
        }
    }
}
Key Points —
- Setting Up the Map: We create a Google Map with a specific center point (
center) and initial zoom level using therememberCameraPositionStatefunction. - Defining Marker States: We define two
MarkerStateinstances,archesandcanyonLands, to represent the positions where we want to place markers on the map. - Loading Custom Marker Icons: To add custom marker icons, we use
BitmapDescriptorobjects. We use therememberandLaunchedEffectcombination to asynchronously load custom marker icons from URLs using theloadBitmapDescriptorFromUrlfunction. In this case, we load images from Unsplash that are related to Arches National Park and Canyonlands National Park. - Displaying Custom Markers: Within the
GoogleMapcomposable, we use the loadedBitmapDescriptorobjects to set custom icons for the markers. We add the markers to the map when the state changes and the custom marker images are successfully loaded (archesIconState.valueandcanyonIconState.valueare not null). This ensures that the markers appear on the map once the images are ready, creating a seamless user experience.
Note — You can refer the gist for the custom function to get the bitmap descriptor from a url.
3. Interactivity with Info Window
While markers provide information at a glance, interactivity enhances the user experience. Let’s explore how to make markers interactive and display additional information when users interact with them.

Marker Info Window Example
@Composable
fun MapScreenWithMarkerInfoWindow() {
    val philipineSea = LatLng(20.302039, 134.2082661)

    val cameraPositionState = rememberCameraPositionState {
        position = CameraPosition.fromLatLngZoom(philipineSea, 2f)
    }

    val markerState = MarkerState(LatLng(14.5892056, 120.9646546))

    GoogleMap(
        modifier = Modifier.fillMaxSize(),
        cameraPositionState = cameraPositionState
    ) {
        MarkerInfoWindow(
            state = markerState,
            icon = bitmapDescriptorFromVector(LocalContext.current, R.drawable.baseline_location_city_24)
        ) {
            Column(
                horizontalAlignment = Alignment.CenterHorizontally,
                verticalArrangement = Arrangement.Center,
                modifier = Modifier
                    .border(
                        BorderStroke(1.dp, Color.Black),
                        RoundedCornerShape(10)
                    )
                    .clip(RoundedCornerShape(10))
                    .background(Color.Red)
                    .padding(20.dp)
            ) {
                Icon(
                    Icons.Filled.Info,
                    contentDescription = null,
                    modifier = Modifier.size(36.dp)
                )
                Text("Manila", fontWeight = FontWeight.Bold)
                Text("Capital of the Philippines", fontWeight = FontWeight.Medium)
            }
        }
    }
}
In this snippet, we use MarkerInfoWindow that pops up when a marker is clicked. This window can have be it’s own composable containing anything you wish to add and design it same way you would a normal composable. You can even customize them to include images, descriptions, and interactive elements, providing a rich user experience.
4. Adding Polylines
This code showcases how to build an interactive route map, allowing users to explore the specified route within your app. You can extend it to have more routes.
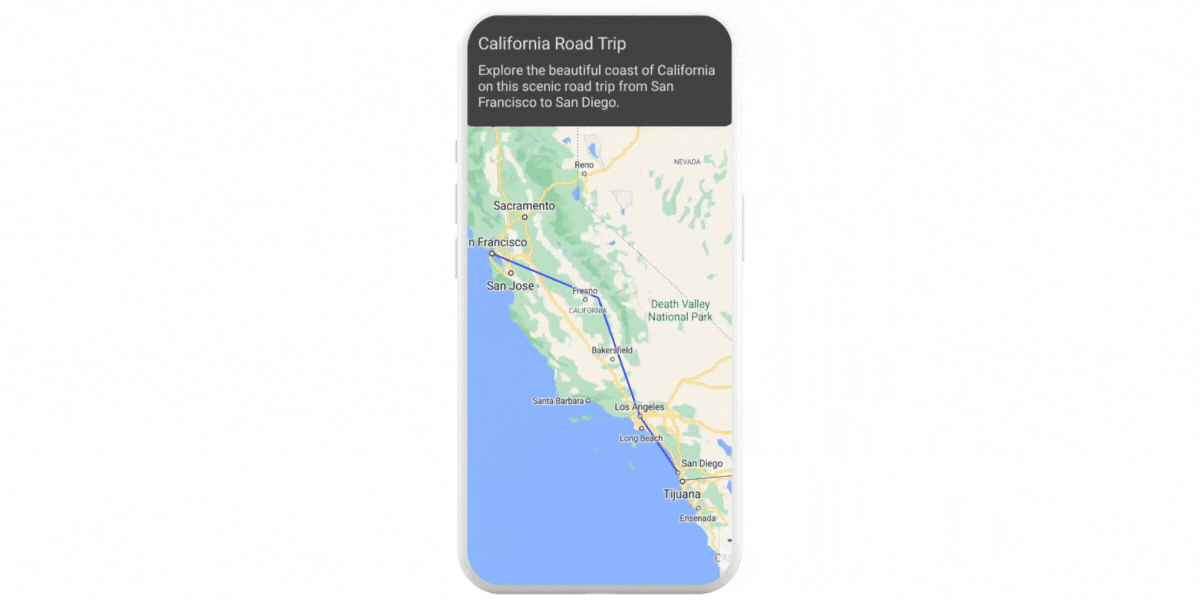
Polyline Example
@Composable
fun RouteMap() {
    // Define the coordinates for a route as a list of LatLng points
    val routeCoordinates = listOf(
        LatLng(37.7749, -122.4194), // Starting point (e.g., San Francisco)
        LatLng(36.7783, -119.4179), // Waypoint 1
        LatLng(34.0522, -118.2437), // Waypoint 2 (e.g., Los Angeles)
        LatLng(32.7157, -117.1611)  // Ending point (e.g., San Diego)
    )

    // Create a mutable state to track the selected route
    var selectedRoute by remember { mutableStateOf<Route?>(null) }

    val cameraPositionState = rememberCameraPositionState {
        position = CameraPosition.fromLatLngZoom(LatLng(36.7783, -119.4179), 6f)
    }

    GoogleMap(
        modifier = Modifier.fillMaxSize(),
        cameraPositionState = cameraPositionState
    ) {
        // Draw the route polyline
        Polyline(
            points = routeCoordinates,
            clickable = true,
            color = Color.Blue,
            width = 5f,
            tag = CaliforniaRoute,
            onClick = { polyline ->
                // Handle polyline click event
                selectedRoute = polyline.tag as? Route
            }
        )
    }

    // Display information about the selected route
    selectedRoute?.let { route ->
        Box(
            contentAlignment = Alignment.TopCenter,
            modifier = Modifier.offset(y = 24.dp)
        ) {
            Column(
                modifier = Modifier
                    .wrapContentHeight()
                    .width(350.dp)
                    .clip(RoundedCornerShape(10))
                    .background(Color.DarkGray)
                    .padding(20.dp)
            ) {
                Text(text = route.name, style = TextStyle(fontSize = 20.sp))
                Spacer(modifier = Modifier.height(8.dp))
                Text(text = route.description, style = TextStyle(fontSize = 16.sp))
            }
        }
    }
}

data class Route(val name: String, val description: String)

val CaliforniaRoute = Route(
    name = "California Road Trip",
    description = "Explore the beautiful coast of California on this scenic road trip from San Francisco to San Diego."
)
Key features include —
- Defining a route with geographical coordinates.
- Tracking the selected route with a mutable state.
- Drawing a clickable polyline representing the route.
- Handling polyline clicks to update the selected route.
- Displaying route information within a styled box.
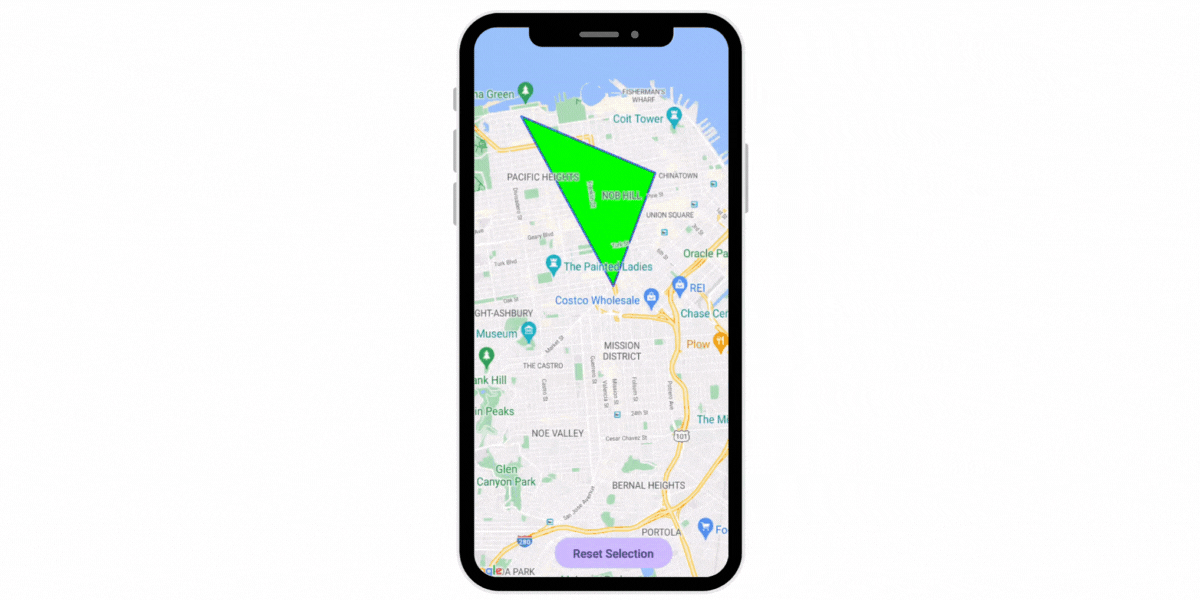
5. Adding Polygons
Here, let’s add a polygon on the map that will change color when clicked. Users can reset the selection by clicking the “Reset Selection” button. This adds interactivity to the map and allows users to interact with the polygons on the map.
We can further extend this simple example to a more real world example like showcasing different national park areas via polygons and when users click on them we display a bottom sheet with more information.
Polygon Example
@Composable
fun MapWithPolygon() {
    val polygonPoints = listOf(
        LatLng(37.7749, -122.4194),
        LatLng(37.8049, -122.4400),
        LatLng(37.7949, -122.4100)
    )

    // Create a mutable state to track whether the polygon is selected
    var isPolygonSelected by remember { mutableStateOf(false) }

    GoogleMap(
        modifier = Modifier.fillMaxSize(),
        cameraPositionState = rememberCameraPositionState {
            position = CameraPosition.fromLatLngZoom(LatLng(37.7749, -122.4194), 13f)
        }
    ) {
        Polygon(
            points = polygonPoints,
            clickable = true,
            fillColor = if (isPolygonSelected) Color.Red else Color.Green,
            strokeColor = Color.Blue,
            strokeWidth = 5f,
            tag = "San Francisco",
            onClick = { polygon ->
                // Handle polygon click event
                isPolygonSelected = true
            }
        )
    }
    // Add a button to reset the selection
    Box(contentAlignment = Alignment.BottomCenter) {
        Button(
            onClick = {
                isPolygonSelected = false
            },
            modifier = Modifier
                .padding(16.dp)
        ) {
            Text("Reset Selection")
        }
    }
}
- We use a mutable state,
isPolygonSelected, to track whether the polygon is selected. The polygon’sfillColorchanges based on this state to provide visual feedback. - Inside the
onClickcallback, we setisPolygonSelectedtotruewhen the polygon is clicked - We’ve added a “Reset Selection” button at the bottom of the map to allow users to clear the selection.
6. Adding Circles
The following CircleMap example demonstrates how to use the Circle composable to mark and interact with specific locations or areas on a map. Users can click on circles to access additional information about those locations.
 Circles Example
@Composable
fun CircleMap() {
    // Define the coordinates for circle centers and their associated information
    val circleData = listOf(
        CircleInfo("Park A", LatLng(37.7749, -122.4194), "This is Park A"),
        CircleInfo("Park B", LatLng(36.7783, -119.4179), "This is Park B"),
        CircleInfo("Park C", LatLng(34.0522, -118.2437), "This is Park C")
    )

    // Create a mutable state to track the selected circle
    var selectedCircle by remember { mutableStateOf<CircleInfo?>(null) }

    val cameraPositionState = rememberCameraPositionState {
        position = CameraPosition.fromLatLngZoom(LatLng(36.7783, -119.4179), 11f)
    }

    GoogleMap(
        modifier = Modifier.fillMaxSize(),
        cameraPositionState = cameraPositionState
    ) {
        // Draw clickable circles for each location
        circleData.forEach { circleInfo ->
            Circle(
                center = circleInfo.center,
                clickable = true,
                fillColor = Color.Blue.copy(alpha = 0.3f),
                radius = 5000.0, // Specify the radius in meters
                strokeColor = Color.Black,
                strokeWidth = 2f,
                tag = circleInfo,
                onClick = { circle ->
                    // Handle circle click event
                    selectedCircle = circle.tag as? CircleInfo
                }
            )
        }
    }


    // Display information about the selected circle
    selectedCircle?.let { circle ->
        Box(
            contentAlignment = Alignment.TopCenter,
            modifier = Modifier.offset(y = 24.dp)
        ) {
            Column(
                modifier = Modifier
                    .wrapContentHeight()
                    .width(350.dp)
                    .clip(RoundedCornerShape(10))
                    .background(Color.DarkGray)
                    .padding(20.dp)
            ) {
                Text(text = circle.name, style = TextStyle(fontSize = 20.sp))
                Spacer(modifier = Modifier.height(8.dp))
                Text(text = circle.description, style = TextStyle(fontSize = 16.sp))
            }
        }
    }
}

data class CircleInfo(val name: String, val center: LatLng, val description: String)
In this example —
- We define multiple
CircleInfoinstances, each representing a clickable circle with a name and description. - Users can click on the circles to select them.
- When a circle is selected, a Box containing information about the selected circle (name and description) is displayed at the top of the screen.
- The
Circlecomposable is used to draw clickable circles on the map, with click handling and associated circle information.
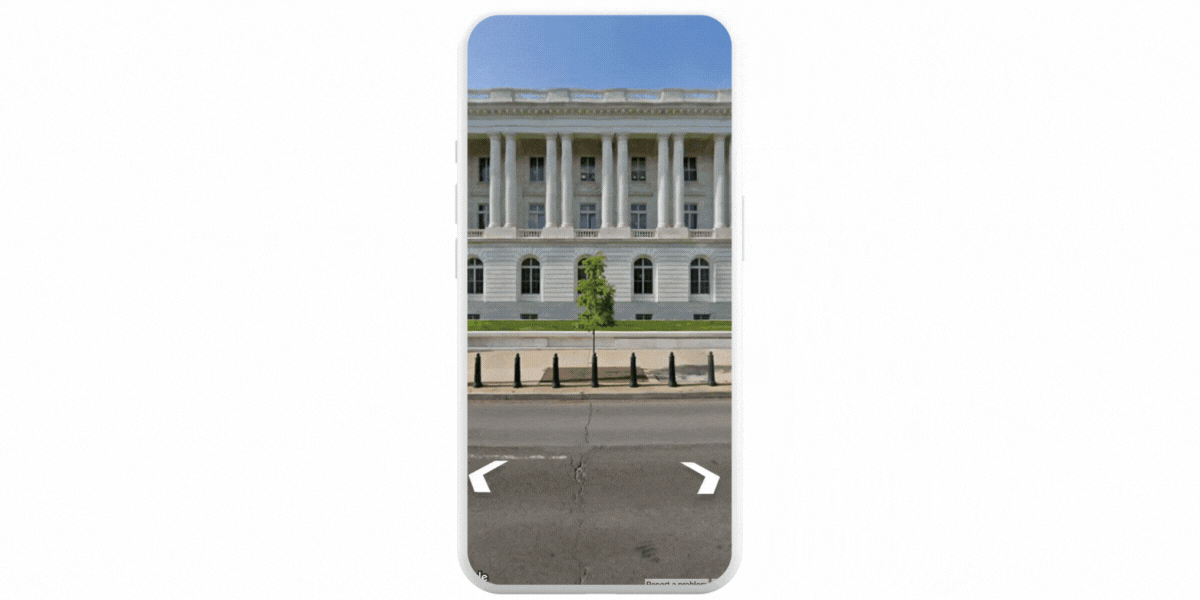
Street View
Let’s see how we can add the street view functionality to our app. For instance we want to build an app where we display a number of prominent locations but also give the user the option to explore the location / nearby areas. Here’s a snippet that can help you get started with that —
Street View Example
@Composable
fun StreetViewExplorer() {
    // Define the location for the Street View Panorama

    val constitutionAve = LatLng(38.8921, -77.0067) // Example: DC
    StreetView(
        streetViewPanoramaOptionsFactory = {
            StreetViewPanoramaOptions().position(constitutionAve)
        },
        isPanningGesturesEnabled = true,
        isStreetNamesEnabled = true,
        isUserNavigationEnabled = true,
        isZoomGesturesEnabled = true
    )
}
In this example —
- We specify a specific location (Constitution Ave in this case) for the Street View panorama.
- The
StreetViewcomposable displays the panorama, allowing users to explore the location using panning gestures, zoom gestures, and navigation controls.
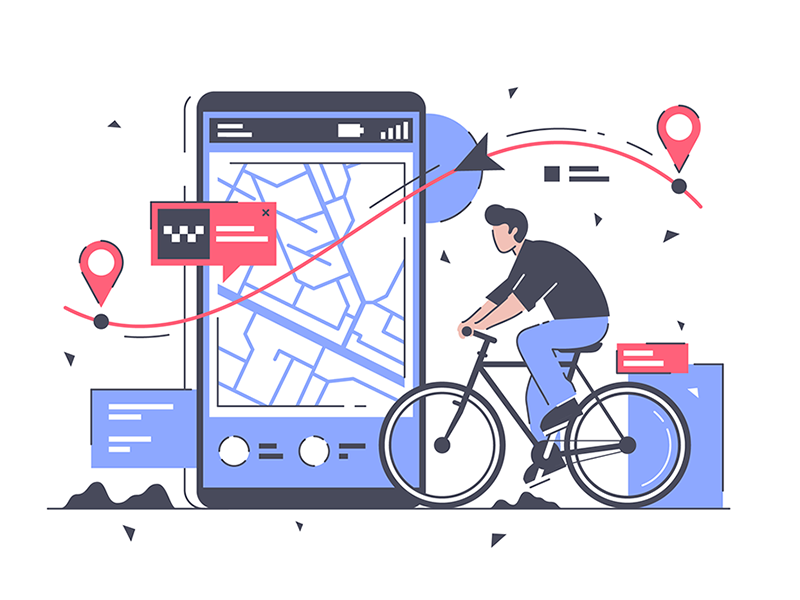
Building Location-Based Apps
In this section, we will talk about Jetpack Compose and Google Maps to build location-based apps. Location-based apps are apps that use the user’s location to provide information or services.
Sourced from Dribbble
Here are some examples of location-based apps —
- Navigation apps — These apps help users find their way around.
- Weather apps — These apps provide information about the weather at the user’s current location.
- Nearby places apps — These apps help users find nearby businesses, restaurants, and other places of interest.
For reference, here is an article you can refer that shows how to get the user’s current location. You can use that and use the snippets provided above to create a location tracking / sharing app.
Additional Resources
- Google Maps Compose Repository — https://github.com/googlemaps/android-maps-compose/tree/main
- Sample App Provided By Google — https://github.com/googlemaps/android-maps-compose/tree/main/app
- Google Maps Android Developers’ Documentation — https://developers.google.com/maps/documentation/android-sdk/maps-compose
Conclusion
In this journey of exploration, we’ve uncovered the incredible possibilities of combining Google Maps with Jetpack Compose.
From custom markers to interactive polygons, and even immersive Street View experiences, your Android app’s potential can expand dramatically.
We are now equipped to craft stunning and feature-rich location-aware applications that not only guide users but also inspire them to explore the world around them.
“In every map, there’s a story waiting to be told.” — Terry Pratchett
Closing Remarks
If you liked what you read, please feel free to leave your valuable feedback or appreciation. I am always looking to learn, collaborate and grow with fellow developers.
If you have any questions feel free to message me!
Here is the link to the gist containing all the previously mentioned code snippets and code for some of the examples I mentioned at the end.
Follow me on Medium for more articles — Medium Profile
Connect with me on LinkedIn for collaboration — LinkedIn Profile
Also, you’re welcome to follow me on Twitter for more updates and insights — Twitter Profile
Happy Composing!
This article was previously published on proandroiddev.com


