

 Original Photo by Divyanshi Verma on Unsplash
In mobile app development, designers and developers often clash over creative design and practical implementation. Recently, my designer presented a design concept for our project that was entirely centred around the idea of Glassmorphism. Yes, you heard it right — a design filled with blurriness. While blur effects are quite common in the iOS world, they are not as common in the Android realm. This difference mainly comes from design preferences and platform traditions. However, as a front-end developer, I had no choice but to take on the challenge. In this article, I’ll walk you through our journey of creating a BlurSurface in Jetpack Compose, which allowed us to achieve a Glassmorphic design on Android.
So we know what’s a blur. Understanding blur is one thing, but how do we blur backgrounds in Android apps, especially when the background keeps changing? The trick is to create a custom Compose Surface, BlurSurface that can show a blurry picture as a background and update it when needed. Since we want to blur the background, we’ll take pictures from the parent of our BlurSurface, make them blurry, and put them behind our BlurSurface. This way, we’ll keep taking new pictures, blur them, and set them as the background. The result is a smoothly changing, blurred background that adds a cool look to the UI.
Let’s tackle the tricky part first: capturing images from the parent. Since we’re working with Compose, it’s not as straightforward as you might think. There’s no direct method that I came across during my research to transform a Compose layout into a bitmap. But don’t fret; we have a solution. Compose and Views can play nicely together, so we can leverage this. There’s a handy library called Capturable that can convert a Compose layout into a bitmap, through a similar process. In this article, we’ll take a manual approach. We’ll convert our parent Composable into a View internally. Once we have a View, we can use existing APIs to convert it into a bitmap canvas. After that, it’s just a matter of applying a blur effect and carefully positioning it as a background behind our BlurSurface. This way, we’ll achieve a dynamic background blur effect.
Now, let’s get into the coding part.
Our first step is to create a custom view and then try to capture the parent view and use it as the background.
Here, we extend a View class, which includes a Bitmap object to store the background and a Canvas instance for drawing. We’ll override the onDraw() method to render the stored bitmap within the view.
| class BlurSurfaceView: View { | |
| private var canvas: Canvas? = null | |
| private lateinit var bitmap: Bitmap | |
| constructor(context: Context) : super(context) | |
| constructor(context: Context, attrs: AttributeSet?) : super(context, attrs) | |
| override fun onSizeChanged(w: Int, h: Int, oldw: Int, oldh: Int) { | |
| super.onSizeChanged(w, h, oldw, oldh) | |
| init(measuredWidth, measuredHeight) | |
| } | |
| private fun init(measuredWidth: Int, measuredHeight: Int) { | |
| bitmap = Bitmap.createBitmap( | |
| measuredWidth, | |
| measuredHeight, | |
| Bitmap.Config.ARGB_8888 | |
| ) | |
| canvas = Canvas(bitmap) | |
| } | |
| override fun onDraw(canvas: Canvas) { | |
| super.onDraw(canvas) | |
| canvas.save() | |
| canvas.drawBitmap(bitmap, 0f, 0f, null) | |
| canvas.restore() | |
| } | |
| } |
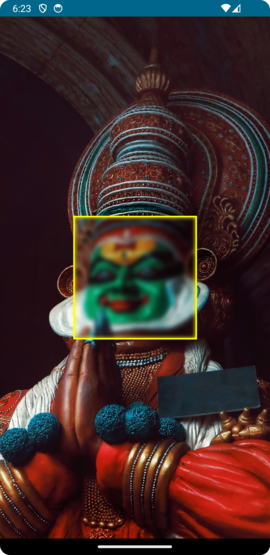
Next, let’s add our BlurSurfaceView to the main layout. The main layout already has a background image, and to help you locate our custom view, I’ve added a yellow border around it.
| class MainActivity : ComponentActivity() { | |
| override fun onCreate(savedInstanceState: Bundle?) { | |
| super.onCreate(savedInstanceState) | |
| setContent { | |
| Theme { | |
| Surface( | |
| modifier = Modifier.fillMaxSize(), | |
| color = Color.Black | |
| ) { | |
| val context = LocalContext.current | |
| Box( | |
| modifier = Modifier | |
| .fillMaxSize() | |
| ) { | |
| Image( | |
| painter = painterResource(id = R.drawable.background), | |
| contentDescription = "background", | |
| contentScale = ContentScale.FillHeight | |
| ) | |
| } | |
| Box( | |
| modifier = Modifier | |
| .wrapContentSize() | |
| .border( | |
| width = 2.dp, | |
| color = Color.Yellow | |
| ) | |
| ) { | |
| AndroidView( | |
| factory = { | |
| BlurSurfaceView(context) | |
| }, | |
| modifier = Modifier | |
| .size(180.dp) | |
| ) | |
| } | |
| } | |
| } | |
| } | |
| } | |
| } |
The output will resemble the following image.

Background Photo by Divyanshi Verma on Unsplash
To capture the background from the parent, we can use the following code to obtain the root layout of the activity.
| val decorView = window.decorView | |
| val rootView = decorView.findViewById(android.R.id.content) as ViewGroup |
Now we should convert this view to a bitmap. As I mentioned earlier, you can use the Capturable library for this, but to simplify things here I’m following the view.draw() approach. This ensures that the captured image from the parent view becomes the background of our BlurSurfaceView. Now we simply write a method inside BlurSurfaceView to draw the bitmap background inside.
| fun getBackgroundAndDrawBehind(parent: ViewGroup) { | |
| canvas?.save() | |
| canvas?.let { | |
| parent.draw(it) | |
| } | |
| canvas?.restore() | |
| } |
Now call this method on the update callback of AndroidView in our main layout and pass the rootView instance.
| AndroidView( | |
| factory = { | |
| BlurSurfaceView(context) | |
| }, | |
| modifier = Modifier | |
| .size(180.dp), | |
| update = { blurView -> | |
| blurView.getBackgroundAndDrawBehind( | |
| parent = rootView //Pass rootView here | |
| ) | |
| } | |
| ) |
Let’s see the output.

Hmm !. What do I miss?
To resolve this issue, we need to account for the fact that the canvas draws from the top-left corner (0.x, 0.y) by default, which results in capturing only the top-left portion of the background. To correct this, we can adjust the canvas’s coordinates using the canvas.translate() method. By determining the relative position of our view within the screen concerning the parent, we can then translate the draw pointer appropriately, ensuring the background is aligned correctly in our BlurSurfaceView.
Here’s the code to find the relative position of view within the screen and translate the draw pointer accordingly
| fun getBackgroundAndDrawBehind(parent: ViewGroup) { | |
| //Arrays to store the co-ordinates | |
| val rootLocation = IntArray(2) | |
| val viewLocation = IntArray(2) | |
| parent.getLocationOnScreen(rootLocation) //get the parent co-ordinates | |
| this.getLocationOnScreen(viewLocation) //get view co-ordinates | |
| //Calculate relative co-ordinates | |
| val left: Int = viewLocation[0] - rootLocation[0] | |
| val top: Int = viewLocation[1] - rootLocation[1] | |
| canvas?.save() | |
| canvas?.translate(-left.toFloat(), -top.toFloat()) //translates the initial position | |
| canvas?.let { | |
| parent.draw(it) | |
| } | |
| canvas?.restore() | |
| } |
OUR VIDEO RECOMMENDATION


Jobs
Let’s see the output.

Great, it’s time to apply the background blur effect. In Android API 31 and later, we have the option to use RenderEffect, and for older versions, we can rely on RenderScript. For the sake of simplicity, we’ll use RenderScript in this article, keeping in mind that RenderScript is deprecated after API 31.
Now, let’s add the code to apply the blur effect to the bitmap. Feel free to use this code directly.
| private fun blurWithRenderScript() { | |
| val renderScript = RenderScript.create(context) | |
| val blurScript = ScriptIntrinsicBlur.create(renderScript, Element.U8_4(renderScript)) | |
| val inAllocation = Allocation.createFromBitmap(renderScript, bitmap) | |
| val outAllocation = Allocation.createTyped(renderScript, inAllocation.type) | |
| blurScript.setRadius(20f) | |
| blurScript.setInput(inAllocation) | |
| blurScript.forEach(outAllocation) | |
| outAllocation.copyTo(bitmap) | |
| inAllocation.destroy() | |
| } | |
| fun getBackgroundAndDrawBehind(parent: ViewGroup) { | |
| ... | |
| ... | |
| canvas?.restore() | |
| if (::bitmap.isInitialized) { //Only execute after bitmap is initialized | |
| blurWithRenderScript() | |
| } | |
| } |
Let’s see the output.
Impressive, and it works seamlessly.
But what if the background is dynamic, like it’s scrollable or subject to changes? This is where View APIs come to our rescue. We can leverage the ViewTreeObserver along with listeners. A ViewTreeObserver is used to register listeners that can receive notifications of global changes within the view tree. In this case, we use a PreDrawListener, which informs us when the parent view is about to be redrawn. Inside the PreDrawListener, we handle the capture and blur operations. By doing this within the PreDrawListener instead of calling it directly from the main layout, we ensure that whenever there’s a change in the background, it will automatically trigger a redraw, allowing us to maintain a dynamic background blur effect.
Here is the final code. I have exposed a setParent() method which will handle adding listeners and I have wrapped our BlurSurfaceView inside a composable BlurSurface which can be used easily with other composables.
@Composable
fun BlurSurface(
    modifier: Modifier,
    parent: ViewGroup
) {
    Surface(
        modifier = modifier,
        color = Color.Transparent
    ) {
        AndroidView(
            factory = {
                BlurSurfaceView(parent.context)
            },
            modifier = Modifier
                .fillMaxSize(),
            update = { blurView ->
                blurView.setParent(
                    parent = parent
                )
            }
        )
    }
}
class BlurSurfaceView: View {
    private var canvas: Canvas? = null
    private lateinit var bitmap: Bitmap
    private lateinit var parent: ViewGroup

    private var renderScript: RenderScript? = null
    private lateinit var blurScript: ScriptIntrinsicBlur
    private lateinit var outAllocation: Allocation

    constructor(context: Context) : super(context)

    constructor(context: Context, attrs: AttributeSet?) : super(context, attrs)

    override fun onSizeChanged(w: Int, h: Int, oldw: Int, oldh: Int) {
        super.onSizeChanged(w, h, oldw, oldh)
        init(measuredWidth, measuredHeight)
    }

    private fun init(measuredWidth: Int, measuredHeight: Int) {
        bitmap = Bitmap.createBitmap(
            measuredWidth,
            measuredHeight,
            Bitmap.Config.ARGB_8888
        )
        canvas = Canvas(bitmap)
    }

    override fun onDraw(canvas: Canvas) {
        super.onDraw(canvas)

        canvas.save()
        canvas.drawBitmap(bitmap, 0f, 0f, null)
        canvas.restore()
    }

    private fun getBackgroundAndDrawBehind() {
        //Arrays to store the co-ordinates
        val rootLocation = IntArray(2)
        val viewLocation = IntArray(2)

        parent.getLocationOnScreen(rootLocation) //get the parent co-ordinates
        this.getLocationOnScreen(viewLocation) //get view co-ordinates

        //Calculate relative co-ordinates
        val left: Int = viewLocation[0] - rootLocation[0]
        val top: Int = viewLocation[1] - rootLocation[1]

        canvas?.save()
        canvas?.translate(-left.toFloat(), -top.toFloat()) //translates the initial position
        canvas?.let {
            parent.draw(it)
        }
        canvas?.restore()
        blurWithRenderScript()
    }

    private fun blurWithRenderScript() {
        renderScript = RenderScript.create(context)
        blurScript = ScriptIntrinsicBlur.create(renderScript, Element.U8_4(renderScript))

        val inAllocation = Allocation.createFromBitmap(renderScript, bitmap)
        outAllocation = Allocation.createTyped(renderScript, inAllocation.type)
        blurScript.setRadius(20f)
        blurScript.setInput(inAllocation)

        blurScript.forEach(outAllocation)
        outAllocation.copyTo(bitmap)

        inAllocation.destroy()
    }

    fun setParent(parent: ViewGroup){
        this.parent = parent
        this.parent.viewTreeObserver.removeOnPreDrawListener(drawListener)
        this.parent.viewTreeObserver.addOnPreDrawListener(drawListener)
    }

    private val drawListener =
        ViewTreeObserver.OnPreDrawListener {
            getBackgroundAndDrawBehind()
            true
        }
}
class MainActivity : ComponentActivity() {
    override fun onCreate(savedInstanceState: Bundle?) {
        super.onCreate(savedInstanceState)

        val decorView = window.decorView
        val rootView = decorView.findViewById(android.R.id.content) as ViewGroup

        setContent {
            Theme {
                Surface(
                    modifier = Modifier.fillMaxSize(),
                    color = Color.Black
                ) {
                    val context = LocalContext.current

                    Box(
                        modifier = Modifier
                            .fillMaxSize()
                            .horizontalScroll(rememberScrollState())
                    ) {
                        Image(
                            painter = painterResource(id = R.drawable.background),
                            contentDescription = "background",
                            contentScale = ContentScale.FillHeight
                        )
                    }

                    Box(
                        modifier = Modifier
                            .wrapContentSize()
                            .border(
                                width = 2.dp,
                                color = Color.Yellow
                            )
                    ) {
                        BlurSurface(
                            modifier = Modifier.size(240.dp),
                            parent = rootView
                        )
                    }

                }
            }
        }
    }
}
The final output!

Looks cool right? We’ve successfully achieved the desired background blur effect.
In conclusion, while the code we’ve explored in this article serves as a valuable starting point for achieving dynamic background blurring, it’s important to keep in mind that blurring is a computationally intensive operation. The code provided here is intended for learning purposes and is not optimized for production use. For production-ready apps, consider using specialized libraries such as BlurView.
I appreciate your time and attention. Thanks for reading!
This article was previously published on proandroiddev.com


