


…But, my goodness, is it a hard master to work with! I genuinely have never worked with an Android technology so full of complexity, pitfalls and weird errors. Even Google’s official documentation — which is almost always excellent — isn’t enough to get it working.
So I intend this blog to be as exhaustive a tutorial as possible: everything you need to actually get stuff to work. By the end you’ll know about how Bluetooth and BLE work and how they are different. And you’ll be able to write an Android app to search for, connect to, and read and write data to BLE devices. And you will learn many of the pitfalls to navigate.
- How Bluetooth and BLE work and how they are different. And you’ll be able to write an Android app to search for, connect to, and read and write data to BLE devices. And you will learn many of the pitfalls to navigate.
Buckle up, there’s a lot to get through…
You can jump to the code here. You can also install this BLE peripheral simulation on another Android device, so you have a BLE peripheral to play with.
Let’s start from the beginning. What are Bluetooth and BLE?
In 1998 the Bluetooth Special Interest Group (SIG) was formed to produce the a technology designed to connect peripherals wirelessly, in a manufacturer-independent way. This ended up being Bluetooth v1.
BLE (Bluetooth Low Energy) is a completely separate standard which came later, designed primarily to save battery power. But that’s jumping ahead…
The original 1998 technology — which these days we call Bluetooth Classic — is in fact fundamentally very similar to the Bluetooth of today; the same tech that allows you to stream music wirelessly to a headset or share files between devices in an OS-independent manner.
Bluetooth Classic is like cups and string
This tech works like cups and string. You receive at one end whilst someone transmits at the other. Either end is free to transmit at any time they need, and the connection drops when one or other side stops listening.

The trouble is this requires both sides to be listening all the time. So they have their radios switched on for the duration of the connection. These are relatively high-power radios, making the whole tech pretty power-hungry.
That’s OK for a laptop with a big battery, or at a push earbuds that can be charged daily. But it’s no good for health monitors which need to collect medical data 24/7 for months, or location beacons placed up in ceiling rafters which require maintenance to get to. It’s also wasteful for tech which only needs to transfer small packets of data.
So the challenge was set: Could we produce a new wireless communications standard in which the radio was mostly off?
BLE is like recurring meetings
So in 2006 Nokia engineers worked on a technology which they codenamed Wibree which did exactly that. This is what became BLE.
Rather than cups and string, the analogy for BLE is a recurring meeting. You connect with someone, say, once a week and exchange information. If there’s lots to talk about, you can stay connected for a while. If there’s nothing to discuss you still turn up to the meeting to hear what your contact has to say, and also to prove you’re still alive.
BLE works exactly like this. It has a connection interval (between 7.5 ms and 4 seconds) which is how often both participants have agreed to connect up. If the connection interval is, say, 1 second, then the radios wake every 1 second, talk for as long as they need, then go back to sleep until the next second. Crucially, outside of that those waking periods, both sides’ radios are completely switched off.
So how does BLE detect if the connection is dropped, when there is no maintained connection? Easy — if the other side of the conversation misses multiple simultaneous connection interval “appointments” then you’re no longer connected.
Are BLE and Bluetooth Classic compatible?
BLE is a totally separate standard to Bluetooth Classic, with no interoperability. However, it was adopted by the Bluetooth SIG which is why it ended up being named Bluetooth Low Energy.
So, as if designed for a tricky interview question, it’s a Bluetooth standard with no compatibility with what everyone knows as “Bluetooth” (more correctly Bluetooth Classic).
Android and BLE
Now that we’ve understood some of the theory, let’s look at how Android handles BLE. You’re going to need the latest Android Studio, and a real Android device (not the emulator — it doesn’t do BLE).
Android’s Bluetooth and BLE APIs have been through some significant changes recently, which supplement the ongoing improvements since way back in 2013 when BLE support was first added.
First stop, let’s get our permissions right.
Android BLE permissions are crazy complex
Permissions for Bluetooth are a bit unnecessarily complicated. They have been much improved since Android 12, but usually we need to support API levels earlier than that, so we also have to handle the complexity of what went before.
In the old days — Android 11 (API 30) and before — you needed BLUETOOTH and BLUETOOTH_ADMIN permissions. Broadly speaking, BLUETOOTH was for connecting to devices and BLUETOOTH_ADMIN was to scan for them, though in practice the differentiation wasn’t quite as neat as that.
But scanning for Bluetooth beacons can end up revealing location information. So Google (rightly, but somewhat confusingly) said: in order to scan for BLE devices the user also needs to give you location permission. Specifically ACCESS_COURSE_LOCATION. You might have seen this in apps that connect to headphones etc. Since Android 10, the requirement has been strengthened to requiring ACCESS_FINE_LOCATION.
Android 12 and above dramatically simplifies this. To connect, use BLUETOOTH_CONNECT and to scan use BLUETOOTH_SCAN. And — hurrah! — we no longer need to ask for location permissions if we don’t need location information. We can specify android:usesPermissionFlags="neverForLocation" , and the OS will just chop out any location information from the scans.
In total, then, here are the manifest permissions needed:
| <uses-permission android:name="android.permission.BLUETOOTH" | |
| android:maxSdkVersion="30" /> | |
| <uses-permission android:name="android.permission.BLUETOOTH_ADMIN" | |
| android:maxSdkVersion="30" /> | |
| <uses-permission android:name="android.permission.ACCESS_COARSE_LOCATION" | |
| android:maxSdkVersion="30" /> | |
| <uses-permission android:name="android.permission.ACCESS_FINE_LOCATION" | |
| android:maxSdkVersion="30" /> | |
| <uses-permission android:name="android.permission.BLUETOOTH_CONNECT" /> | |
| <uses-permission android:name="android.permission.BLUETOOTH_SCAN" | |
| android:usesPermissionFlags="neverForLocation" | |
| tools:targetApi="s" /> |
This handles all cases from Android 4.4 onwards (which is when BLE was added).
And then to request the permissions we use this (Jetpack Compose):
| val ALL_BLE_PERMISSIONS = if (Build.VERSION.SDK_INT >= Build.VERSION_CODES.S) { | |
| arrayOf( | |
| Manifest.permission.BLUETOOTH_CONNECT, | |
| Manifest.permission.BLUETOOTH_SCAN | |
| ) | |
| } | |
| else { | |
| arrayOf( | |
| Manifest.permission.BLUETOOTH_ADMIN, | |
| Manifest.permission.BLUETOOTH, | |
| Manifest.permission.ACCESS_FINE_LOCATION | |
| ) | |
| } | |
| @Composable | |
| fun GrantPermissionsButton(onPermissionGranted: () -> Unit) { | |
| val launcher = rememberLauncherForActivityResult( | |
| contract = ActivityResultContracts.RequestMultiplePermissions() | |
| ) { granted -> | |
| if (granted.values.all { it }) { | |
| // User has granted all permissions | |
| onPermissionGranted() | |
| } | |
| else { | |
| // TODO: handle potential rejection in the usual way | |
| } | |
| } | |
| // User presses this button to request permissions | |
| Button(onClick = { launcher.launch(ALL_BLE_PERMISSIONS) }) { | |
| Text("Grant Permission") | |
| } | |
| } |
Finally, here is some code to check if permissions have been granted already:
| fun haveAllPermissions(context: Context) = | |
| ALL_BLE_PERMISSIONS | |
| .all { context.checkSelfPermission(it) == PackageManager.PERMISSION_GRANTED } |
How do you search for BLE devices?
BLE peripherals send out regular advertisements to shout out their existence. This advertisement could include things like the device’s name and what kind of device it is.
So, to find a BLE peripheral, you just turn on your BLE radio and listen out for those advertisements.
On Android this is done using the BluetoothLeScanner class. You get an instance of that via the system’s Bluetooth Service.
| private val bluetooth = context.getSystemService(Context.BLUETOOTH_SERVICE) | |
| as? BluetoothManager | |
| ?: throw Exception("Bluetooth is not supported by this device") |
(Here context can be from your activity or an AppContext.)
And the scanner is obtained from this:
| private val scanner: BluetoothLeScanner | |
| get() = bluetooth.adapter.bluetoothLeScanner |
To actually use the scanner to scan for advertisements, you need to create a ScanCallback object:
| private var selectedDevice: BluetoothDevice? = null | |
| private val scanCallback = object : ScanCallback() { | |
| override fun onScanResult(callbackType: Int, result: ScanResult?) { | |
| super.onScanResult(callbackType, result) | |
| //TODO: Set the criteria for selecting the device. Here we check the device's | |
| // name from the advertisement packet, but you could for example check its | |
| // manufacturer, address, services, etc. | |
| if (result.name == "MyDevice") { | |
| //We have found what we're looking for. Save it for later. | |
| selectedDevice = result.device | |
| } | |
| } | |
| override fun onScanFailed(errorCode: Int) { | |
| super.onScanFailed(errorCode) | |
| //TODO: Something went wrong | |
| } | |
| } |
This will receive the results of the scan. (Note that there are other overrides to ScanCallback but the above two will do for now).
And then finally we ask the scanner obtained above to use our scanCallback object:
| @RequiresPermission(PERMISSION_BLUETOOTH_SCAN) | |
| fun startScanning() { | |
| scanner.startScan(scanCallback) | |
| } |
Equally, we can use scanner.stopScan(scanCallback) to kill the scan.
How do you connect to a BLE device?
Sometimes the advertising data from a device is all you need. Bluetooth beacons are an example of this. In that case, everything is contained in result.scanRecord in your scanCallback’s onScanResult override. Your life is simple.
But usually you have to connect to a BLE device to get any useful information from it.
Once the device you’re looking for has popped up in your onScanResult method, save off the result.device and call its connectGatt method:
| //Our connection to the selected device | |
| private var gatt: BluetoothGatt? = null | |
| //Whatever we do with our Bluetooth device connection, whether now or later, we will get the | |
| //results in this callback object, which can become massive. | |
| private val callback = object: BluetoothGattCallback() { | |
| //We will override more methods here as we add functionality. | |
| override fun onConnectionStateChange(gatt: BluetoothGatt, status: Int, newState: Int) { | |
| super.onConnectionStateChange(gatt, status, newState) | |
| //This tells us when we're connected or disconnected from the peripheral. | |
| if (status != BluetoothGatt.GATT_SUCCESS) { | |
| //TODO: handle error | |
| return | |
| } | |
| if (newState == BluetoothGatt.STATE_CONNECTED) { | |
| //TODO: handle the fact that we've just connected | |
| } | |
| } | |
| } | |
| @RequiresPermission(PERMISSION_BLUETOOTH_CONNECT) | |
| fun connect() { | |
| gatt = bluetoothDevice.connectGatt(context, false, callback) | |
| } |
As with the scanner, we receive the results in a callback object — this time it’s a BluetoothGattCallback. Its onConnectionStateChange method will be called with the newState argument set to BluetoothGatt.STATE_CONNECTED when it manages to connect. If its status argument is anything other than BluetoothGatt.GATT_SUCCESS then there has been an error — check the error constants in the BluetoothGatt class.
Now that we’ve scanned and connected to the BLE device, we want to read and write data to/from it.
Jobs
How is data stored and maintained in BLE?
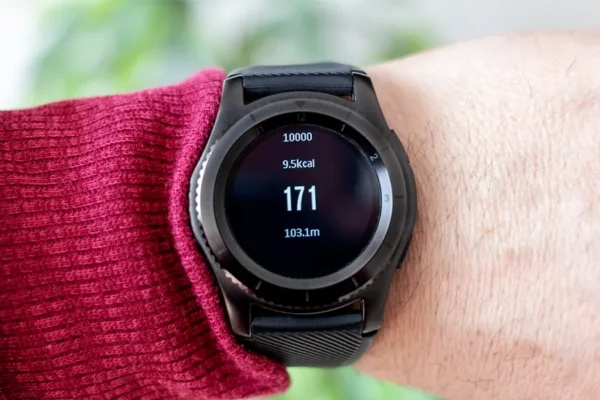
Let’s take a heart rate monitor for example.
Characteristics
Data in BLE is organised into characteristics — small pieces of data that represent a single output.
Our heart rate monitor will for example offer this characteristic:
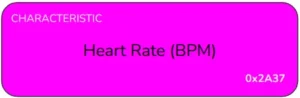
So to get the heart rate you need to ask for the heart rate characteristic. Each characteristic defined in the BLE standard has a 16-bit unique ID and for heart rate that’s 2A37. (You can create your own characteristic for anything not currently recognised in the BLE standard — in which case you’ll use a 128-bit UUID).
But a heart rate monitor will typically have more characteristics than this. For example:
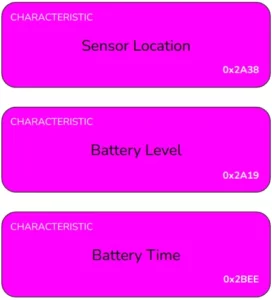
Again, these are all characteristics defined in the BLE standard: sensor location is where the heart monitor is located (neck, chest, arm etc); battery level and battery time detail how much battery you have left as a percentage and in terms of minutes remaining, respectively.
Characteristics are arranged into services
Though our example device is a heart rate monitor, only two of the characteristics above are actually related to heart rate monitoring. The other two are battery related, and could be applicable to any kind of device.
So, characteristics are arranged into services; this groups them into related areas.
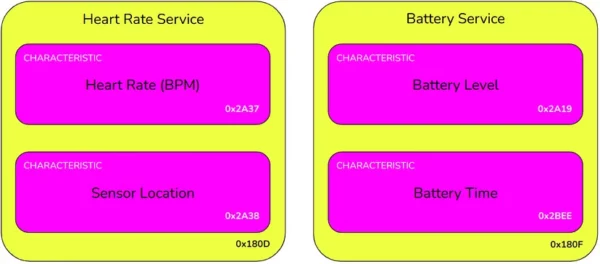
Like characteristics, services also have a 16-bit unique ID defined in the BLE standards. Or you can create your own service using a 128-bit UUID. The service IDs are shown in the diagram above.
And so if you want to ask for the battery level, say, you have to request characteristic 2A19 from service 180F.
Read, write, notify and indicate
A characteristic’s descriptor will tell you whether it can be read or written. If readable, it will also tell you how it can be read. There are three possibilities:
- A normal read: Ask for, and receive, the data
- A notify: Ask the device to keep you updated on the value of the characteristic. It will send you the new value whenever there’s a change. You don’t have to do anything.
- An indicate: As for notify, but you have to acknowledge receipt of every update. This makes indicate more reliable but slower and less battery-efficient.
Devices often support multiple types of read to suit the client.
How does Android get a list of the device’s services and characteristics?
Before we read or write any characteristics, we have to ask the device for a list of them.
Here, gatt is the connection to the BluetoothDevice we created earlier:
| // The saved list of services. The BluetoothGattService objects here can be used | |
| // to list the characteristics in each service. | |
| private var services: List<BluetoothGattService> = emptyList() | |
| @RequiresPermission(PERMISSION_BLUETOOTH_CONNECT) | |
| fun discoverServices() { | |
| gatt?.discoverServices() | |
| } | |
| private val callback = object: BluetoothGattCallback() { | |
| //Continuing our override of methods in this object from previous steps... | |
| ... | |
| override fun onServicesDiscovered(gatt: BluetoothGatt, status: Int) { | |
| super.onServicesDiscovered(gatt, status) | |
| services = gatt.services | |
| } | |
| } |
In the example project I’ve saved the list of services to a Kotlin Flow, so that we can communicate the list to other areas of the app. The above is a simplified version.
How do we perform a one-off read on a characteristic?
Now that we’ve got a list of the characteristics, we can read the data from one.
The magic method is BluetoothGatt.readCharacteristic(…). The results are returned in our BluetoothGattCallback’s onCharacteristicRead method:
| private val callback = object: BluetoothGattCallback() { | |
| ... | |
| @Deprecated("Deprecated in Java") | |
| override fun onCharacteristicRead( | |
| gatt: BluetoothGatt, | |
| characteristic: BluetoothGattCharacteristic, | |
| status: Int | |
| ) { | |
| super.onCharacteristicRead(gatt, characteristic, status) | |
| if (characteristic.uuid == myCharacteristicUUID) { | |
| Log.v("bluetooth", String(characteristic.value)) | |
| } | |
| } | |
| } | |
| @RequiresPermission(PERMISSION_BLUETOOTH_CONNECT) | |
| fun readCharacteristic(serviceUUID: UUID, characteristicUUID: UUID) { | |
| val service = gatt?.getService(serviceUUID) | |
| val characteristic = service?.getCharacteristic(characteristicUUID) | |
| if (characteristic != null) { | |
| val success = gatt?.readCharacteristic(characteristic) | |
| Log.v("bluetooth", "Read status: $success") | |
| } | |
| } |
You read the characteristic’s value by accessing characteristic.value.
Gotcha: Java deprecation of onCharacteristicRead
You may notice from the above code that onCharacteristicRead(gatt: BluetoothGatt, characteristic: BluetoothGattCharacteristic, status: Int) is deprecated. Since API 33, it’s been replaced by a new version of this function with an extra argument: onCharacteristicRead(gatt: BluetoothGatt, characteristic: BluetoothGattCharacteristic, value: ByteArray, status: Int) .
However, this new function is only called on devices running API 33 and higher. This is a real gotcha if your main test device uses Android ≥ 13, because everything will appear to work fine. Then when someone runs it on Android 12, it’ll fall apart.
So we have to use the deprecated function, and ignore the compiler warning. An OCD nightmare! The good news, however, is that the old function will be called on Android ≥ 13 devices as well as Android ≤ 12, so it’s universal.
Don’t implement both versions of this function, or your logic will run twice on recent versions of Android.
How do we write to a characteristic?
You use BluetoothGatt.writeCharacteristic() and you get the result in the BluetoothGattCallback.onCharacteristicWrite() method.
| private val callback = object: BluetoothGattCallback() { | |
| ... | |
| override fun onCharacteristicWrite( | |
| gatt: BluetoothGatt, | |
| characteristic: BluetoothGattCharacteristic, | |
| status: Int | |
| ) { | |
| super.onCharacteristicWrite(gatt, characteristic, status) | |
| if (characteristic.uuid == /* the one you're looking for */) { | |
| Log.v("bluetooth", "Write status: $status") | |
| } | |
| } | |
| } | |
| @RequiresPermission(PERMISSION_BLUETOOTH_CONNECT) | |
| fun writeCharacteristic(serviceUUID: UUID, characteristicUUID: UUID) { | |
| val service = gatt?.getService(serviceUUID) | |
| val characteristic = service?.getCharacteristic(characteristicUUID) | |
| if (characteristic != null) { | |
| // First write the new value to our local copy of the characteristic | |
| characteristic.value = "Tom".toByteArray() | |
| //...Then send the updated characteristic to the device | |
| val success = gatt?.writeCharacteristic(characteristic) | |
| Log.v("bluetooth", "Write status: $success") | |
| } | |
| } |
How do we receive notifications for a characteristic?
It’s a two-part process — which, if we’re being honest, really could have been made a lot simpler than it is!
First, you tell the local device to expect to receive notifications using gatt.setCharacteristicNotification(characteristic, true) .
Second, you tell the remote device to start sending notifications by writing to the characteristic’s client configuration descriptor. This descriptor has a UUID of 00002902–0000–1000–8000–00805f9b34fb.
val CLIENT_CONFIG_DESCRIPTOR = UUID.fromString("00002902-0000-1000-8000-00805f9b34fb")
val desc = characteristic.getDescriptor(CLIENT_CONFIG_DESCRIPTOR)
desc?.setValue(BluetoothGattDescriptor.ENABLE_NOTIFICATION_VALUE)
gatt.writeDescriptor(desc)
And once that’s all set up, the change notification is received in the onCharacteristicChanged(gatt: BluetoothGatt?, characteristic: BluetoothGattCharacteristic?) of our usual BluetoothGattCallback object. Note that there is a similar gotcha to reading a characteristic in that this method is deprecated in favour of a shiny new one (onCharacteristicChanged(gatt: BluetoothGatt, characteristic: BluetoothGattCharacteristic, value: ByteArray)). But don’t use the new one! Unless, that is, you only want to support Android ≥ 13. Because it won’t be called in older versions.
Putting those pieces together, you get:
| private val callback = object: BluetoothGattCallback() { | |
| ... | |
| override fun onCharacteristicChanged( | |
| gatt: BluetoothGatt?, | |
| characteristic: BluetoothGattCharacteristic | |
| ) { | |
| super.onCharacteristicChanged(gatt, characteristic) | |
| Log.v("bluetooth", characteristic.value.contentToString()) | |
| } | |
| } | |
| @RequiresPermission(PERMISSION_BLUETOOTH_CONNECT) | |
| fun startReceivingPasswordUpdates() { | |
| val service = gatt?.getService(CTF_SERVICE_UUID) | |
| val characteristic = service?.getCharacteristic(PASSWORD_CHARACTERISTIC_UUID) | |
| if (characteristic != null) { | |
| gatt?.setCharacteristicNotification(characteristic, true) | |
| val CLIENT_CONFIG_DESCRIPTOR = UUID.fromString("00002902-0000-1000-8000-00805f9b34fb") | |
| val desc = characteristic.getDescriptor(CLIENT_CONFIG_DESCRIPTOR) | |
| desc?.setValue(BluetoothGattDescriptor.ENABLE_NOTIFICATION_VALUE) | |
| gatt?.writeDescriptor(desc) | |
| } | |
| } |
If you want to check whether the descriptor write succeeded (i.e. whether you were successful in requesting notifications from the remote device), you can override onDescriptorWrite in your BluetoothGattCallback object, like so:
| private val callback = object: BluetoothGattCallback() { | |
| override fun onDescriptorWrite( | |
| gatt: BluetoothGatt?, | |
| descriptor: BluetoothGattDescriptor, | |
| status: Int | |
| ) { | |
| super.onDescriptorWrite(gatt, descriptor, status) | |
| if (status == BluetoothGatt.GATT_SUCCESS) { | |
| Log.v("bluetooth", "Descriptor ${descriptor.uuid} of characteristic ${descriptor.characteristic.uuid}: write success") | |
| } | |
| else { | |
| Log.v("bluetooth", "Descriptor ${descriptor.uuid} of characteristic ${descriptor.characteristic.uuid}: write fail (status=$status)") | |
| } | |
| } | |
| } |
How do we stop receiving notifications for a characteristic?
To stop receiving notifications, you need to reverse the process above. That is:
| @RequiresPermission(PERMISSION_BLUETOOTH_CONNECT) | |
| fun stopReceivingPasswordUpdates() { | |
| val service = gatt?.getService(CTF_SERVICE_UUID) | |
| val characteristic = service?.getCharacteristic(PASSWORD_CHARACTERISTIC_UUID) | |
| if (characteristic != null) { | |
| val CLIENT_CONFIG_DESCRIPTOR = UUID.fromString("00002902-0000-1000-8000-00805f9b34fb") | |
| val desc = characteristic.getDescriptor(CLIENT_CONFIG_DESCRIPTOR) | |
| desc?.setValue(BluetoothGattDescriptor.DISABLE_NOTIFICATION_VALUE) | |
| gatt?.writeDescriptor(desc) | |
| gatt?.setCharacteristicNotification(characteristic, false) | |
| } | |
| } |
As before, if you want to check whether the remote part of that operation succeeded, then you can use your onDescriptorWrite override of BluetoothGattCallback.
How can you try this out?
You will need two Android devices, one to be the peripheral and the other to be the central. The peripheral is the one that advertises and (usually) hosts information, and the central scans and initiates connection.
Build and install this app on the peripheral device: https://github.com/tdcolvin/BLEServer
…And build and install this app on the central device: https://github.com/tdcolvin/BLEClient
Finally…
BLE technology isn’t perfect. Partly that’s because BLE is a massive standard, so any two BLE devices will have their own behavioural idiosyncrasies. If you’re having trouble:
- Add delay-retry loops. It’s stupid but it often works. If an operation fails and you weren’t expecting it to, try waiting some short time and then doing it again.
- Try switching Bluetooth on and off. You can do this programmatically. Again, it’s stupid and it shouldn’t work, but you’d be surprised how many problems it solves.
- Ditto disconnecting and reconnecting to the peripheral
- Try slowing down. BLE is slow. Peripherals often have tiny, tiny CPUs and can’t cope with doing a lot at once.
But it’s fun to work with. There’s so much to explore — I bet a scan of your home reveals a few BLE devices you didn’t know existed, and you can easily write code to play with them.
Enjoy — and get in touch if you need any help.
Tom Colvin has been architecting software for two decades and is particularly partial to working with Android. He’s co-founder of Apptaura, the mobile app specialists, and available on a consultancy basis.
This article was previously published on proandroiddev.com


