

I’ve been really intrigued to try out Google Health Connect and build an app that utilizes it. When I started thinking about what I’d make, I realized that the one thing that I would need is a custom period tracker.
There are some apps to track your menstruation, but they’re usually pretty complex, and most require an account. And when all I want to do is track the times when I’m bleeding, I thought I could build my own app.
Also, many of these apps are often so freaking heteronormative that I don’t want to use them. What if I don’t have just (CIS) men as potential partners? What if I don’t need to care about possible pregnancy? What if I only want to track when I’m bleeding?
Also, why are these apps often colored pink? And why do they (almost) always assume it’s women using these apps? Some non-binary folks and trans-men menstruate, too, you know. And yes, some apps are more inclusive than others. However, it is still frustrating how many apps make these assumptions about people who menstruate.
So yes. I decided to build my own app. I’m also writing a couple of blog posts that will share the steps I took to make the first version of my period-tracking app. Even though I’m writing about the menstruation-related Google Health records, these same steps apply to other records.
In this first blog post, I’m sharing how to set things up and ask for permission from the user. The following blog post (published next week) will be about writing and reading data from Health Connect. After these two posts, the app I’m building will look like this:
Before diving into the coding, let’s discuss Health Connect a bit.
What is Health Connect?
Health Connect is a way to share data between apps on Android. It provides a centralized way to handle health and fitness data, giving users control over which apps they want to share their data. You can learn more from Health Connect by Android site.
As Health Connect is related to sensitive data, you must fill out a form to use it in production. I’m not pushing this app to production anytime soon, so I have yet to check that procedure out. You can read more from the “Request access to Health Connect data types”-documentation.
Starting Point for the App
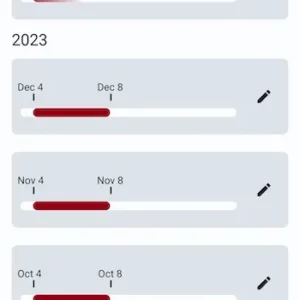
So before I started implementing integration to Health Connect, I built the UI ready. The app is simple: It has one screen that lists all the periods and a dialog to pick the start and end dates. Here’s a picture of the UI:
The code from where we’re starting to build this is in the start-branch.
Setup
To be able to use Health Connect, we need to do a couple of things: Add necessary dependencies, add required permissions to AndroidManifest, and ask permission to use Health Connect data from the user. Let’s start with the first two.
Add Dependencies and Permissions to AndroidManifest
A separate Health Connect client is available, and we need to add it to module-level build.gradle.kts. By the time of writing this blog post, the latest version is 1.1.0-alpha06, but be sure to check the latest release from Jetpack library versions.
So, let’s add this line to module-level build.gradle.kts:
// build.gradle.kts

implementation("androidx.health.connect:connect-client:1.1.0-alpha06")
We also need to add the permissions to AndroidManifest. The following two lines are enough as this application only reads and writes menstruation-related data. They go just before the <application>-element.
// AndroidManifest.xml

<uses-permission
    android:name="android.permission.health.READ_MENSTRUATION" />
<uses-permission
    android:name="android.permission.health.WRITE_MENSTRUATION" />
You can read more about the permissions for each record Health Connect provides from the documentation’s “Permissions”-section.
Ask for Health Connect Permissions
The next thing to do is ask the user for permission. In the context of this app, we want to read the data when the user opens the app, so we need to ask for permission when the user opens the app for the first time (or any time if the permissions are not granted).
We could implement a second check for writing permissions when the user wants to save data to Health Connect. However, I’m trying to make things straightforward, so in this app, we’ll ask for both writing and reading permissions simultaneously, and the user needs to give them both to be able to use the app.
So, let’s start by adding an intent-filter to MainActivity in AndroidManifest so that we can actually open the permissions dialog:
// AndroidManifest.xml

<intent-filter>
    <action
        android:name="android.intent.action.VIEW_PERMISSION_USAGE"/>
    <category
        android:name="android.intent.category.HEALTH_PERMISSIONS"/>
</intent-filter>
Without these two, the permission dialog won’t open. In a production app, you’d probably add a privacy policy screen, and these intent filters would be part of that activity. Read more in Show privacy policy section in Health Connect documentation.
Next, let’s create a new file and name it HealthConnectManager. It will serve as a connection point to Health Connect. Inside the file, we declare a class and pass it context as a parameter:
// HealthConnectManager.kt

class HealthConnectManager(private val context: Context) {
  ...
}
To be able to ask for the permissions, we need three things inside the class:
// HealthConnectManager.kt

private val healthConnectClient by lazy {
    HealthConnectClient.getOrCreate(context)
}

suspend fun hasAllPermissions(): Boolean =
    healthConnectClient
        .permissionController
        .getGrantedPermissions()
        .containsAll(PERMISSIONS)

fun requestPermissionsActivityContract(): ActivityResultContract<Set<String>, Set<String>> {
    return PermissionController
        .createRequestPermissionResultContract()
}
We store the healthConnectClient we use later as a private variable and lazily initialize it. We’re also implementing a check for permissions we need and getting the activity result contract.
In addition, we define the permissions we need as a separate variable. In the case of this app, and at this point, we need just two:
// HealthConnectManager.kt

val PERMISSIONS =
    setOf(
        HealthPermission
            .getReadPermission(MenstruationPeriodRecord::class),
        HealthPermission
            .getWritePermission(MenstruationPeriodRecord::class),
    )
The view model is another layer we’ll need to define between the API and UI. The view model needs an instance of HealthConnectManager, which we pass in as a parameter.
We also define a variable to store whether the app has all permissions, a variable to store the permission launcher, and a function to check the permissions.
// PeriodViewModel.kt

var permissionsGranted by mutableStateOf(false)

val permissionsLauncher =
    healthConnectManager
        .requestPermissionsActivityContract()

private fun checkPermissions() {
    viewModelScope.launch {
        permissionsGranted =
            healthConnectManager
                .hasAllPermissions()
    }
}
Now, we have all we need to implement the permission check. In MainScreen-composable, we’ll define the actual launcher with rememberLauncherForActivityResult, and pass in the permissionsLauncher we defined in the view model:
// MainScreen.kt

val permissionsLauncher =
    rememberLauncherForActivityResult(
        viewModel.permissionsLauncher
    ) {
    // TODO
}
We will fetch the records in the next blog post in the TODO-block.
After that, we use LaunchedEffect to check if the user has given permissions:
// MainScreen.kt

LaunchedEffect(Unit) {
    if (viewModel.permissionsGranted) {
        // TODO
    } else {
        permissionsLauncher.launch(PERMISSIONS)
    }
}
Here again, the TODO-block is where we’ll call the function to get records.
With these changes, the app will prompt the user to give the necessary Health Connect permissions, as seen in the video at the beginning of this blog post.
What If User Doesn’t Give Permission?
There is just one more thing in the context of this blog post. What if the user doesn’t give Health Connect permissions to the app? Or what if they accidentally press cancel when the permission screen is prompted?
We’ll need to add a possibility to re-ask the permissions. In the LazyColumn in MainScreen, let’s add an item with a Button conditionally as the first thing in the column if the user has not granted permissions:
// MainScreen.kt

if (viewModel.permissionsGranted.not()) {
    item {
        Button(onClick = {...}) {
            Text("Give permissions to Health Connect")
        }
    }
}
This button would be visible only when the permissions are not granted.
When the user presses the button, the settings for Health Connect should open. The following code does that:
// MainScreen.kt

Button(
    onClick = {
        val intent = if (Build.VERSION.SDK_INT >= Build.VERSION_CODES.UPSIDE_DOWN_CAKE) {
            // HCM is an import alias for HealthConnectManager from the Health Connect client
            Intent(HCM.ACTION_MANAGE_HEALTH_PERMISSIONS)
                .putExtra(
                    Intent.EXTRA_PACKAGE_NAME,
                    context.packageName
                )
        } else {
            Intent(
                HealthConnectClient.ACTION_HEALTH_CONNECT_SETTINGS
            )
        }
        startActivity(context, intent, null)
    }
) { ... }
In the onClick-handler, we first check if the user has Android 14 (SDK-version 34), as Health Connect permission management is slightly different starting from that version. If the answer is yes, we set the intent to be HealthConnectManager.ACTION_MANAGE_HEALTH_PERMISSIONS with the extra of the package name to open the dedicated Health Connect permission management screen.
If the user has an earlier version, then the intent is HealthConnectClient.ACTION_HEALTH_CONNECT_SETTINGS, the general Health Connect settings page.
You can find all the changes done in this blog post in this commit: Add Health Connect Permissions
Wrapping Up
In this blog post, we’ve been looking at how to set up things for Health Connect and how to ask for the permissions from the user. As I’m building this app for my personal use, there might be some corners I’ve cut, so be sure to check the official documentation if you’re building an app that uses Health Connect in production.
The next blog post will be about reading and writing data, as well as updating and deleting it. So stay tuned; I will publish it next week!
Links in the Blog Post
- Health Connect by Android site
- “Request access to Health Connect data types”-documentation
- the start-branch
- check the latest release from Jetpack library versions.
- Show privacy policy section in Health Connect documentation
- the documentation’s “Permissions”-section
- Add Health Connect Permissions
This article was previously published on proandroiddev.com


