


I’ve been building a period tracking app for myself, and my other goal has been to explore Health Connect. There are already two blog posts in this series:
- Exploring Health Connect Pt. 1 — Setting Up Permissions
- Exploring Health Connect Pt. 2 — Reading and Writing Data
This is the third (and last) blog post of the MVP version of this period tracker. We’ll look into updating and deleting Health Connect data. After changes in this blog post, the app will look like this:
So, let’s start with allowing the user to update data.
Update Records
Updating records is pretty straightforward after the changes we made in the context of the last blog post. First, in Health Connect Manager, we add updateMenstruationRecords-function:
// HealthConnectManager.kt

suspend fun updateMenstruationRecords(
    menstruationPeriodRecord: MenstruationPeriodRecord
) {
    try {
        healthConnectClient.updateRecords(
            listOf(menstruationPeriodRecord),
        )
        Toast.makeText(context, "Successfully updated records", Toast.LENGTH_SHORT).show()
    } catch (e: Exception) {
        Toast.makeText(context, e.message.toString(), Toast.LENGTH_SHORT).show()
        Log.e("Error", "Message: ${e.message}")
    }
}
It works the same way as writing — takes in a record, calls Health Connect Client’s function updateRecords with a list of records, and then shows a toast message if an update is successful.
Then, in the view model, we add a function to call updateMenstruationRecords in Health Connect Manager:
// PeriodViewModel.kt

fun updateMenstruationRecord(
    menstruationPeriodRecord: MenstruationPeriodRecord
) {
    viewModelScope.launch {
        tryWithPermissionsCheck {
            healthConnectManager
              .updateMenstruationRecords(
                  menstruationPeriodRecord
              )
          getPeriodRecords()
        }
    }
}
After a successful update, we re-read the records from Health Connect to update our UI as we did with the write-action.
Then, in the UI layer, we don’t need to modify the DateRangePickerDialog, as the functionality already returns an updated record when the user presses the “Save”-button. However, we need to use different methods in MainScreen for writing and updating data. So, let’s define an enum to represent whether we’re updating or editing the dates:
// MainScreen.kt

enum class DatePickerAction {
    UPDATE, INSERT
}
We want to remember that value as a mutable state:
// MainScreen.kt

var datePickerAction by remember {
    mutableStateOf(DatePickerAction.INSERT)
}
Then, we set the value for this datePickerAction when we’re opening the date range picker dialog: When it’s from the floating action button, we set it to INSERT, and when it’s from the edit button in a period row, we set it to UPDATE.
Then, in the onConfirm-block of the DateRangePickerDialog, we check the action and call the correct method:
// MainScreen.kt

when (datePickerAction) {
    DatePickerAction.INSERT ->
        saveMenstruationPeriod(updatedSelectedPeriod)
    DatePickerAction.UPDATE ->
        updateMenstruationPeriod(updatedSelectedPeriod)
} { viewModel. updateMenstruationRecord ( menstruationPeriodRecord )
And if you’re wondering, the update method we’re calling looks like this:
// MainScreen.kt
fun updateMenstruationPeriod(
    menstruationPeriodRecord: MenstruationPeriodRecord
) {
    viewModel.updateMenstruationRecord(
        menstruationPeriodRecord
    )
}
Alright, after these changes, the user can update the dates. Yay! But we have one more action to add: Deleting a record.
Delete Records
Once again, let’s start with the Health Connect Manager and add a function there. For deleting records, it’s a little bit more complex than for other actions. First, we want to get (possible) client record ID from the metadata of the menstruation period record we’re passing in:
// HealthConnectManager.kt

suspend fun deleteMenstruationRecords(
    menstruationPeriodRecord: MenstruationPeriodRecord
) {
    val clientRecordIdList = if (menstruationPeriodRecord.metadata.clientRecordId != null) {
        listOf(
            menstruationPeriodRecord.metadata.clientRecordId
        )
    } else {
        emptyList()
    }
   ...
}
This is because the delete operation from Health Connect Client requires both client record IDs and IDs. Next, we pass in the variable we just defined and the id of the MenstruationPeriodRecord we’re deleting. Otherwise, this function uses the same patterns as the others:
// HealthConnectManager.kt

suspend fun deleteMenstruationRecords(
    menstruationPeriodRecord: MenstruationPeriodRecord
) {
    ...
    try {
        healthConnectClient.deleteRecords(
            MenstruationPeriodRecord::class,
            recordIdsList = listOf(
                menstruationPeriodRecord.metadata.id
            ),
            clientRecordIdsList = clientRecordIdList,
        )

        Toast.makeText(context, "Successfully deleted records", Toast.LENGTH_SHORT).show()
    } catch (e: Exception) {
        Toast.makeText(context, e.message.toString(), Toast.LENGTH_SHORT).show()
        Log.e("Error", "Message: ${e.message}")
    }
}
OUR VIDEO RECOMMENDATION


Jobs
Next up is the view model. It’s as straightforward as with the other operations:
// PeriodViewModel.kt

fun deleteMenstruationRecord(
    menstruationPeriodRecord: MenstruationPeriodRecord
) {
    viewModelScope.launch {
        tryWithPermissionsCheck {
            healthConnectManager.deleteMenstruationRecords(
                menstruationPeriodRecord
            )
            getPeriodRecords()
        }
    }
}
So, once again, we call the deleteMenstruationRecords from Health Connect Manager after checking if the app has all the permissions. After that, we re-read the records after deleting the item.
We’ll need to do a couple of things on the UI side. First, we want to change the edit button in the PeriodRow to a menu with two actions: Edit and Delete, as seen in the picture:
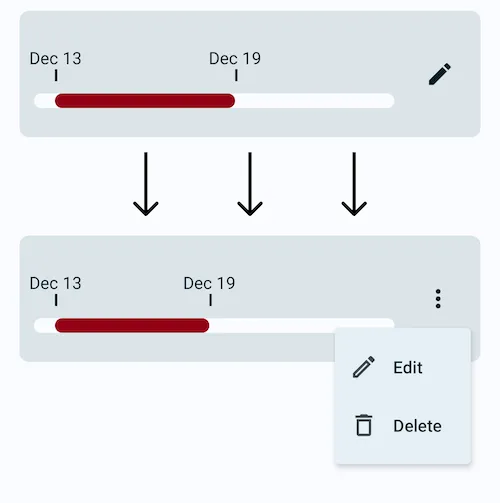
As this blog post is about Health Connect (and getting rather long), I’m leaving out the details of the UI change, but if you’re interested, the change is reflected in the final commit.
To complete the deletion, we need to pass the action to execute when the user presses “Delete”. This, again, is pretty similar to what we did with other options: Defining a method and then calling it in the correct place in the UI:
// MainScreen.kt

fun deleteMenstruationPeriod(
    menstruationPeriodRecord: MenstruationPeriodRecord
) {
    viewModel.deleteMenstruationRecord(
        menstruationPeriodRecord
    )
}
and
// MainScreen.kt

PeriodRow(
    ...
    onDeleteIconClick = {
         deleteMenstruationPeriod(it)
        ...
    }
) { ... }
With these changes, the user can delete the period. From a UX perspective, it would be good to add a dialog to ask if the user really wants to delete that menstruation record, but for the sake of this blog post being straightforward, I decided to leave implementing that to some later moment.
Wrapping Up
In this blog post, we’ve looked at how to update and delete data from Health Connect. You can find all the changes made to the code in the context of this blog post in this commit: Update and delete data from Health Connect.
I’m planning to develop this app further, including things like adding menstruation flow to the mix. From a development perspective, this will be interesting because it’s another type of record, and working with aggregated data adds more complexity to the code. I won’t promise to publish that blog post next week, but sometime in the near-ish future!
Links in Blog Post
- Exploring Health Connect Pt. 1 — Setting Up Permissions
- Exploring Health Connect Pt. 2 — Reading and Writing Data
- Update and delete data from Health Connect
This article is previously published on proandroiddev.com


