

Filament is an open source rendering engine developed by Google. You can use it to render objects in real time. It’s commonly used by games and AR applications.
In this tutorial I’ll show you how to use Filament to render a model created in Blender. I’ll also be using Jetpack Compose.

Setting up the project
To get started we need to add the dependencies. I’m using filament 1.36 but you should use the latest version.
dependencies {
   implementation 'com.google.android.filament:filament-android:1.36.0'
   implementation 'com.google.android.filament:filament-utils-android:1.36.0'
   implementation 'com.google.android.filament:gltfio-android:1.36.0'
}
Now that we have Filament available, we need to initialize it. You can basically do this anywhere given it’s before you use Filament. You can do it in your Application or MainActivity class. You just need to call Utils.init() and it’ll initialize Filament for you.
Utils.init()
Utils.init internally calls Filament.init so you don’t need to do that again. If Utils is not available, it’s probably because you forgot to add the filament-utils-android dependency.
Filament may not work correctly on emulators so try to use a physical device if you can.
Exporting the Blender model
You can create your models by defining all the vertices manually but that’s really difficult and time consuming. Another approach is to use a tool like Blender to create the models and then export them.
I won’t teach you how to create models in Blender because there are hundreds of tutorials about that.
In this tutorial I’ll be using a cube I created in Blender. Pay attention to the 2 lights, if you don’t add lights your models will look dark. If you add lights make sure you increase their power(W).

Go to File > Export > glTF 2.0.
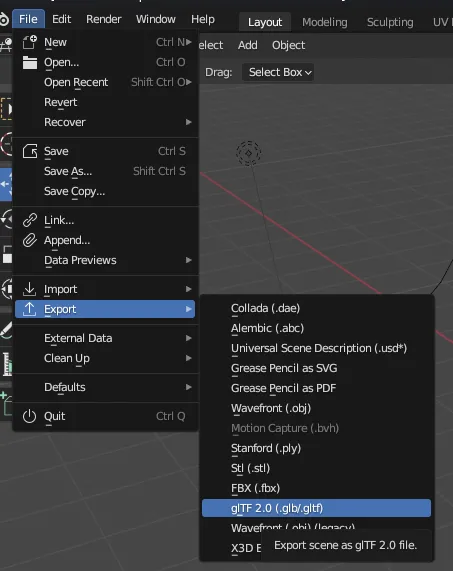
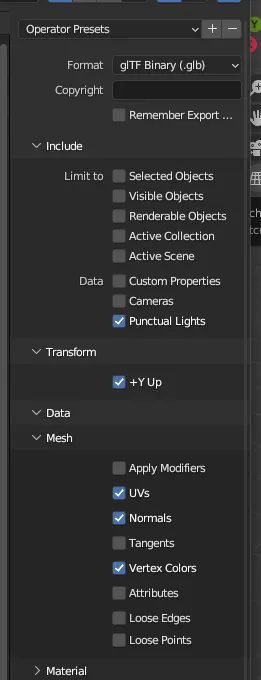
Set the format to gltFT Binary.
Under Include, select Punctual Lights if you included lights.
Under Data > Mesh, make sure UVs, Normals and Vertex Colors are selected.
After your model is exported you should have a .glb file.
Visualizing the model
Now that we have Filament initialized and the model we can proceed to the next step.
To make sure your model was exported correctly, you can use websites like glb.ee or babylon.js to visualize it. If it’s rendered correctly in these websites, then Filament should have no problem rendering them.
Go back to your IDE and put the glb file under app/src/main/assets/models. If you don’t have the assets or models folders just create them.
I’m using Jetpack Compose and to make my code more organized, I’m creating a class that’s responsible only for rendering.
Let’s start by defining a few variables. We also need to observe the view lifecycle to dispose the components correctly.
class ModelRenderer {
    private lateinit var surfaceView: SurfaceView
    private lateinit var lifecycle: Lifecycle

    private lateinit var choreographer: Choreographer
    private lateinit var uiHelper: UiHelper
    private lateinit var modelViewer: ModelViewer
    private lateinit var assets: AssetManager

    private val frameScheduler = FrameCallback()

    private val lifecycleObserver = object : DefaultLifecycleObserver {
        override fun onResume(owner: LifecycleOwner) {
            choreographer.postFrameCallback(frameScheduler)
        }
        override fun onPause(owner: LifecycleOwner) {
            choreographer.removeFrameCallback(frameScheduler)
        }
        override fun onDestroy(owner: LifecycleOwner) {
            choreographer.removeFrameCallback(frameScheduler)
            lifecycle.removeObserver(this)
        }
    }
}
Below that let’s define a method that will get called when the SurfaceView becomes available in the composition.
fun onSurfaceAvailable(surfaceView: SurfaceView, lifecycle: Lifecycle) {
    this.surfaceView = surfaceView
    this.lifecycle = lifecycle
    assets = surfaceView.context.assets
    lifecycle.addObserver(lifecycleObserver)
    ...
}
Below that in the same method let’s continue the configuration.
fun onSurfaceAvailable(surfaceView: SurfaceView, lifecycle: Lifecycle) {
    ...
    choreographer = Choreographer.getInstance()
    uiHelper = UiHelper(UiHelper.ContextErrorPolicy.DONT_CHECK).apply {
        // This is needed to make the background transparent
        isOpaque = false
    }

    modelViewer = ModelViewer(surfaceView = surfaceView, uiHelper = uiHelper)
    // This is needed so we can move the camera in the rendering
    surfaceView.setOnTouchListener { _, event ->
        modelViewer.onTouchEvent(event)
        true
    }
    // This is the other code needed to make the background transparent
    modelViewer.scene.skybox = null
    modelViewer.view.blendMode = View.BlendMode.TRANSLUCENT
    modelViewer.renderer.clearOptions = modelViewer.renderer.clearOptions.apply {
        clear = true
    }
    // This part defines the quality of your model, feel free to change it or
    // add other options
    modelViewer.view.apply {
        renderQuality = renderQuality.apply {
            hdrColorBuffer = View.QualityLevel.MEDIUM
        }
    }

    createRenderables()
}
The onSurfaceAvailable method is responsible for initializing the variables the we need to render the model.
The createRenderables method is one the method that loads the glb file we exported earlier. modelViewer.loadModelGlb is the method that parses the contents of the file and creates the entities in Filament. modelViewer.transformToUnitCube is needed to position and scale the model correctly.
private fun createRenderables() {
    val buffer = assets.open("models/tutorial.glb").use { input ->
        val bytes = ByteArray(input.available())
        input.read(bytes)
        ByteBuffer.allocateDirect(bytes.size).apply {
            order(ByteOrder.nativeOrder())
            put(bytes)
            rewind()
        }
    }
    modelViewer.loadModelGlb(buffer)
    modelViewer.transformToUnitCube()
}
Finally we define FrameCallback .
inner class FrameCallback : Choreographer.FrameCallback {
    override fun doFrame(frameTimeNanos: Long) {
        choreographer.postFrameCallback(this)
        modelViewer.render(frameTimeNanos)
    }
}
By default ModelViewer adds a directional light above the model so even if you add no lights you’ll still see the top part of the model illuminated. Filament also only supports 1 directional light.
Now that ModelRenderer is finished let’s go the Compose part. I’m putting my composable inside my MainActivity.
class MainActivity : ComponentActivity() {
    companion object {
        init {
            Utils.init()
        }
    }

    override fun onCreate(savedInstanceState: Bundle?) {
        super.onCreate(savedInstanceState)
        setContent {
            MaterialTheme {
                Surface(
                    modifier = Modifier.fillMaxSize(),
                    color = MaterialTheme.colorScheme.background
                ) {
                    AndroidView(factory = { context ->
                        val renderer = ModelRenderer()
                        SurfaceView(context).apply {
                            renderer.onSurfaceAvailable(this, lifecycle)
                        }
                    })
                }
            }
        }
    }
}
Now let’s run the app.

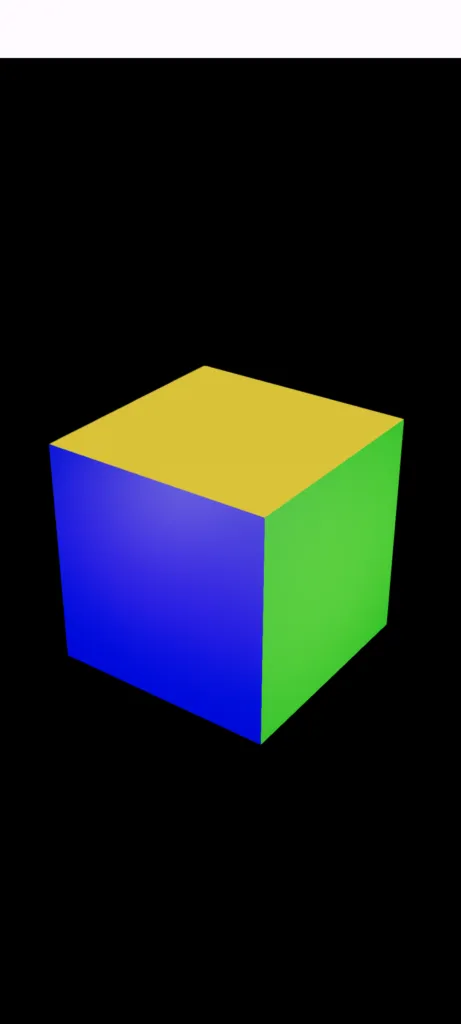
If your model looks like this it’s because it’s missing lighting, make your lights brighter in Blender. I’m using 9000W for this example.
After making the lights brighter the final final result should looks like this:
For some reason the background stays black on emulators but if you run this on a physical device it’ll be transparent.
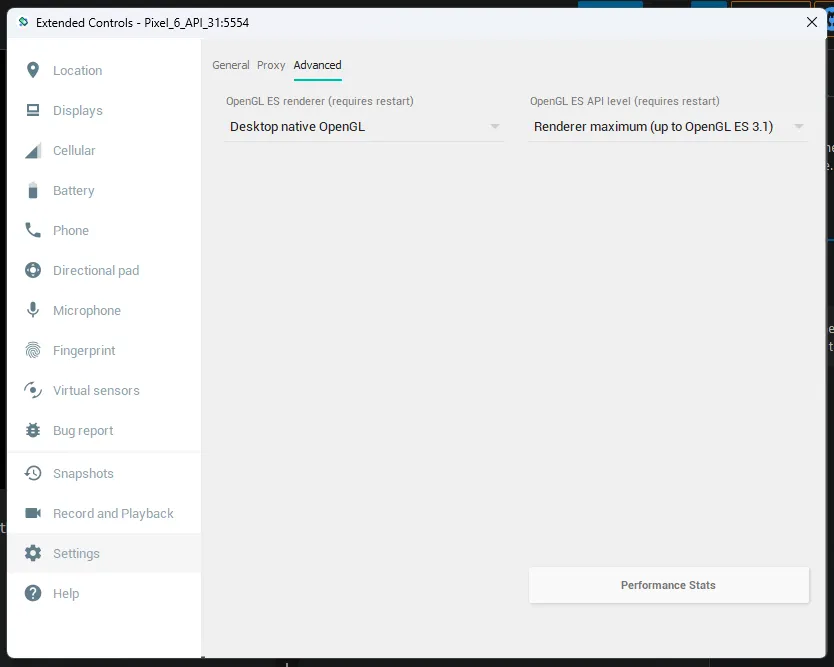
If you’re using an emulator make sure you enable OpenGL2 or 3, otherwise it’ll crash when rendering the material.
You can find the source code here.
If you have any comments or suggestions, please reach out to me on Twitter.
Photo by Milad Fakurian on Unsplash


