

For: Anyone who is interested in Jetpack Compose Canvas, Mathematics
Level: Mid-Senior
Hello everyone. In this story, we are going to discover the basic math that needs to be used when drawing an analog clock. It’s really fascinating to see such math even in a simple clock.
We are gonna use Jetpack Compose, but if you can follow me till the end and grasp the logic, you will be able to do this in any platform. Because you will be knowing what you are doing.
 Output
– Step 1: Drawing the circle
First things first, we need to draw the circle. This could be the easiest part of the work. To do this, we need a point(x,y) and a radius (r).

In our example, the point will be the center of the screen. And I decided to use the radius as follows to get a better looking;
val r = (screenWidth / 2) * 2/3
val center = Offset(screenWidth /2, screenHeight /2)
So, we have everything we need. Now let’s start drawing the circle. For this we need two options
– drawCircle from Compose DrawScope
– drawCircle from Native Canvas.
In order to achieve our shadow goal, we will use the Native Canvas, that takes a Paint object which we can pass a shadowLayer
Canvas(modifier = Modifier) {
        val center = Offset(
                boxWithConstrainsScope.maxWidth.toPx() / 2,
                boxWithConstrainsScope.maxHeight.toPx() / 2
        )
        val radius = (boxWithConstrainsScope.maxWidth.toPx() / 2) * 2 / 3
        drawContext.canvas.nativeCanvas.apply {
            drawCircle(
                center.x,
                center.y,
                radius,
                Paint().apply {
                    strokeWidth = 3.dp.toPx()
                    color = android.graphics.Color.parseColor("#040E25")
                    style = Paint.Style.FILL
                    setShadowLayer(150f, 0f, 0f, android.graphics.Color.argb(90, 255, 255, 255))
                }
            )
        }
}
– Step 2: Drawing the minute lines
This is the part that could be the heart of the work. Once we figure this section out, the rest comes so easy.
To do this part, I need to take you to your high school days. We learned two very important things, I assume none of use was aware that they were that important.
- Polar coordinate system, where we know the distance from a point and the angle.
- Cartesian coordinate system, where we know the x and y.
Now think about the code that we are working on. We know the distance radius from a point which is our center. And since we will make a tour around the circle to draw the minutes, we will be knowing the angle. (0 to 360). Sounds like a polar system?
But… to draw the lines, we will use drawLine, which wants a start and end point (x,y), but we have angle and radius. So we need to somehow calculate the target point, to draw the line.
 Getting coordinates from r and angle
So what we are going to do, we will loop the circle with 6 degree steps. So the r = our calculated radius, angle will be increasing by 6. So 6, 12, 18 degrees, and the above formula is clear. By this way, we will calculate all the coordinates that we need to draw the minutes.
 Demonstration how we find the start, end points of the minute lines
OUR VIDEO RECOMMENDATION


Jobs
So we can apply the strategy as follows,
val lineHeight = 60f
val strokeWidth: Float = Stroke.HairlineWidth
for (i in 0..360 step 6) {
    val angle = i.toFloat()
    val startX = center.x + radius * cos(angle)
    val startY = center.y + radius * sin(angle)
    val endX = center.x + (radius - lineHeight) * cos(angle)
    val endY = center.y + (radius - lineHeight) * sin(angle)
    drawLine(
        color = Color.Gray,
        start = Offset(startX, startY),
        end = Offset(endX, endY),
        strokeWidth = strokeWidth
    )
}
However, when we run the code, we will see the below output which is weird.

Do you see that some lines are missing? We need a line for every minute but we are missing some.
This is because of the sin and cos function from kotlin.math, accepts radians instead of degree.
/** Computes the sine of the angle [x] given in radians.
 *
 *  Special cases:
 *   - `sin(NaN|+Inf|-Inf)` is `NaN`
 */
@SinceKotlin("1.2")
@InlineOnly
public actual inline fun sin(x: Float): Float = nativeMath.sin(x.toDouble()).toFloat()
For a simplicity, you could think that the radian is another a measure unit. And the conversion is so simple. Follow me with the steps,
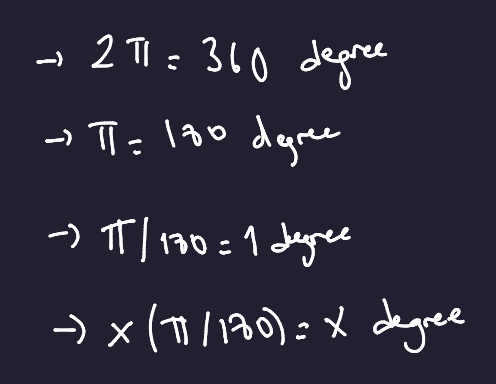
1 degree = pi / 180
So we are adding this simple fix,
val angle = i.toFloat() * (PI / 180)
Additionally, if we parametrized the lineHeight and strokeWidth as follows,
if (i % 30 == 0) {
     lineHeight = 60f
     strokeWidth = 1.dp.toPx()
} else {
     lineHeight = 40f
     strokeWidth = Stroke.HairlineWidth
}
Then we can have thicker and longer lines for the hours. So the final code should be like this,
var lineHeight: Float
var strokeWidth: Float
for (i in 0..360 step 6) {
    if (i % 30 == 0) {
        lineHeight = 60f
        strokeWidth = 1.dp.toPx()
    } else {
        lineHeight = 40f
        strokeWidth = Stroke.HairlineWidth
    }
    val angle = i.toFloat() * (PI / 180)
    val startX = center.x + radius * cos(angle)
    val startY = center.y + radius * sin(angle)
    val endX = center.x + (radius - lineHeight) * cos(angle)
    val endY = center.y + (radius - lineHeight) * sin(angle)
    drawLine(
        color = Color.Gray,
        start = Offset(startX, startY),
        end = Offset(endX, endY),
        strokeWidth = strokeWidth
    )
}
The output of final code by far.
– Step 3: Drawing the hour, minute and second hands
I think this part should be much easier, if you grasped the logic in step2. Because we will do almost the same things, just not in a loop.
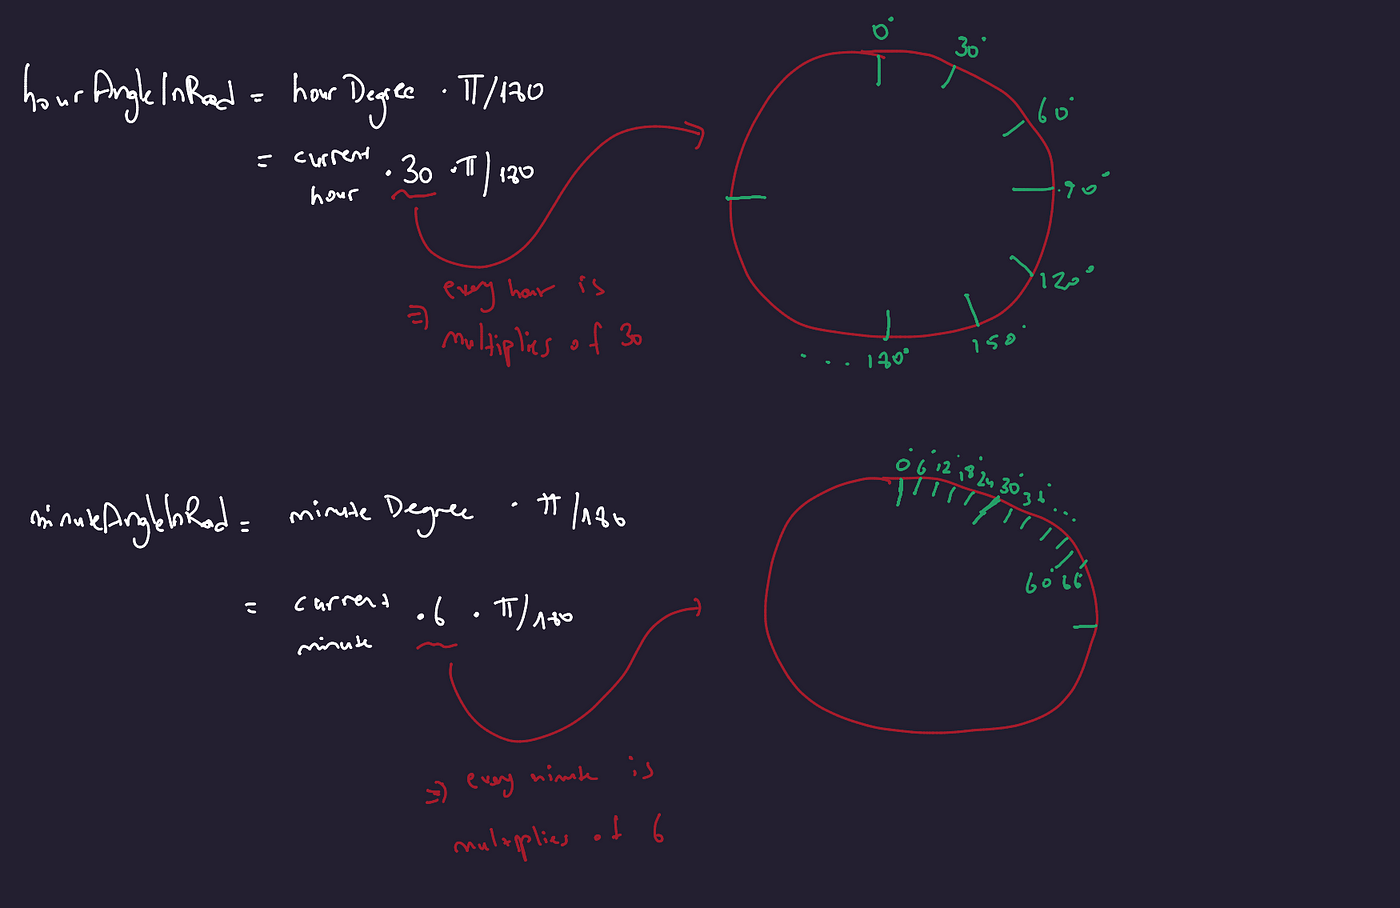
Hour Hand
hourInRadians = currentHour * 30 * π / 180
MinuteHand
minuteInRadians = currentMinute * 6 * π/180
How to find where to target
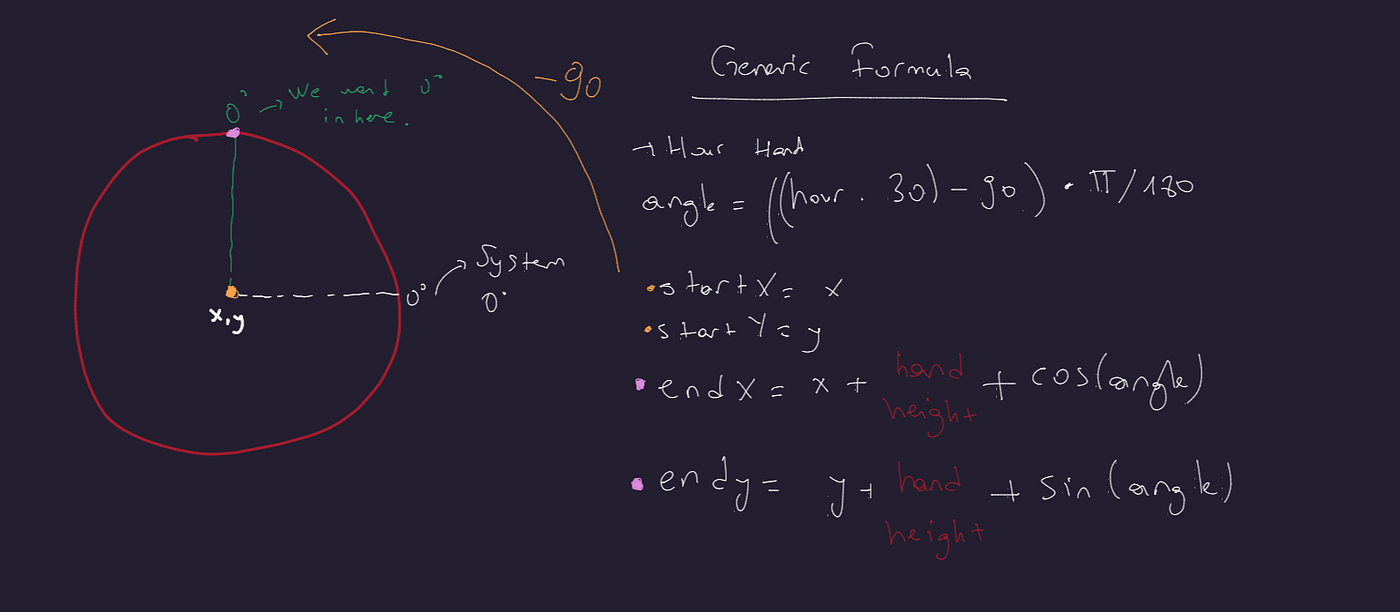
Generic Formula
So the most important part here, is that because of the differences of starting point of the system and our desire. Notice the -90 in the scheme.
If we don’t subtract (think like a rotating 90 degree anticlockwise), when the time is 12, our clock would be displaying 3. Because 0 degree is pointing the clock 3 direction.
// drawing hour hand
val hour = (((hours * 30) - 90F) * (PI / 180))
val startX = center.x
val startY = center.y
val endX = center.x + 100 * cos(hour).toFloat()
val endY = center.y + 100 * sin(hour).toFloat()
drawLine(
    color = Color(0xFFF454FF),
    start = Offset(startX, startY),
    end = Offset(endX, endY),
    strokeWidth = 3.dp.toPx()
)
// drawing minute hand
val minutesAngle= (((minutes * 6) - 90F) * (PI / 180))
val startX = center.x
val startY = center.y
val endX = center.x + 180 * cos(minutesAngle).toFloat()
val endY = center.y + 180 * sin(minutesAngle).toFloat()
drawLine(
    color = Color(0xFFF454FF),
    start = Offset(startX, startY),
    end = Offset(endX, endY),
    strokeWidth = 3.dp.toPx()
)
As you can see, there is only height and degree differences where hours have 30, minutes have 6 and the height of the hand, where hour has 100, minute has 180.
One last thing…
Only thing left is to implement a local timer, use state variables and update the UI when state changes. I will not mention those in this story, as they are quite simple and going out of the scope. I’m leaving the repo here.
GitHub – TayfunCesur/Clok
What to do next?
If you feel inclined and would like to go more, then here is a shopping list for you,
- Implement hour in fractions. Currently the hour hand shows only integers. If the time is 11:50, our hour hand shows 11 direction but in real life applications, it shows like 11.8.
Small hint: Consider current minutes, when deciding the hour angle. - Implement chronometer and date: You can consider adding more functionalities on top of this clock. Like showing the current date, chronometer, stopwatch etc.
- Clockface for WearOS: The app is almost ready, why don’t you push it for further and deploy it as a clockface? So you can use it in your smartwatch, and be proud of yourself everytime when you look at the clock 🙂
Parting thoughts
In this story, I wanted to deep dive into the details as much as I can. Because I believe, learning behind the scene can give you a new perspective, bring new ideas and you would be surviving under many different conditions. If you made this far, I believe that you have great curiosity, motivation and I believe you will be so successful.
If you have learned something new, feel free to leave a clap for me 🙂
Till then 👋
This article was previously published on proandroiddev.com


